 What can I say but this time of the year is exciting, simply exciting! I know, I know….it takes time to let the new things settle and sink in….and that’s ok! I am in the same boat as you are!LE
The NEW CATALOG launched on Friday but because of way that the calendar fell…NO NEW ORDERS are even starting to be shipped until tomorrow (Monday) so please…do not feel that you are late!!! Heck…we’ve got this catalog for a whole darn year so please…take it all in and enjoy the journey!
I love to share tips & tricks that make things easier and when it comes to ORGANIZING I know that when we have a system that works – we are happy stampers!
Let’s DIVE IN to the sea of getting ORGANIZED!
This post is one for you to sit back and take in…one for you to reread and revisit…and this post clearly is tips & tricks that have worked for me and by no means am I suggesting for you to change if you have a system that works perfectly fine for you.
That is what is great about this fun thing that we do…we always see things in different ways and the ultimate goal is to have a system that allows you to continue to create with ease and by all means, not to feel stressed over something that I am sure we have said to ourselves….”What the heck to I do with ALL OF THIS!”
Before we continue forward with this post I need to be upfront and say this…I know that my posts are very long (a bunch of times) and for those that like short and sweet, (I’m sorry) but I just have to be “me” and when I started this journey with Stampin’ Up! 6 years ago…the LAST THING that I ever thought that I would be doing is blogging and also – actually still being a Stampin’ Up! Demonstrator as I was just joining to get a discount and then OUT THE DOOR! They make it just too easy to continue to get a discount and the reality is I love the people I have met and touched my life….so I guess you can say – your stuck with me!
Let’s get this going and I will say…this took me a LONG TIME to compile as I have hyperlinked many items for you to help “make sense” for you to understand what I am trying to convey. Darn, I wish that we all lived in the same town and I could just show you in person what I am trying to say convey!
There are 3 things that need to be organized – Paper, Ink and Stamps…
Trust me, there are a bunch more but lets start with these 3 things as if these areas are total chaos for you… you are NOT going to have a fun stampin’ experience and we need to do something about that! Today is all about Paper Storage….something that ALWAYS seems to perk you up and always ask questions!
YEARS AGO….I did a blog post about paper storage (click here and then here is another one) and I will say…I still believe in it. Since that post I have invested in some custom cabinets in my craft area so I have tweaked my personal area but this system that I will highlight below is a PERFECT one for a crafter.
Get 1 or 2 storage bins that are similar to the ones that I have pictured below. The reason that you might need 2 is simply for the fact that you might have more paper and also depending on the amount of scraps you put into it. Personally, I only keep the current Stampin’ Up! colors in it but again, do what works for you!

I am linking things for you from many different sources so please, just do what works for you – we all live all over the place so many people feel comfortable with certain retail places. The MOST IMPORTANT thing is that make sure it works for your needs with the space you have dedicated to. There is nothing more frustrating than starting something to only figure out you are saying – “Now where in the heck am I going to put it”
I think it is ket to have the option to have a lid. WHY? Well for starters…many of us like an option to stack to minimize space. Personally, I keep my 2 bins behind a cabinet door so my lids are not on them but if I were ever to go somewhere and take these bins…you bet that I would put the lids on them!
Here you go with some links / options…..
- Let’s start with Amazon – this does the job….here is the link.
- Another option – here is a link from Staples…that would work.
Next, file folders….I use a separate file folder for every color. I know that some might be thinking. THAT’S A LOT OF FILE FOLDERS and YEP, it is but it is worth it and you can and will always use file folders!
- Here is a link for the File Folders…
- Here is a link for the 3 1/2″ clear tabs that will hold the actual card stock and label on. I really like this longer length (3 1/2″) as it allows more of the color of paper to show after you will put your label with the color name on it.
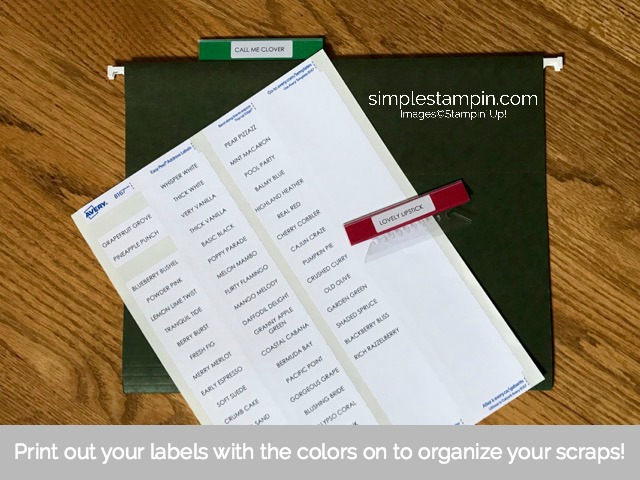
- Here is a link for the labels – I will say this – when it comes to labels, buy the Avery Brand. It is well worth the extra money as the labels stick well. Heck, I am one that always loves to save when I can…but this brands really is the best.
WHEW….how are you doing? Hanging in there?
I feel bad that this post is sooo darn wordy but I truly am trying my best to share and paint the picture of organization for you! You can do this and I know that IF you have a workable system than you are more likely to enjoy the journey a bit better!
CLICK HERE for all of the Stampin’ Up! Colors for you to get organized!
Next, we need to add card stock and label them. I cut a 3 1/2″ X 1 1/4″ piece of the card stock and then score it at 5/8″…the reason that I do it this way is that I have found that sometime the card stock paper will fall down if I make it 5/8″ X 3 1/2″ (and that makes me grumpy) so if it is a bit thicker (being scored and folded in 1/2…it stays put). Add the specific color label of the card stock and SMILE! (you’re getting there)
I know that there is going to be someone asking this question….How do you organize your colors? Here’s my answer…I organize them by the color families.In one bin I have the BRIGHTS, REGALS and SUBTLES together…and in the other bin I have the NEUTRALS and IN COLORS.
If you do it this way and if you also have retired Stampin’ Up! colors…you can easily add more folders to your 2nd bin. I know that some people organize by the color of the rainbow but for me, my simple brain works better this way!
I have shared with you that I use these bins for my scraps because I have a built in paper cubbies for all of my full sheets of paper (and I will share that with you in a later post) but here is an idea of how to incorporate your full sheets of paper to keep them both clean & organized.
You can actually do 3 things….please read them below and then let them “sink in” and you decide how it works best for you.
- Add an additional file folder to your bins and place it in front of the one that has the tab scraps like we did above.
- Add the full sheets of the card stock behind all of your scraps as described above.
- Put your full sheets of Card Stock in a Job Ticket Holder and then slide this in the scraps folder.
Let me explain…I like to use these pouches to keep my Non-Stampin’ Up! Paper in when I purchase it full packs of paper, just like we can do with our Stampin’ Up! Paper. A full pack of 24 sheets can easily fit into a Job Ticket Holder. I totally realize that many of you do not purchase full packs of every color…but I am just trying to share with you another way to stay organized.

I guess you could say I am a bit picky about the way that I like my products to be kept…nice and neat….with no chances of getting the tips bent etc…so these works for me. Just as I shared above with the labels, I would buy the Avery Brand for these as the quality is stellar – they are super heavy gauge vinyl that truly hold a bunch. These pouches WILL fit in the file folders.
We are just about done…..(well heck, I could go on for HOURS about this topic) but I will try to wrap it up! On the outside of the Job Ticket Holder I use the label maker to identify what is inside the Job Ticket. In the picture below you will see that I have the Company Name on line #1 and then underneath it I put the product color.
I have blogged about this a BUNCH but I think a label maker is a MUST HAVE – we use it all over the house! Here is a link for the Brothers P Touch Label Maker….this is “go-to” in my home! I can tell you that the price fluctuates a bunch in Amazon and also in stores… but seriously, if you do not have it…I would treat yourself.
As for the refills…always have refills because when you are in a groove in making labels…nothing is more frustrating than running out. For this…I do buy a knock off brand from Amazon and they work GREAT….I would make sure you have both widths.
- Here is a link for the 1/2″ width (I use this size more than the 1/4″ as I like to get either 2 lines of text on it and also I like the font to be super large if I am just labeling something with one word)
- Here is a link for the 1/4″ width – I do think that it is wise to have this width as well because I use this to label my punches and also to label my non stampin’ up! ink pads ….I just think you will be amazed with how you will use the narrower width (I also use this for my spices in the kitchen)
When I can save money, I do…(heck, that’s why I signed up to be a Stampin’ Up! Demonstrator) and I will say….buying an off brand for the tape for you Label Maker IS the way to go. The quality is just fine and there is a HUGE difference in the Brothers Label Refill price.
Now we are going to touch on what I truly think IS THE BEST OPTION for you to me on the “New Track of the Stampin’ Up! Color Revamp” Chances are you already have many of the Stampin’ Up! Colors but I think that at the beginning of a NEW CATALOG YEAR the best and most economical thing to do is purchase the collections of the card stocks.
This way, you will have (2) sheets of EACH COLOR of EVERY SOLID COLOR of paper (4 of the In Colors) that we have and then you will be able to get a feel to what colors you gravitate to – this way you will start to see a pattern in your style and then perhaps purchase full packs of 24 sheets of a given color. At the end of this post you will see all of the Collection Lines Up! in the Product Line up!
The other thing that I would do is…purchase one of my Card Stock on a Ring Swatch Books that I have made up! This is a must have and actually I would have (2) – one to keep at home and another to keep with you in case you are somewhere and are trying to match up something and use a current color that we have.

I have had to re-order on them as they seem to be “hot cakes” and to me, there is nothing like seeing and feeling the actual card stock in your own hands. Each swatch is professionally printed with the Color Name and Color Family it comes from. CLICK HERE TO ORDER ONE and in the SUBJECT LINE PLEASE PUT, Card Stock Swatches.
How are you scratching your head as to what and where do the new COLOR FAMILY called BASICS fit in? (page184) First – I am THRILLED that stampin’ up! has pulled out the old faithfuls and made a new sub-section for them. I am talking about Whisper White, Very Vanilla and Basic Black. All of these are in my swatch book so you can feel the difference on the weights between the thick and the regular.
Again, you will see them in the product line up at the end but we all need full packs of these papers as they are just as they are called, the BASICS. I always use the Thick Weight for my card bases and then the regular weight gets used for the inside layer as well as for when I stamp an image and want to use the blends or copics with it.
You can put them in your bins just like I have outlined above but here I am going to share with you what I call a GAME CHANGER for me in my work area. I use the Whisper White and also the Very Vanilla ALL THE TIME and honestly because I reach for them quite often, I keep my scraps of these in the AMAZING stacking containers that are SUPER AFFORDABLE.
You can CLICK HERE to see where I purchased them but truthfully you can find something in a store that would probably work but I honestly think these are the best because of the price and also because of the quality. They are SUPER STRONG as we know sometimes we get things that are nothing more than cheap plastic.

I do love the Container Store and in future posts you will see more Items I get there in keeping me organized! You want to make sure that the container you use is long enough to have the scraps lay flat. These stack perfectly and the quality – fabulous! I often go ahead and precut strips of paper in the basics so when I am creating, I can reach in and pull out a strip that is 1″ .
You can see that I labeled them with my P-Touch Label Maker and it is super easy for me to read and use….hence saving a bunch of full sheets as I think when we cannot find something easily – we just grab a full sheet. (does this sound familiar to anyone)
WHEW….this has taken me FOREVER TO DO and I do hope that you have enjoyed it, found it helpful and can see the vision as to where I am going for you in being organized. Please feel free to leave me a comment. I will continue to explore more organizational ideas on the future if you enjoy these.
Please know….if you want to get into the 1st wave of the PROJECT SHARE for this new catalog….you can! The cut off for WAVE 1 is this Wednesday, June 6th and then I will do another wave of product shares but that will not be until towards the end of the month.
The cut off for the 1st wave of the product share is WEDNESDAY, June 6th.
I am excited to hear and see what products tickle your fancy from the newbie. The BEST ADVICE I can give you is…look….look…and then look again. Take sometime to let it sink in and then take an inventory of the stamps you already have. There are some new and exciting products and some that I think you will be able to use a bunch in conjunction with things you already have!
With the NEW goes the retired…and yep, I have deeply discounted my RETIRED STAMPS/BUNDLES from the past Catalog. They are all at least 50% off and you can find them under the Blog Header/Shop…and it is the 4th down – RETIRED SU Product. All of them are on a 1st come basis so take a look to take advantage of a great deal!
Enjoy the afternoon and on the East Coast….I think we are all about to swim away as we have had rain, rain and MORE RAIN! This is the time of the year that I adore to pick Strawberries…but with all of the rain we have been having…it has really put a damper on the local farmers.
Please let me know if this blog post helps you and if YES – I will share more…and if NOT – no worries….it would save me a bunch of time! I do love sharing with you as this little thing that I do is soooo much more than selling….it’s about a journey of love and passion that I have with some AMAZING PEOPLE….like YOU!


Thank you for the great tips on paper storage! Will be getting the job ticket holders this week.
Your organizational skills have always impressed and inspired me. Thanks for sharing these tips.
Please continue sharing your ideas for organization. They are very helpful.
Awesome tips and great ideas! Your blogs are never too long for me….they are always so insightful. Thank you, dear friend. ?
Great blog today Susan. Thanks for taking the time to be so thorough and to include links. I always enjoy reading your tips on organizing. I inevitably learn something new. I too am a huge Container Store fan. We lived in Dallas when the first tiny Container Store was opened on Forest Lane. My sons’ rooms were full of their bins, crates and baskets. I look forward to your future blogs on the subject. Stay dry!
Susan, This email was a real labor of love. Thank you for taking so much time to share all these wonderful tips. Yep, this is one email that will not be deleted- too much info! Need to get my shopping list started.?
I’m always interested in how others organize their paper, etc. I love the wonderful tidbit from you. I can’t imagine how long it took you to go through all the new colors to organize by your system. Thanks so much for sharing. Enjoy your day!
Learned so much about storage from you Sue. You explained all the tips so thoroughly so I wasn’t bothered by the length. Thank you for taking so much of your time to help us stampers!
Thank you for taking the time out of your day to share your organizing tips. Thanks to one that you posted last year my paper is organized just like yours. I also purchased the label maker, which is a must have. You are such an inspiration to get organized and it is so worth it! We have had all the rain here in Delaware too. Hopefully we see sunshine this week!
I greatly appreciate you taking the time to post about the paper organization tips that have worked for you. I have been in the process of reorganizing my craft area for several months and with your post I should be able to move forward and complete the organization. Thanks Susan!
Thank you for these great tips on organizing paper ! I have a been a demonstrator (hobbiest) since July 2011 and I have an extra bedroom FULL of SU stuff that I need to reorganize. Can’t wait to see what you have to say about organizing next !
Well crap, I just did a big comment on how efficient the tubs are with the files and it went to cyber haven. Anyway, LOVE, LOVE LOVE this post! Thank you for the links as I need to get some more of the job ticket things and now I don’t have to search. Also, the longer labels will be a great idea too so you can see them easier. I had also learned the hard way about scoring them etc so they don’t fall down! Anyway, at least part of my stuff is organized! I need to get busy and regroup or REVAMP (sounds pretty cool to say!) my color groups and add the new ones. Thank you Susan for this post, I know I appreciate it!
Thank you for your organizational tips. I think we all like to know other ways to make life easier and one idea doesn’t work for all. I already use this system for my full sheets of c/s. I keep my scraps in a page protector (mostly because they are cheaper and readily available) in the same file folder. I keep full packages of c/s stored flat on a shelf. I have a wooden credenza that is a file cabinet (long, not tall) with 4 drawers. I put a paper clip on the file folder to indicate that I have a full pack stored. Of course, some folders have 2 or 3 clips and some have none. It really helps me when I need to place an order and it is easy to keep current. Have a joyful week!
this post is fabulous ! just what I need to get organized . i just have stuff stashed everywhere and you are correct , I never use to create . I am going to follow your ideas , get everything together and then sign up to be a hobby stamper .i feel my creative side with papercrafting can be used to bless members of our church .
again thank you so much and your posts are not long 🙂
I found this article very helpful. I try to stay organized but as I get more stuff* it gets harder to stay organized. I would like to get hanging folders for the paper but have to wait till later in the month as my budget is still stinging from the SU purchases I made last month. Thanks again for the wonderful tips!
*stamps, inks, tools, paper, embellishments, adhesives
Susan!!! I love your organizing tips! I am all over them so I can have my new play area totally organized! Keep ’em coming!
FUN blog info ! I bought the P Touch after reading one of your blogs on getting it together !
I just gotta put in another yay for those CS Swatch Rings ! My old ones have some of the retired colors (grin)
I went to look at your big RETIRED SALE ….great bargains !
Your fans love your long blogs !!
Great tips. Tha.nks for helping us to organize
Thanks for sharing tips. Please give us more!
Oh YES, Thank You, Susan, I love your tips and organizational help. Keep ’em coming! I’m looking forward to how you store your stamps and ink too. I can just read you like a book . . . I can’t stop until I’m finished. You are very easy to understand and I love your pictures too.
Happy Monday!
🙂
Hi Susan, I love your blog and they are never too long for me. Thank you for all the wonderful tips… I keep saying I am going to get organized but somehow it never happens… I am now on a path to get at least get my paper organized. Very interested in learning more about the paper cubies.. do you still use these bins with the cubies? Can’t wait for more about your organization tips… Thanks for taking the time to bring this to us…I know it must be very time consuming
Grrrrrreat tips!
Always love your organization tips. Keep them coming.
Love the long posts Susan. Thanks for the effort you put into them.
I refreshed my P-Touch after seeing your original post and I use it constantly.
Thanks for the tip on the off brand refills that can be purchased on Amazon. Even at Costco the refills are expensive.
Thanks Susan for the tips on organizing. I need all the help I can get . Your post are never too long for me..I need to live closer to you.i need lots of help.looking forward to part two..in the meantime I have a lot to work on..sending a Texas hug to you and John and all your “fury. Friends”. Monday I get to keep one of my Grand Dogs for 3 weeks..I think he and my cat,Eli will get along ..it is so hot here it is a good time to stay in and work on my room ..Alyece
I enjoyed this post even tho some of it is repeats from the past…because sometimes you find improvements along the way and share with us. I am going to get the tabs because the stores don’t have the long ones. Also going to try the knock offs of the labeling tape next order of that.
The old printer is out of the closet in my craft room!!! I also made a big pathway to the closet! I can’t get into my E-mail right now. Don’t ask. Do, I thought I would print out the labels for the new kids (colors) on the block. So, I have all that done and organized. I am going to do the labels for when the shares of the DSP comes – so I will have the container ready to roll and be all efficient.
I am still struggling about what to do about ink pads as my cute little antique looking thing has been outgrown by leaps and bounds. My ribbons are out of control too. The spools are way to big for my little drawers and such. I am such a sucker when Wal Mart puts their spools of ribbon on sale! I still am struggling with all my sets. I always feel like if I try to sell them, will people really buy them?
I do have a nice pile of stuff to walk over to the Community Art Center with more stuff. Mary was needing more Altoid tins for a class so I am giving her a dozen.
I actually might organize my catalog like Connie Stewart does esp. since she went to the trouble of making all the labels for us. I need to get that Tab punch…ummm I am wondering if my neighbor has it or the one SU demo I still go to…oh but I need those adhesive sheets anyway. May as well get the punch too and be done with the whole project. Maybe it would be a great idea to get it spiral bound too.
Hey Susan, keep the tips acoming as I can at least access your site if not my E-mail for a bit! Meanwhile back to moving boxes around and figuring out where to go with all the stuff I just gotta keep. Also, the wallpaper in my room is so gross and busy looking. It looks like it is on there really good so not sure if it is strippable or do I paint it and let the next owner deal with paint over the wallpaper dilemma?
I have been to this blog site a bunch of times. Can you share what you have on the shelf in the stamp holder boxes? I am thinking of maybe putting the 3×3 cards and envelopes in one of those. How do you store your envelopes and notecard packs? Once I get more label maker tape stuff, I plan on labeling the punches – much easier to read and then try and get them organized as I have them in about 6 drawers – they are in a sturdy metal drawer Mike brought home that they were throwing away at the office. I have tons of stuff in them and the drawers are labeled. But, I have circle punches in all of them and at least I need to get them corralled into one drawer or two. Etc. The ribbons are out of control. The Washi tapes are in little drawers at least. Any one else have some tips I can use too?
Hi Susan! I love your blog and have been missing it!