by Susan Itell | Aug 17, 2017 | Uncategorized |

WOOT-WOOT to Thursday! It is time to play Tic-Tac-Toe and the board this week is super fun!
I hope that you pop over to the Challenge Site and see what the designers came up with this week and then grab another cup of coffee…study the game board and GO FOR IT!
I ended up with a very productive game board! If I had changed my sentiment…I bet that I could have covered the entire board and the best thing – it was not intentional but the more I looked at the board, the more elements of the game I had….that is what is FUN about this challenge!
I went Across – Burlap (the bow), Banner (the sentiment) , Yellow (the watercoloring)….then Down….Flower (the stamp image), Leaf (the stamp image)….then Across…FREE…and Splatter (Specks of Gold Paint)

I have a super sweet and fast one for you today! I think that we can all agree that there are so many times that a simple and sweet notecard like this and this just…“does the trick” There is something very unusual for me with this card….
Can you guess it? Well, let me help you! I rarely, I mean rarely ever do a side fold card. Think about it…I usually do a top fold vertical….or a top fold horizontal ….but rarely a side fold card…WHY???I have no idea!
I wanted to use a note card and today I am using the Very Vanilla Notecard and Envelopes. I am so happy that Stampin’ Up! came out with these in the Vanilla. I am a big fan of this size and it is a treat to have 2 color options! I also love the price…$6.00 for 20 thick very vanilla card bases that are already scored and matching envelopes….here comes another WOOT!

I am working on a handmade special Birthday gift for my dear sweet Aunt Jean as she will be turning 90 in about 2 weeks. If you have followed my blog than you might remember her. She is not only super sweet and special to me…she is truly a person that I look up to.
You will be seeing more cards that I will be making for her….one thing that she loves and often asks me for…is cards… and naturally I smile. I am trying to come up with fun and practical cards that I know she will love! This was …well besides the game board – the motivation for the design of todays post!
I have said endless times before that I would have never…ever imagined that I would be doing this “blog thing” that I do…and also still be a Stampin’ Up! Demonstrator … remember, I was one of those that joined for the discount and then I was “out of here”…well, I guess I changed my mind!!!

What I share with you is what I use. It truly is a win-win for both you and I. I am able to cross things off of my to do list and you can learn…enjoy….have a smile and hopefully leave feeling inspired!
You can tell that I have not put the Count My Blessings Stamp Set away from Wednesday! This will be in the upcoming catalog and I know that it is going to be a one that will be in the Brown Truck to many of our homes….and I say – smart shopper!
Below you will see the images in this stamp set, very classic and easy to work with!

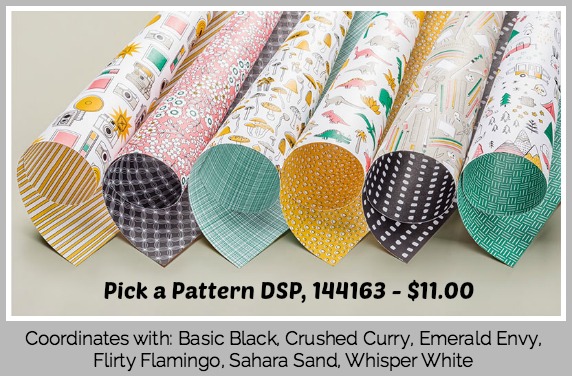
You an see that this is sooooo straight forward but it works! I hope that you agree. It is great to have “secret weapons” like this ready to roll. I adore this new paper and I think that you will too!
Below you can take a peek but I think that you will agree…the picture just does not do justice to this sweet paper! (that’s why Product Shares are the best!!!!) I will be offering them to you soon….real soon!

I covered the entire front of the notecard in this fun DSP. It’s funny, you can see that the DSP has a good bit of Pool Party in it and I do not have a lick of that color in my watercoloring…but it still looks great!
The reason why I am pointing that out to to share with you that it is ok not to be so exact with your coordination….go with what feels good to you! I am tickled with the simplicity of this…very fast!

The sentiment was from the fabulous carried over Stamp Set Feather Together. There are 2 main things that I adore about this stamp set. One, because it is a Photopolymer and then other…the sentiments & fonts…WOW. I used this for a card kit that I created last year and I still look at the samples from that kit and I smile! (that’s when you know it’s a keeper)
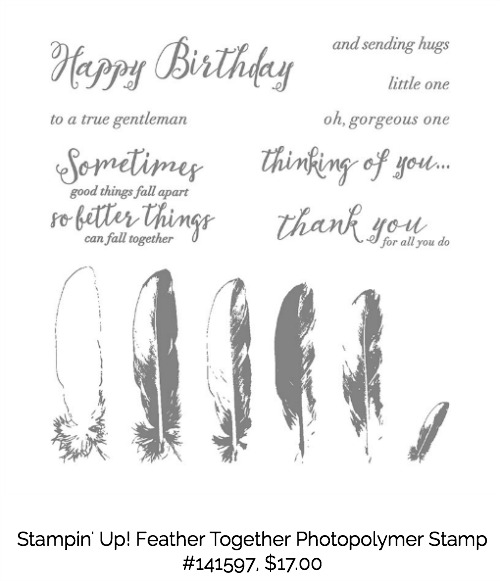
I invite you to look at the stash that you have and then make a “blending of 2 stamps together” Let me explain, when you see the sentiments in the Count My Blessings Stamp Set, the sentiments are amazing, but the scale of them for a note card is too big for a notecard in the orientation that I chose for this card.
I went to the stash that I have and PRESTO – the Feather Together was a perfect pick. I loved the way that the sentiment had a natural flow to compliment the flower.

I bet you are wondering where did I get the gold ink for the flecks – I have a small palette of 6 paints that I enjoy adding a wee bit of bling to projects. When you hold it in your hand, you see the classic little accent that catches the light!
Enjoy your day and don’t forget to take a peek in the Clearance Area….I can see that many items have already depleted but I totally “get it” – as who does not like a deal!
Stampin’ hugs….

by Susan Itell | Aug 16, 2017 | Thinking of you, Uncategorized |

HHD to you! This week is zooming by and I am excited about that as John and I are going to head South for the weekend to visit our dear Hannah! Visiting adult “peeps” is both very exciting and just FUN!
I was so excited about this super simple card! It is right up my simple “one way alley in life” and the classic color combo of Black and White…I ask you, how can you go wrong? (let me answer this for you)…YOU CAN”T GO WRONG!
The stamp is a new kid on the block (Count My Blessings) that will be available on Sept 1st….I think you all are going to like it…no I know you will LOVE IT as it is a beauty!
Darn, I could not share with you picture from within the new catalog but I was squealing (did you hear me) when I thought – “I should just take a picture of the sheet that I made when I conditioned the stamp set”!
Here you go! I was doing a happy dance when I stamped this – look how clean and crisp the images are. I swear by the versa mark…stamp….ink with Black…stamp…making a 5″ X 7″ stamped image of my stamp set just works for me.
I slide it in the inside of the cover as a reference. (I know its kinda strange, but I like to see an inky stamped version with my own eyes)
This embossing folder, Layered Leaves Dynamic Embossing Folder….is just beautiful sooooo beautiful that this is the “freebie pick from me to you” this month when you place an order of $75+. The super deep impression of these dynamic folders is just amazing!
Here’s an important tip! I like to mist the piece of paper before I run it through the Big Shot. Stampin’ Up! did a video that I have shared with you before but just in case you missed it….click here – it is a great video and it will also show you the correct “sandwich” that is need for Mr. Big.

This card is sooooo easy! I am holding tight to my motto…”If you have a keeper stamp (Count My Blessings)…the basics (the circles)…fun DSP (the embossed piece for texture & the pick a pattern for contrast)…. a wee bit of bling or interest (silver thread and the black rhinestones) you will have a great card!
Stamp + Basics + Texture + Bling = a Keeper Card
I used this embossing folder for my monthly card kit just like I am doing today and I will say – the amazing details in this folder are so clean and classic – it makes a card come together in no time as the embossing folder has done the work for you.

Let’s chat about the Black and White DSP…You know that I have blogged using this paper a bunch since its debut. It makes me smile (and that’s a good thing)
To me, this pack of DSP – Pick a Pattern has a learning curve. WHAT? Yep, a learning curve. At a glance many thing that it is a kiddie paper as they see the big, bold, graphic designs but always remember my friends…we know that there are always 2 sides to a story….well for us – there are always 2 sides to our DSP!

Whenever I see a Black and White print…I not only “squeal” but I “cut it wisely” as I just LOVE IT! We have some new DSP’s coming out that you are going to LOVE as they are the same…a FUN & FESTIVE print on one side….and the flip – a classic! No worries, I will be doing a Product Share and we all know that they are the BEST way to try the newbies out!
This DSP that I am using today is a perfect reason/example of why having a swatch book from my shares is the way to go. WHY? Easy – as we chatted about this from a glance…the DSP being a busy bunch of prints….well having the swatch book on my work area makes it a breeze to flip through the offerings and then make the decision! They truly are lifesavers!

I know that this card is super easy (that you do not need me) but here is a tip about using this thread. I had a love/hate relationship with it until I figured it out and let me help you as well. The effect and texture it gives to a project is fun but it can be frustrating to work with.
To make it a 😀 process I just put a bunch of adhesive (fast fuse is my choice) on the back of the circles. Next, I wrap a bunch of thread around my fingers (for this size of a circle I used 3 fingers) snip it off and then take that whole darn circle and SLAP IT DOWN! Now you can pull the thread mess where you want it – works like a charm each and every time!

If I am using dimensionals or fun foam on the back I still do it this was and then add the dimension. I cannot tell you how many times I have been frustrated with this thread but once I WAS IN CONTROL (not the darn thread in control) it became my friend and heck – it gives a great effect and is super affordable!
There you go a super fast card to whip up and one that I know that we all have people to send it to. “Blessing” are a true “Blessing” and this card would certainly make someone stop and smile. To me, it is one of those “slow down life” cards when someone would receive it as it will automatically make them stop…smile….and remember the “specialness of you”

Speaking of special…..I snuck in that the Clearance Rack was added to yesterday and I also see that many of you have taken advantage of it….WOOT-WOOT, we all love a deal! My heart was skipping a beat to get a great deal on Bakers Twine…I LOVE that stuff!
Enjoy the day and I will see you in the morning….we need to play a game….it is Tic-Tac-Toe Day!
by Susan Itell | Aug 15, 2017 | Uncategorized |

Good Morning…. Here’s a trio for you…
a TIP – a DEAL (50% off Paper Pumpkin) & more DEALS (Clearance Rack Re-Stocked!)
I have a useful tip for you today with what to do with those Paper Pumpkin Boxes that seem to grow and grow! They are truly a very useful size and by flipping them inside/out is a perfect re-use solution.
The outside of the “new box” is perfectly plain…a perfect and clean box to re-use! I was mailing some items several weeks ago and thought…why not jazz this useful box up with some flowers! It was funny – this was not planned but there they were….some flowers just sitting on my work area and I thought, WHY NOT?
If you have never tried Paper Pumpkin…it is 50% off for a limited time….now until Sept. 10th! Grab another cup of coffee and watch this short video….
Here’s the scoop….these make a great gift…and just try it for a month! You have nothing to lose and there is no obligation to continue.
Until September 10, first time Paper Pumpkin subscribers enjoy 50% OFF their first (September) kit!
If you subscribe before September 10, Stampin’ Up! will deliver September’s Paper Pumpkin kit straight to your door, complete with everything you need to make adorable, shareable projects—all for 50% off!
Fine print of the promotion:
- For first-time subscribers only.
- You must subscribe by Saturday, September 10, 2017; 11:50 PM (MT).
- Available for month-to-month subscriptions, not prepaid subscriptions.
- 50% Discount applied to September’s kit ONLY. After that, the price for each month’s kit will return to the regular price of $19.95 (which includes shipping).
- Enter the promo code,HALFOFF0917 upon checkout.
- Unless you cancel, your membership will continue at full price after your first kit. Try your kit out at the 50% off price….and if you find out that it is not for you…no worries, just cancel it by Oct 10th! It is that easy!
To get the 50% discount, remember to enter the promo code of HALFOFF0917
The ? that I am always asked…what’s in the kit? Not to give you a short answer….but I honestly do not know…it is a surprise! Some might find that frustrating…but I love the element of the surprise and POOF – a smile is on my face when I see that little box in my mailbox.
Please do not hold me to this….BUT I would imagine that the September kit will be something super fun as if it is anything like the past (kits from previous Septembers) it is a usually something fun for Halloween/Fall.
For just $10.00 – TRY IT….you might like it!!! Shipping from home is FUN…and make sure that you check out the Clearance Rack as Stampin’ Up! has added some goodies in there…..YEP = Bakers Twine is in there…..you know how I feel about that!!!!
Here’s a throw back that will make you smile – be MIKEY….you have nothing to lose!
by Susan Itell | Aug 13, 2017 | Uncategorized |

Good Sunday morning to you! I was so excited for the post to roll around as I am smiling…..really smiling! I know that this weekend post is a very simplistic one but I think it is great one to share and show you that simple DOES work.
I love todays card….in my eyes there is nothing more that needs to be done as the message is across – welcoming a sweet baby into the world! I hope that you can follow me on this one.
Do you remember seeing pictures of yourself and saying “Who dressed me or what in the world was I thinking about when I bought that” hmmmm….I am sure many of you are smiling and some are probably giggling. 😀
When I paper craft there are times that I think of that…I want people to hopefully save the cards that I have made for them. I know that I do as there are those that just “touch your heart” …inspire you and make a memory continue to live!
With that said…the reason that I adore this card is the oh so classic and super sweet image from the stamp set and the classic twinkle, twinkle little star! (Can you guess what I bought the new sweet boy?…My baby staple – books…and yep the classic twinkle, twinkle made the cut)
So the moral of this story is I adore them both but side by side, you decide!


The changes for today were not many but if you see them side by side, I say take the wee bit of extra time! Here are the changes for todays card. Please remember to go back to yesterdays card as the coloring and actually just about everything else is the same!
- I stamped additional single stars and added my trio of dots
- I used a piece of Post It Note to mask around the moon to stamp 2 of the stars
- In the center of the stars, I used Glossy Accents to add some extra shine and bling. This is a product that we used to carry and one that I know many of you have around. It is funny..when we had it – I never used it but I have been finding that I have been playing with it and I really like the wee bit of bling and umph it gives to a project.
- I broke up the sentiment into 2 lines. Because I already had the stamp a ma jig out…why not? I simply put a piece of washi tape over the line that I did not want to have inky…inked up the sentiment and then peeled off the washi tape and stamped! (Yep, you could use the markers and just isolate just the words that you wanted to have inked…but I like to have a good coverage of ink…just a personal preference)
- The envelope is different…I adore it and we will chat about that below!

Masking is something that I think we forget about and/or are afraid to do. Look how simple this is! The end result is sooooo worth it – just taking an extra step make a “how did she do that” happen!

Let’s chat about the envelope! If this doesn’t make the mailman smile….than we need to find a new mailman! You know that I usually cover the back flap of my envelope with a fun DSP or embossed image etc….but after making the changes on the card today I thought – I am not crazy about the same envelope for today…so POOF – how do you like it!
I stamped the other super fun image in this set on thick whisper white, just like I did for the card and then used the same color palette to color! The actual envelope was made using the Envelope Punch Board and I placed Tear & Tape across the flap…held my colored piece up to the light to see through and POOF (again) I centered it!
I added a sliver of So Saffron over top of it (this was an after thought) but I think that it made the images POP even more! I hope that you can see in the pictures that I did the same as I did on the card, I used the Sahara Sand around the entire image to help POP the animals – this is a great tip and one that does make a difference….just go super light!


Well…thoughts???? I can’t wait to hear how you like these little changes. I am going to stick with what I said yesterday, this is one FABULOUS baby set. I admit, even though I do not make many baby cards…I found this to be super fun and truly – I would make this over and over!
I am now itchin’ to make some of the more detailed cards that I saw when I googled the image. It truly came down to that darn “time thing”.
Hear me out…IF you have a bunch of time to create a card there is nothing more FUN and REWARDING than creating something you set your mind to…(I get that) but then again, there is nothing more frustrating to NOT HAVE THE TIME and stress yourself out that you need to make this amazing…over the top….work of art! (I get that as I have been there)
This is why is it great to have simplicity up your sleeve!
There is nothing wrong whatsoever in making a simple card. Think of it in this way – would you rather HAVE a card to send or would you rather stress each day that passes by and you say, “tomorrow I will make that card” and your tomorrow comes and goes!!! We all keep thinking that the extra time will be in that tomorrow!!! (sound familiar to anyone) – We have ALL BEEN THERE!

Now go and enjoy your day!I am super excited as this afternoon John and I are going to a local Peach Festival! I am super excited because I turn into a peach when they are in season – I just cannot get enough of them! My mouth is already for an amazing Peach Dumpling with homemade Vanilla Ice Cream! YUMMERS!
I will see you on Tuesday….and hopefully I will be able to inspire you! I do hope that you can find some “me time” and get inky – we all know that it is the BEST therapy one could ask for!