
Hi all and happy, HAPPY Friday..Saturday! (truth be told….my day ran away from me yesterday) Before I get to this FUN and oh so EASY card that I have for you…a big reach out to all that are being affected but the Hurricane. We all know, “mother nature” is nothing to mess with and my thoughts and prayers are with those being affected – be safe! Fortunately…it has been downgraded but there still is so much damage and rain still to come!
I have a FUN ONE for you today and I hope that this sweet card will bring a smile to your face and then also you can put your THINKING CAPS on and share a comment with your thoughts about the designs….perhaps some color combos that you would think would be fun…or some design layouts that would be fun with the 1/4″ strips of paper!
I am going to be offering some BLOG CANDY of a BUNCH of 1/4″ strips of Stampin’ Up! Cardstock! I have plenty to share and I know that there are going to be many of you that will be thinking….I could make this…..what a fun look! I love a simple technique like this and I hope that this post will inspire you to give it a try…it is also a SUPER way to use up scraps!
I told you I had a BUNCH already cut…can you guess WHY?

By now you know that obviously I love Stampin’ Up! but you also know that I love and use many other products for my crafting addiction that I have. I have learned so much from Stampin’ Up!, from Videos, going to classes…from YOU and just experimenting on my own but there are a “grouping of amazing You Tube followers” both SUD’s and others that just love to craft that I follow!
Keep reading and you will understand….promise!
I know that I bring this subject up quite often….the subject of CASEing….and why I am sharing this with you is that this morning Yesterday 🙂 I had a notification that one of my ALL TIME favorites uploaded a new video….well, let me tell you – when Laura Bassen shares a new video…I just about stop everything and watch!
I adore her..truly just about everything about her as she is not only super talented…she is SUPER FUNNY….and I feel like I know her and her family from following her channel. I have also leaned soooooooo much from her videos! I had something else planned for today but then I thought….this is a WIN-WIN….as I really wanted to showcase another project with the same Bundle I used on Wednesday!
I am trying to do more of that as trust me, I get it. There is practically no way we can (or really should) purchase everything when a new catalog comes out…..actually for several reasons….there would never be the time to use them all…and also, many probably do not fit your style!
If you are here at my Blog (thank you!) you know that I love clean and simple cards. I only purchase the Stampin’ Up! products that I know that I will love and use for my use so therefore….that’s what I share on my blog! I do like to share how a product can be used for many different projects so this CASE from Laura was a GRAND SLAM in my eyes!
There is NOTHING WRONG WHAT SO EVER in “caseing” and guess what, I do it as well. When I see something that perks me up and also gets me to utilize things that I have in a different way than I intended to do with it….I say, GO FOR IT! I hope that you will watch Laura’s video….she always does a great job and I just adore her style!
Let’s see this simple card and break it down…

I hope that you can see…how darn tootin’ simple this is and to me…so darn tootin’ effective! Paper and colors are all we need today to create this simple and festive card. You can make the focal area of color and width/size you need to get the concept to “set the stage” and I just build my “strips” from a base of cardstock.
The BEST TIP that I can give to you when you try this method of “stripping” (as Laura giggled about) is to USE THE MULTIPURPOSE ADHESIVE SHEETS! This product is a total sleeper with so many of you and I highly suggest you adding it to your next order.
Once you get use to it…you will say, why did I not use these earlier!!!
I have gobs of adhesives….just like you probably do and I will say that we tend to use different types of adhesives for different techniques. I do like and use an adhesive spray for delicate dies….but I find using these sheets to be easier over all with no odor or having to spray in a box……again, we try a bunch but in the end…we use what works for us!

In the pictures below you can see how I used this adhesive for this fun and festive card. I used it on the leaves….as I actually layered 5 on top of each other to have dimension. With this product…it makes it super easy to layer one over the other….with no sticky fingers!
For the card….(if you counted the strips) you can see that the center fun is 2″ wide…the real deal is…you can make it whatever your little heart desires! It also does not matter what color your “base” is….(a great time to use up colors that you do not use often) as in the end, it will all be covered up with the 1/4″ strips of cardstock!
This product DOES allow you to move it it you did not get it lined up “just right” but after you give it a good press….(I recommend using your bone folder) it is STUCK!!! This in itself is another reason that I love this product!


Below you will see a close up of the fabulous leave from the Falling for Leaves Bundle. It truly is a beauty and I encourage you to google and/or go to Pinterest to see other ideas that people have create with this bundle and especially with this classic leaf. I knew that I wanted to keep this card rather simple and flat but I also knew that I wanted to add a bit of “oomph” to the leave and it would be next to impossible to add dimensions behind.
By just cutting several of the leaves out WITH the Multipurpose Sheet on the Whisper White Cardstock before going through Mr. Big…it made the stacking process super easy…without stick! Using the design on the leaf…I simply threaded a piece of good old Linen Thread to make a simple and sweet bow!


Also, I stamped the sweet sentiment with Old Olive Ink and then sprinkle clear embossing powder over it to heat set it. This is not necessary to do but I think you can image how that extra special touch of taking the time to emboss would looks so classic and just amazing! We all know the inner magic and satisfaction we receive when we heat emboss!
Below you will see images of how I build on a base. The example to the left showcases the backdrop that I used to create the magic for the back flap of my envelope love and the one to the right shows the “release papers” from the leaf after being die cut. Again, the bone folder and also the piercing tool are fantastic to have around when working with the adhesive sheets.
Remember, it is temporary until you give it a good and firm pressing down and then you are good to go! The piecing tool makes it easy to start to get “hold of” the release paper…..heck, I would not want to hurt my nails! 😐

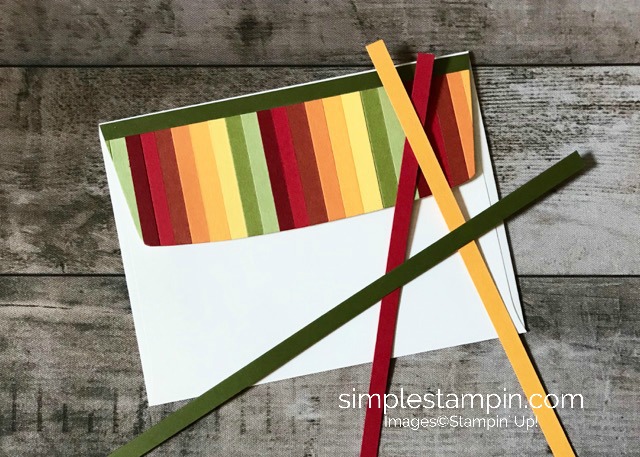
How about this envelope? I was super happy with the end result and trust me, at first I did something totally different. I will use the first envelope I created on a future post but after getting some advice from some dear and sweet friends….I decided to make something different!
In keeping with the 1/4″ strips…I thought – why not? The adhesive sheets are 6″ X 12″ so why not just go ahead and cover a piece of card stock…cut off the extra 1″ and go to town with my strips!
Many of you know from following my blog that when I create a card I usually go ahead and make a couple up at the same time. The way that I look at it is…I like it (or I wouldn’t have created it or blogged about it) so why not….I have the stamps and supplies out and for this envelope…this would allow me to make 5 envelopes from doing this!
Are you following me with my thoughts? I use a 1/4″ strip across the top (which is Mossy Meadow) and then the fun colorful part is roughly 2″ …so by covering the envelope….I can get 5 cuts of fun!!!
WHEW, it happened again, another long post but darn….it is hard to get it all across to you in words! (another reason that there needs to be a “Stampin’ City) for all of us to vacation to!
So…..How about some FUN Blog Candy?
Just leave a comment with your thoughts about the designs….perhaps some color combos that you would think would be fun…or some design layouts that would be fun with the 1/4″ strips of paper…or just to say HI 🙂 ….I don’t care – I just love to see the comments to get ideas and also to see how you can continue to TEACH ME….in ways to use something!
I am curious to see if anyone will leave a comment on how and why I have all of these strips of our cardstock! Put your simple thinking caps on!!! The colors that I used for the project are all listed below….in the product line up!
Let’s all have a great weekend and go and share some simple kindness!


The strips are from your card stock decks for the new color refresh! Love this card!!!!
This is the coolest idea yet. Love the autumn colors & neat idea.
I love this card and definitely will case it. . . . .probbly with blues and a birthday greeting. Oh, maybe a yellow thrown in too.!
Have a blessed weekend.
🙂
Oh, I forgot to mention the envelope . . .LOVE that too. 🙂
Love, love, love this card and envelope. What a neat way to use scraps and it is so colorful. Thanks for sharing.
Great way to use up all those scraps that everyone has. I could see making a Christmas card with this layout. Love the matching envelope. The possibilities are endless.
Clever way to use up those scraps! Doing a basket weave with the adhesive sheets holding everything in place would be great too
Susan, Once again you have made my day! I love this card-of-many-colors and am envisioning it done in other color families and with different “toppers” – butterflies, maybe? I know what I’ll be making this weekend, and my first-ever pack of adhesive sheets arrived the other day. Thanks! (Hope all is well and dry at your house. My nephew evacuated his home at Kure Beach, NC. Couldn’t get either plane or train ticket, so got a ticket on the last bus north out of Wilmington, which with detours and transfer ended up taking 48 hours to get to Ohio. But he’s safe and we’re grateful.)
Stunning card Susan. Thank you for a fun useful technique.
I would make the strips in blues and greens… my “happy colors,” like the sky and the grass. Thinking the strips came from the edges of 8 1/2 by 11 sheets that were then cut in quarters to go on top of the standard A2 card fronts, allowing a thin border along all four edges. ❤️ Thanks for a chance to enter… best wishes to all!
What a creatively cool idea. You have so many! I save my white strips for words/sentiments but not the colors. Now I have a new way to use resources (I hate wasting anything!). Love your enthusiasm! Thanks for sharing.
Love this card and can’t wait to try out the adhesive sheets….one of those things that I bought some time ago and have never used yet. How about purples and blues for a neat combination! I believe the strips are what was left from your cardstock product shares. Great idea!
Susan. Once again you out did yourself! What an awesome card!! Love the colors for fall. I wouldn’t change anything. The basics can be used for any season or theme. Were the strips made from doing your paper shares?? I look forward to your blog posts everyday. Love your creations and your stories!,
Inky hugs,
Terry ~~
Great idea. Love using up some of those scraps. This simple effect would lend itself for many special cards. Thanks for all the inspiration.
Love this card, Susan. The colored strips are a great background for the beautiful leaf in white. I’m a big fan of the adhesive sheets. I can see using the strips as background for a variety of projects. You’re right about how much we learn from each other and from your clear explanations of your projects. My sister lives in Carolina Beach, NC and they are fine this morning.What a relief! Have a great weekend.
Love this idea for using all the scraps! I bet your large stock of strips are from the product shares. Love your ideas and your blog.
Great new technique….puts you in the mood for Autumn!. I can see hues of blues and green (throw in Sahara sand too) for a summer beachy card. I think the strips are from your color coach share. Enjoy the day.
Love this idea and imagine the color possibilities. I love the fall colors you used You always amaze me
Love the card and envelope…the card of many colors. Can see using this idea in many ways. TFS
Love the technique of using up strips! I am going to start saving them!!!! Also, thanks for enabling. Checked out Laura’s blog and followed the hop for a few amazing blogs!
I always save white strips for sentiments and use them often. I save the colored strips but rarely use them. Thanks for this idea. I am going to try it. Actually, I have used colored strips to make woven backgrounds, but they seem cumbersome on most cards. Maybe if I use the adhesive sheets they would turn out better. I will have to try that again soon.
I love this! And especially love the paper colors! I don’t have this stamp set but I have the stamp set colorful seasons which has a pretty leaf die. One of the other ladies suggested using blues. Colorful seasons has pretty snowflake dies that would look beautiful on blue stripping! I’m ready to have fun casing this! Thank you!
Mats! From all your cards that have layers. Love the color combo.
The strips are left from making your color swatches from your shares.
I have a card in progress that has had me stumped. I’m going to try the strip idea with Lemon-lime Twist, Berry Burst, Gray Granite, and Mango Melody for that card. I’ll let you know if it solves my problem.
These strips can be used for any season of colors! This is a great card idea!
Love using scraps and this is a great idea. Thanks!
love the strips of colors for a beautiful effect…I would do pastels for Easter…blues for snowflakes,
black, whites, and grays….the variety is endless…this technique could be used for every season…or just mix up colors at will…..so awesome that you make my day with your inspiration and sharing….it is a great way to use scraps…and fun to plan to use all the colors together….
This is a great idea. I like reading everyone else’s comments too. This would be much easier to do than the idea of covering the front of your card with that “X” idea of strips. I never could get that to work. I save all of my scraps, so I have plenty to work with! Thanks for sharing.
Love the card and envelope and using up scraps this way. What a great idea and what beautiful colors!!
Hi Susan,
I simply adore the colors that you chose! Your card is
great for a masculine card.
Thanks
Love, love this card and envelope. The colors are perfect. When I read that you make up a few more of them when you like how they turned out….I was hoping there would have been one of these stunning cards in with my shares that came today. Oh well, I can wish can’t I?
Now, you know I am going to have to try this but I have one of those love/hate relationships going with those adhesive sheets. I don’t think the hair ever grew back on my arm when I ended up getting it stuck to my fingers and made a real mess of a sheet. Thank goodness Teddy didn’t get a hold of it as there is probably nothing worse than a bald spot on a good looking dog other than maybe a wet dog for the smell.
Anyway, I will try it using the adhesive paper. I should probably make a baby card since a person I used to work with and we were friends also until she was promoted and then eventually demoted my full time to 17 hours a week with no explanation. I eventually quit and she moved on to another place. She was so proud to tell me she was finally pregnant and didn’t know the sex. she is due in a couple of weeks. Maybe pink and blue stripes for a card but then do I really want to give her present? I guess I could suck it up and get a stuffed animal or a book. Maybe carry the stripes onto the little gift bag too?
Either way, I will be using some of my strips even if I just copy yours and use a different focal point. I just love this card and envelope plus the whole idea!
I love this card as it is a true keeper! So many different color combinations can be used to change things up. You could even use the same colors but in a different order so the card ends up looking totally new. I think you have all these little strips because you use them for the top part of your envelopes. So easy to just grab one and use instead of cutting every time a card is made. That’s my guess. I don’t decorate envelopes in general. I read in the newspaper that the postal service doesn’t like the distractions on the outside. Thought that was kind of odd, but whatever. Happy Saturday, Susan! Enjoy your weekend~
Love the colors you used on this card, Susan. (Autumn is my favorite time of year, so I’m partial to them.) I’m wondering if these are your swap cards for Orlando in November?
I also like to 1/4″ strips to the adhesive then I run it through the big shot with words such as the Happy Birthday thinlet. Much more time but love the look…
I forget about the multi layering of die cuts ! Pretty card ! I really like the CS strips ,but when I try to save some they don`t fare too well….they get dog eared or bent . How do you store yours ?? It would be nice to have some that are all straight and pretty ! HINT HINT !!!
I think these could be the strips off mats you cut for layers.
Still have power and just waiting to see if we slide through tonight with out too much Florence !!
Your card made me smile! What a fun idea….LOVE how you keep encouraging us readers. You are a jewel. I too believe those strips are from your product shares? Sure miss your daily blogging….but don’t think I am “guilting” you! I just enjoy each post that shows up.
Beautiful, love how the strips give it such a gorgeous pop of color! As I’m in love with the purples right now, I would love to try it the the gorgeous grape and highland heather! I think the strips are left from your cardstock sample bundles. Happy Saturday!
Love th strips of colored CS. MAY E I would dry emboss them before adhering to CB. I store my strips in a large storage bin. Some stores call them Iris storage boxes. I also keep some in hanging file folders by color. Thank you, Susan, for showing us a colorful technique.
I’m guessing you have all those strips left over from your product shares. I’m thinking of trying maybe different shades of blues with one or a couple of big snowflakes. Have to put my thinking cap on for other ideas.
Now I will cut 2 1/4″ strips instead of 1 1/2″ strip when I am trimming for layers. I think your strips are from the color swatches.
Another super idea. The colors you used are so great for fall….I love this card and envelope!!!! I never think to add a little height by stacking, and I am definitely going to start keeping my scraps!!! Also, can I just say that in addition from loving your posts, I enjoy all the comments and learn from them too!!! Sometimes I even chuckle …..? Oh, I have to check out Laura now too!!! ?
Super fun – striking – Susan card! Love this idea!
Susan, Thanks for sharing such a beautiful fall color CASED idea that is truly a keeper! Such a fabulous color scheme and great way to use those leftover cuts you have from other projects 🙂 I so dislike tossing any small piece of paper, so this will definitely be in my future to try!
I can see this in a number of different color combos, Christmas colors, Reds-pinks for Valentines, Pastels for Easter, along with Brights for Summer 🙂 — Even some classy — Black, grays, whites or cream, and beige, brown color combos…. All good in my eyes !
Thank you for your inspiration every day, by sharing your cards and stories — LIFE is challenging, but, your positive outlook is so awesome 🙂
Susan,I am in love with your card. Those strip colors are amazing! I always forget about adhesive sheets, and I’m adding some to my order today. I bet that all those strips are left over from your On Stage swaps in Orlando! I hope so because I have to hunt you down so we can swap!???
While downsizing, I decided to cut some strips instead of getting rid of the paper. What a great idea! (I think I got the idea from you.) Anyway, I love the look of this card and envelope and will definitely CASE it. Thanks for sharing.
love this card. color combinations are endless. for spring I’m thinking a butterfly could work.
I love the bright colors of your card and envelope. The blog Our Little Inspirations has lots of paper scrap/paper strip ideas too. Carol is a champ with scraps. Are you strips left over from making the color swatch books?
What a striking card. I love the colors! I had so many strips of paper I wasn’t using that I quit saving them! Might have to drop them in the box again. Mine were left over from making multiples of cards for swaps but I think yours might be from product shares or the wonderful swatch books.
This card is absolutely beautiful!! I am a bit confused how you did the envelope. Did you trim a piece of the adhered strips and glue to the flap or did you use green glue for each strip?
Guessing you are preparing for a swap, or cards to send to your downlines. Or maybe you are making cards for the peeps?
How fun is this technique?! I am always so thrilled to see and learn new things – thank you for sharing 🙂
Love the card and envelope and I think your strips are from the Card Stock Swatches that you make.