by Susan Itell | Aug 22, 2019 | Bundles, Product Shares, Super Easy |

Hello and Happy Thursday! I have a super sweet card for you today and I knew the minute I saw this bundle….I needed it! I bet by now you can guess why?
- Super cute and unique for Stampin’ Up!, especially since there are matching framelits that will cut out the intricate shape of the flower clusters
- I enjoy coloring and this is a fun one to add color to…
- The sentiments – BINGO!!!….love them as they are super bold and just plain FUN!!!
- The overall design of this bundle lends itself to a quick Clean and Simple Card….right up my SIMPLE alley!!!
I think that you can clearly see that this card is a “keeper” one and also one that is super easy to mass produce! When I made this card….I made 15 of them as I knew it would be a perfect one to reach for when you need a card quick!

I will break down some of the simple elements that I did for the card and I hope that you can see that is is an easy one with a big bunch! I know that I say this over and over but here you go again…
The basics will never let you down – and this card screams the basics!
At the end of the post you will see the line up of basics that I used to make this care come to life…it all comes down to a great stamp set….and the basics to make the card making process one that brings you joy and to me even just as importantly….bring you a feeling of self accomplishment!
I have shared that I have become very selective with the stamps/bundles I purchase as I really need to look at them and determine if it will be a good investment. I am sure that you will smile with this statement….
It’s super easy to buy stamps…but that darn time thing always happens…so be selective!
I also use a Scan n Cut and love it….so I am even pickier when it comes to purchasing framelits/dies……but this bundle is an example that I would purchase it as a bundle and it would be super hard for the Scan n Cut to cut out these floral images. I am getting pretty good at seeing which will work and which would not work.
Take a peek below and just gander at these AMAZING card that the home office took (page 131)….aren’t they just beautiful! Here you can clearly see the fact that they used not only the stamping as a back drop on the card bases but then they also cut out the images and popped them up using the diecuts!
I totally plan to CASE these gems…and I also encourage you to always look at the samples in the catalog….there are some AMAZING samples! I particularly love the yellow one (to the left)

Let’s chat about the Blends…..these are the easiest way to color this image and I used very few markers. Please do not think that you need to have a “high degree in blending” to make these “do their thing” – remember…
We do all of this to have FUN…not to be stressed
Using an alcohol marker is the quickest way to have coloring fun!

Even though I did not use the matching framelits for this card…you can easily see that the basics made this card happen! Here are some tips for you that might help you on seeing how it came together!
- I used the Subtles Embossing Folder of the Gray Granite Cardstock. To me, this color is one of my most used Neutral (besides white of course) that I go to…if you have not tried this great color…I encourage you to do so….it is great with a POP of color and works well with many color schemes!
- When I used the Subtles Embossing Folder…I ran it through twice on both directions – this really makes the paper look interesting.

- Keep the focal part super clean and simple….let that part shine to make the impact – a quick mat behind makes the POP happen!
- It is super hard to tell in the pictures….but in the centers of the flowers I added a swipe of Wink of Stella to them – this simple addition makes a HUGE difference….I highly encourage you to always have one of them on hand, especially with the holidays coming!
There you go…some simple whys from me to share with you how a card like this makes my heart pitter patter! I do hope that you will give this sweet and practical bundle a look! On the inside of the card I stamped the sentiment of “thank you from the bottom of my heart” – also from the same bundle and added a sweet little purple heart from a punch!
Again, simple little touches that add a big impact…
and really – it does not take much time at all!
You know me…I love to try all types of different techniques on cards….sometimes it is fun to do something more time consuming and a bit out of the box….but when it comes down to it – there is nothing like a great clean and simple card!

Tomorrow, Friday I will be sending out the email confirmations to all of those that have already put in a request for a product share! That calendar will be rolling around fast but if you have not already reserved a share…..no worries – you still have plenty of time to get one!
CLICK HERE to see the POST on the HOLIDAY PRODUCT SHARE
Enjoy the day…..it is super hot here in Maryland….and we lost internet, tv and phones since Saturday…..our internet came back yesterday,,,,but still no phones – I am kinda liking the peace and quiet!

by Susan Itell | Sep 15, 2018 | Blog Candy, Bundles, Fall Cards |

Hi all and happy, HAPPY Friday..Saturday! (truth be told….my day ran away from me yesterday) Before I get to this FUN and oh so EASY card that I have for you…a big reach out to all that are being affected but the Hurricane. We all know, “mother nature” is nothing to mess with and my thoughts and prayers are with those being affected – be safe! Fortunately…it has been downgraded but there still is so much damage and rain still to come!
I have a FUN ONE for you today and I hope that this sweet card will bring a smile to your face and then also you can put your THINKING CAPS on and share a comment with your thoughts about the designs….perhaps some color combos that you would think would be fun…or some design layouts that would be fun with the 1/4″ strips of paper!
I am going to be offering some BLOG CANDY of a BUNCH of 1/4″ strips of Stampin’ Up! Cardstock! I have plenty to share and I know that there are going to be many of you that will be thinking….I could make this…..what a fun look! I love a simple technique like this and I hope that this post will inspire you to give it a try…it is also a SUPER way to use up scraps!
I told you I had a BUNCH already cut…can you guess WHY?

By now you know that obviously I love Stampin’ Up! but you also know that I love and use many other products for my crafting addiction that I have. I have learned so much from Stampin’ Up!, from Videos, going to classes…from YOU and just experimenting on my own but there are a “grouping of amazing You Tube followers” both SUD’s and others that just love to craft that I follow!
Keep reading and you will understand….promise!
I know that I bring this subject up quite often….the subject of CASEing….and why I am sharing this with you is that this morning Yesterday 🙂 I had a notification that one of my ALL TIME favorites uploaded a new video….well, let me tell you – when Laura Bassen shares a new video…I just about stop everything and watch!
I adore her..truly just about everything about her as she is not only super talented…she is SUPER FUNNY….and I feel like I know her and her family from following her channel. I have also leaned soooooooo much from her videos! I had something else planned for today but then I thought….this is a WIN-WIN….as I really wanted to showcase another project with the same Bundle I used on Wednesday!
I am trying to do more of that as trust me, I get it. There is practically no way we can (or really should) purchase everything when a new catalog comes out…..actually for several reasons….there would never be the time to use them all…and also, many probably do not fit your style!
If you are here at my Blog (thank you!) you know that I love clean and simple cards. I only purchase the Stampin’ Up! products that I know that I will love and use for my use so therefore….that’s what I share on my blog! I do like to share how a product can be used for many different projects so this CASE from Laura was a GRAND SLAM in my eyes!
There is NOTHING WRONG WHAT SO EVER in “caseing” and guess what, I do it as well. When I see something that perks me up and also gets me to utilize things that I have in a different way than I intended to do with it….I say, GO FOR IT! I hope that you will watch Laura’s video….she always does a great job and I just adore her style!
Let’s see this simple card and break it down…

I hope that you can see…how darn tootin’ simple this is and to me…so darn tootin’ effective! Paper and colors are all we need today to create this simple and festive card. You can make the focal area of color and width/size you need to get the concept to “set the stage” and I just build my “strips” from a base of cardstock.
The BEST TIP that I can give to you when you try this method of “stripping” (as Laura giggled about) is to USE THE MULTIPURPOSE ADHESIVE SHEETS! This product is a total sleeper with so many of you and I highly suggest you adding it to your next order.
Once you get use to it…you will say, why did I not use these earlier!!!
I have gobs of adhesives….just like you probably do and I will say that we tend to use different types of adhesives for different techniques. I do like and use an adhesive spray for delicate dies….but I find using these sheets to be easier over all with no odor or having to spray in a box……again, we try a bunch but in the end…we use what works for us!

In the pictures below you can see how I used this adhesive for this fun and festive card. I used it on the leaves….as I actually layered 5 on top of each other to have dimension. With this product…it makes it super easy to layer one over the other….with no sticky fingers!
For the card….(if you counted the strips) you can see that the center fun is 2″ wide…the real deal is…you can make it whatever your little heart desires! It also does not matter what color your “base” is….(a great time to use up colors that you do not use often) as in the end, it will all be covered up with the 1/4″ strips of cardstock!
This product DOES allow you to move it it you did not get it lined up “just right” but after you give it a good press….(I recommend using your bone folder) it is STUCK!!! This in itself is another reason that I love this product!


Below you will see a close up of the fabulous leave from the Falling for Leaves Bundle. It truly is a beauty and I encourage you to google and/or go to Pinterest to see other ideas that people have create with this bundle and especially with this classic leaf. I knew that I wanted to keep this card rather simple and flat but I also knew that I wanted to add a bit of “oomph” to the leave and it would be next to impossible to add dimensions behind.
By just cutting several of the leaves out WITH the Multipurpose Sheet on the Whisper White Cardstock before going through Mr. Big…it made the stacking process super easy…without stick! Using the design on the leaf…I simply threaded a piece of good old Linen Thread to make a simple and sweet bow!


Also, I stamped the sweet sentiment with Old Olive Ink and then sprinkle clear embossing powder over it to heat set it. This is not necessary to do but I think you can image how that extra special touch of taking the time to emboss would looks so classic and just amazing! We all know the inner magic and satisfaction we receive when we heat emboss!
Below you will see images of how I build on a base. The example to the left showcases the backdrop that I used to create the magic for the back flap of my envelope love and the one to the right shows the “release papers” from the leaf after being die cut. Again, the bone folder and also the piercing tool are fantastic to have around when working with the adhesive sheets.
Remember, it is temporary until you give it a good and firm pressing down and then you are good to go! The piecing tool makes it easy to start to get “hold of” the release paper…..heck, I would not want to hurt my nails! 😐


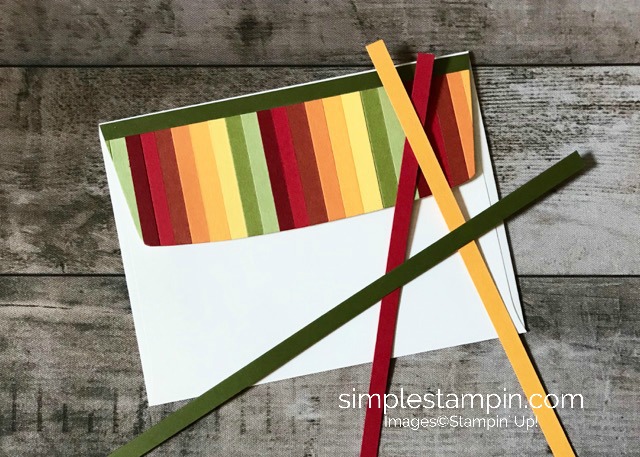
How about this envelope? I was super happy with the end result and trust me, at first I did something totally different. I will use the first envelope I created on a future post but after getting some advice from some dear and sweet friends….I decided to make something different!
In keeping with the 1/4″ strips…I thought – why not? The adhesive sheets are 6″ X 12″ so why not just go ahead and cover a piece of card stock…cut off the extra 1″ and go to town with my strips!
Many of you know from following my blog that when I create a card I usually go ahead and make a couple up at the same time. The way that I look at it is…I like it (or I wouldn’t have created it or blogged about it) so why not….I have the stamps and supplies out and for this envelope…this would allow me to make 5 envelopes from doing this!
Are you following me with my thoughts? I use a 1/4″ strip across the top (which is Mossy Meadow) and then the fun colorful part is roughly 2″ …so by covering the envelope….I can get 5 cuts of fun!!!
WHEW, it happened again, another long post but darn….it is hard to get it all across to you in words! (another reason that there needs to be a “Stampin’ City) for all of us to vacation to!
So…..How about some FUN Blog Candy?
Just leave a comment with your thoughts about the designs….perhaps some color combos that you would think would be fun…or some design layouts that would be fun with the 1/4″ strips of paper…or just to say HI 🙂 ….I don’t care – I just love to see the comments to get ideas and also to see how you can continue to TEACH ME….in ways to use something!
I am curious to see if anyone will leave a comment on how and why I have all of these strips of our cardstock! Put your simple thinking caps on!!! The colors that I used for the project are all listed below….in the product line up!
Let’s all have a great weekend and go and share some simple kindness!

by Susan Itell | Sep 12, 2018 | Bundles, formula, Thinking of you |

Good Morning and Happy Hump Day to you! I know it has been a while since I have posted but as you know me by now…Family is always 1st for me and even thought I thought that I would be able to blog sooner…it simply did not happen!
At the end of the post I will share with you some pictures of what I have been up to…but in short, John and I went to Seattle to get our Hannah settled in her new “home” for the next 5+ years….talk about being on the other side of the country….mission was accomplished and it was wonderful to see her happy and content with the next chapter in her life!
Before we get going on today’s card of inspiration that I have for you….I have some GREAT NEWS…..
ALL OF THE HOLIDAY SHARES ARE OUT THE DOOR!!!
I must admit, I was super happy and I did do a “happy dance” myself as I did not get back from Seattle until last Thursday and yes, we pulled down Randall Lane and there they were….Stampin’ Up! boxes waiting for me. I expedited the shipping as if not….I know that it would be too darn long for you to get them…so I was super happy that there was..MISSION ACCOMPLISHED!
I will NOT be doing another wave of this Holiday Product Share as I am really trying to implement some new offerings to my blogging (and trust me, all of this takes a BUNCH OF TIME) but there is more GOOD NEWS…..I have a couple of shares left and at the end of the post I will share with you what they are….they are READY TO BE MAILED TODAY so as the saying goes….early bird will get the worm!
WHEW….lets get to the card!
The new Holiday Catalog was launched last Wednesday…..CLICK HERE to see it in it’s entirely or you can CLICK HERE and see the new kids on the block….by catalog (ie…stamps, bundles etc)…and with just about the month of September already here…..this catalog is going to ZOOM BY FAST!

You know that I love to design clean and simply cards and todays card is from the Bundle Falling for Leaves. Remember…when you purchase a bundle…you will get an automatic 10% discount! I did purchase this as a bundle as I felt that the framelits being offered were pretty darn special!
I used another newbie, the Country Lane DSP. It is funny…new DSP papers are just like new stamps to me…it takes a while to get used to them. After cutting so much paper over the weekend I really got to know them better and in turn…I was able to think ahead in how I would like to use them! I love the fact that we have double-sided paper….always something for everyone!

This Blackberry Bliss crosshatch print is a great one fro so many different cards that we like to make…from Birthdays….to Sympathies…to just a quick Think of You Card like I am doing today! When you break it down…it really uses a minimal about of products and this also is one that you could easily make many of to have on hand!
I went with a monochromatic look today but you easily know that the sky is the limit with the choices we have in dsp and colors of ink & cardstock! Can you easily see that this is one of those “FORMULAS” that I love to share with you! YEP, it is and YEP, I will give you the measurements for you to easily duplicate!

I would go ahead and make this card today even if you do not have the Falling for Leaves Bundle yet as MAKING IT….is the BEST WAY for you to walk through the steps that I will outline below and then make notes of reference for you to make over and over again. It truly is just as simple as that!
- Card Base is Thick Very Vanilla Cardstock in an A-2 size, 4 1/4″ X 5 1/2″
- Layer of Very Vanilla just 1/8″ smaller, 4 1/8″ X 5 3/8″ (WHY do I do this? Easy, I love layers and I love the fell of a solid card. Also, I do not like seeing the mechanics of a card when you open it….this will make sense in the next bullet point!)
- Score at 1/8″, 1’4″, 1 1/4″, 1 3/8″ and 1 1/2″ I use the Simply Scored Board for my scoring on all of my cards as I feel like it gives a much deeper impression than using our trimmer. This IS one of those BASIC TOOLS that I always talk about that makes the journey of cardmaking easier…..you know me, I always try to be upfront and very honest with what makes me tick! If you have the Simply Scored Board maybe these might be easier for you to score in this way….score at notches 1,2 10,11 & 12!
- Cut your DSP to 3/4″ X 6″ and adhere it in between the scored lines! This in ITSELF make a HUGE WOW….don’t you think?
- Cut 3 Stitched Squares – another BASIC MUST HAVE to the size that will fit your sentiment and adhere one flat to the base and then pop up the other 2. I like to angle the squares differently as I think it provides more interest!
- I cut 3 dies from the Falling Leaves Bundle….I just adore the details that Stampin’ Up! did with them and then I tucked them in with a simple glue dot, darn I love those little things!
- The icing on this super card was to use a galvanized button with a sweet touch of linen thread to add a wee bit of simple bling. I used the glue dots again to hold it in place! (You know that I do not use buttons often but these are SUPER as they are not only super thin,,,the subtle texture it gives is PERFECT in my simple eyes!)
- Envelope LOVE….simple! I took the same theme of the scoring with a scrap piece of Very Vanilla and score it 3 times, adhered it and then added the DSP under it and trimmed off the excess!

Well, there you go! I know that my posts are super long but it is super important to me to give you all of the info needed for you to make it yourself. Remember….I am JUST LIKE YOU….as if something is clear to me I can attempt to try it myself and again, I am like you…being able to accomplish something….it is a WIN-WIN feeling of “I CAN DO IT” inside!
Why do we do this to ourselves?…we can do anything that we want to do if it is understood, clear and concise! There is no reason that when we sit down to ever feel frustrated.
I know that I was actually feeling like I had a creative block and I was frustrated with myself…..and then I did what works best for me….WALK AWAY from it….do something totally different and then come back and say – just do it! In the end, it always comes back to the basics of being clean and simple!

The next couple of pictures show you what I do when I get a new stamp and bundle. I purchase my magnetic cards from Stamp N Storage and YEP, it is an investment but what the heck about this crafty thing that we do that is NOT AN INVESTMENT!?
If I have something that retires and if I sell it (that’s why I always put so much info on the labels that I create) as it saves me a bunch of time looking through catalogs to see what I paid for it (I sell all of my retired products at 50% of the retail price)
In the 2nd picture you will see the shapes I cut out….I started to do this and ad them to the back of the magnetic card and if it gets retired…no biggie, I just peel off the white piece and reuse the magnetic card. I think that it makes such a BIG DIFFERENCE to actually SEE THE IMAGES cut out…..I find that I am more like;y to use them more!


Now to the Product Shares that I have left! While we were flying to Seattle I worked on what it was that I needed to order so when the GREEN LIGHT went on last Wednesday…..I could order and be ready! Here are the items that I have left and ready to ship today to you if you are interested!
Share #1 DSP Swatch Books – SOLD OUT
Share #2 new DSP – I have 1 to sell
Share #3 Glimmer Paper – I have 2 to sell
Share #4 Ribbon -SOLD OUT
Share #5 Embellishments – I have 1 to sell
Add On Share #1 – TONS of them available….this is my 4th re-order of them
Add On Share #2 – I have 1 of them to sell
Please email me and put in the subject line PRODUCT SHARE so I can spot it and I will go to Pay Pal and invoice you and ship it out. I am here getting (hopefully) caught up on a bunch of emails and will be doing the Post Office RUN right before they close at 5!
You can CLICK HERE TO SEE THE SHARE OFFERINGS….(a previous post) – Shares ARE the best way to take advantage of getting a taste of the newbies without breaking your Daisy Bank……speaking on my little doodle daisy bug…..she is GREAT and loves and appreciates her pedicure!
Now to Hannah….my little Red Caboose has moved to Seattle Washington to start working on her PHD in Molecular Cellular Biology with the University of Washington and the Fred Hutch Research Institute. That in itself you can clearly see that she get “that stuff” from her Dad….darn, I have a hard time even getting it out!
We are both very proud and excited for her. She works super hard and loves the field of research. I think that we can all agree….our world needs more and more medical research and I have witness first hand the power and importance it is.
She has 2 roommates that are also just starting this venture and I think with my MAMA BEAR GUT INSTINCT that these girls will be a perfect match for one another…..I just have a hard time relating to all of the “talk that they do”…..but I will say – ONE OF THEM IS SUPER CRAFTY…so I beamed…..
Each one of the girls came from different areas….Hannah – Maryland, Kansas and South Africa but one thing they had in common was they each came with NO FURNITURE……so as you can see…we rented BIG RED to do the job!
Hannah had basically her life in her suitcases….we took full advantage of Southwest and we each took 2 bags that could be check in plus 3 carry ons….it was a hoot – one suitcase had all of her favorite kitchen stuff….one had pictures that made it great…….another all of her favorite bedding….etc….so you can see….we were a HUGE help to her!
You will laugh…there was an IKEA there so naturally I made sure that John had some great nibbles and libation….and I left and did the FUN STUFF….like the Container Store run and the Grocery Store……You have to admit, there is always methods to ones madness!
I am pretty slick at parallel parking and for those of you that know how narrow and tight parking is in Seattle….I whipped Big Red into even the tiniest spaces….I have had lots of practice with our truck and trailer!


Lastly….my sweet daughter. I know that many of you will “GET THIS”! Do you remember taking your kids picture before they went off to the 1st day?!?! Well….I was super surprised at when I said to Hannah before she went off for the day…..can I take your picture….she surprised me and smiled and then said…..I JUST KNEW THAT YOU WERE GOING TO ASK ME! Yep, I have trained her well!!!
Now here is a CLASSIC that my Mom did to me when I was a grasshopper…..she would take a picture of me getting on the school bus the 1st day and I CRINGED as we had a really big bus stop and no other Moms did that and then…..SHE HOPPED IN HER CAR…..and drove to the Elementary School and took a picture of me getting OFF THE DARN BUS MY FIRST DAY…….
I just you could say that I get my passion and love of my family honestly!

Have a great day and below you will find all of the products that I used for this great card! I hope to be back in your In-Box on Friday! It does feel great to have the Product Share behind me but trust me, my house needs some love and attention!
You know we have horses…..but I now have Hannah’s horse here – Stanley…(which I need to treat with extra special TLC)….we are hoping to get him leased out for the year as if not…this Mom is going to have to ride him daily to keep him in shape! The things we do for our kids….but I don’t mind, I am blessed to have the ability to do so!
Stampin’ hugs to you all and please know that when I am absent from your In-Box I am missing you as well. This crafting thing that we all do DOES MAKE A DIFFERENCE and so do YOU!
by Susan Itell | Jun 19, 2018 | Blends, Bundles, Just Because... |

Happy Tuesday to you and I admit….I was fearful that I was going to forget how to blog!!! I think that this is the absolute longest that I have gone from blogging but please do not think that I have not been busy…as the Product Share Orders kept me full time each day and they are all complete and OUT THE DOOR! (whew, a great feeling !!!)
Life on Randall Lane has been busy and I feel like there are sooooooo many “funnies” to share with you and I will on another day as I think you will laugh….BIG TIME with some of the shenanigans that have been going on with the critters! Poor Daisy Mae…she is a grumpy piggy with the heat and my family thinks I spoil her with air conditioning….heck I say – a girl has to do what a girl needs to do! I promise I will share as I know you enjoy my animal stories!
Today I have for you a card that I think is going to make you smile, well at least I hope so! When I am woking on Product Shares, I get to know the new products really well! I watch sooooo many videos while cutting and sorting! It is funny, products that I did not give much emphasis to clearly make me look at it differently and this bundle is one that perked my interest…the Serene Garden Bundle.

You have heard me blog about this before but here it is again…I adore looking at the catalog for inspiration as the amazing pictures of projects in the catalog will make you have a “spring board” to start your creative juices to flow! (page 166) I think the thing that intrigued me about attempting to make todays card was the Pool Party pop of color around the stamped image.
The coloring on this card was all done with the Stampin’ Blends. They make coloring a breeze. One question I am asked many times is…what colors do I need? Hang tight as you might think I am being over board on this one but here you go….YOU NEED THEM ALL! Yep, you heard me…you need them all as I just cannot imagine sitting down to work on a project and being limited to waht you can do and what you cannot do because of the color options!
The Blends (page page 205) are an alcohol based marker that makes coloring as fun as the day when you were a “grasshopper” and got the new box of Crayola Crayons (now THIS IS a great memory as getting a new box felt like you hit the jackpot). They come in a light and a dark but I would just look at the column on the right and purchase them as a combo pack as you DO WANT both the light and dark of each coloring offering!
WHY DID THEY DO THIS LIKE THIS??? Easy….you will see that you will gravitate and use certain colors more than others, just like we do with our cardstock and stamps that we use. The great thing is that YOU WILL be able to purchase just what you need in case you have to reorder on one Blend….not having to get it as a set.
Using an alcohol based marker allows you to color without marker streaks and here is a myth…as many of you think that you need to understand the whole blending and shading scoop…NOPE – you can get GREAT results without knowing any of this stuff! I did all of this with straight forward putting the Blend to the paper! Once you get comfy with the Blends, then you can experiment with shading etc….

There is SOOOOOO much to chat about this new catalog and darn it, I wish that we all lived in the same town so we could chat in person (the reality is…our families would NEVER see us cause’ we would have a BIG OLD TIME together) But for me, a NEW CATALOG takes time to settle in and get to know! I am looking so forward to sharing you things that I love in a clean and simple way!
One thing that is FOR SURE is…
Stampin’ Up! ROCKS IT with DSP and the color coordination across the entire product line!
I am just goo-goo over the Garden Impressions DSP Stack! It is just over the top beautiful and truth be told, I am drawn more to the flip side of this paper that I am using today but I wanted to stretch my comfort zone and use this side…and I learned a lesson – I loved the end result!!! When I showed my best critic (my sweet hubby John) he smiled and said – this is great and what makes it is that background! (and then I smiled)

I often like to cover the entire panel of a card front. To me, it makes an instant impact. Speaking of impact…the new color of Gray Granite is my new favorite Neutral! I invite you to play with this color as it is one that makes a subtle project rock, a bold project rock etc…I did a wee mat of it around the focal portion of the card today! Just a little goes a long way and IT’S WORTH IT!
You just cannot go wrong with paper…I love to layer, I love to pop up – taking that extra step, taking that extra time will clearly show up in the end result. I like to look at layering as an accessory…just like when we dress ourselves, a scarf can make a fun outfit a wow outfit…just like paper does with our card designs!
Speaking of extra touches…how about this Linen Thread? It’s like a crisp white blouse in your closet…you ALWAYS need this! I love to wrapped several strands of the Linen Thread around when I create as I think the texture and effect makes a difference.
I like to run my Linen Thread (and also I do this with Bakers Twine) through a Bees Wax thingie???? (I have linked it for you from Jo Ann’s Fabric) but I am sure you can get them many places….I might be creative but I cannot sew worth a lick! I do this because it make the thin stands “behave and make a perfect bow with both texture and substance” I secure my bows with a simple glue dot – works every time!

The sentiment….super cute, right?!?! The font is right up my alley and this is from the amazing bundle, Varied Vases! I wish that Stampin’ Up! would share with us what products are on the tops but I would wagger to say that this one…has to be in the top 3! It is super special as not only is is a clean and oh so versatile bundle but the price point is perfect!
I know that you all have seen many amazing projects with this set and it is one that will be a classic through the test of time! Perfect for all occasions…and paper piecing….one of my favorite techniques to do (watch for future posts with this technique). I am also super “family proud” as this bundle was created by my upline, Mary Fish for becoming a million dollar SU seller….you can see her clean and classic style! I guess I could say, I’m proud of my SU Mama!

I simply took a 1/2″ piece of Calypso Coral cardstock and heat embossed it with white embossing powder. This IS a technique that I never get tired of as the WOW comes back to you just as it was the first time you did it! This is funny….I can remember that after I purchased the Heat Tool I could hardly wait for John to get home to show him the magic! (kinda silly that as an adult things like this makes us feel giddy)
The 2 most important tips I can give you for great Heat Embossing results are….get the Heat Tool good and hot before you bring it to the project to set…and you DO NEED the embossing buddy…this helps with stray pieces of embossing powder to your area that you are heat setting. Both of these products are a one time investment!
I often get emails about how do I get the embossing powder off of my darker cardstock after heat embossing. Here you go – I keep Swifter Clothes in my work area and use them often! (You can get them at any Grocery Store but I linked you to Amazon for convenience) and I cut them into smaller sizes and use them for many things….cleaning off the white reside from the embossing buddy…removing any excess embossing powder that is on my work area etc….
I love the look of white embossing on a color cardstock…clean and classic!

Speaking of things I love…I love my envelopes!
This is something that I do with each and every card I send out… to me, it is all about first impressions and when you receive a card in the mail and see some envelope love to it….I know what happens, you smile! Trust me, I “get it” as I am the same way and it is funny that when John brings the mail in and sees that I have some “happy mail” from someone….he will SPOT OUT THE ENVELOPE and say….this will make you smile – it’s a pretty envelope!
With this card today I wasn’t feeling the love to put this DSP on the outer flap like I usually do so I thought – make your own envelope in Pool Party to pull it all together! This IS a great example of envelope love! There is an instant WOW with a colorful envelope and making one with the envelope punch board is a cinch. (you have heard me say this….but this IS the best piece of plastic you can buy for $20.00)
It just took an 8″ X 8″ square of cardstock to create this smile! For those of you that like to make square cards like I do…you can easily whip up any size using the trusty guide on the front.
Are you hanging in there???? I am sorry that my posts are so darn long but I cannot help it sometimes – it is always my goal to inspire you and help you “see where I am coming from” with my projects! Remember, it’s ME…..SIMPLE SUSAN so I do not showcase anything that I do not like personally and I am just who I am with my style of blogging!
I am sooooo happy that many of you enjoyed the Blog Post of how I organize my Cardstock….I am going to pop in there today and respond to your comments! Being organized just makes this whole process of this “addiction we have” so much more enjoyable and it also allows us not to over buy.
The next post I am going to do is how I organize my Designer Series Paper! Trust me, you will be SHOCKED with how little room it takes up and I have every offering that Stampin’ Up! has! It is all about the process and all about having the right products!
Enjoy the day and I am sooooo hoping to have more “me time” today in my studio! I just wanna play with the new kids on the block! All of the products that I used to create this sweet card will be found below!!! See you soon!
by Susan Itell | Jan 8, 2018 | Bundles, Thank You |

Ok….hands down….I think that this is the BEST bundle in the new Occasions Catalog! For us Stampin’ Up! fans….it gives us the best of all worlds – great florals….amazing sentiments…. Fantastic artwork on the stamps…and framelits that will WOW us in many ways….I say a HOME RUN!
The minute I saw this catalog…I knew that this bundle would have a forever home on Randall Lane. It is just stellar in so many ways. When you have the best of all worlds it makes it super easy to create. That sums this up…it is just one beautiful bundle and I ask you, how can you go wrong when the “moon and the stars line up” like this does! 😀

No worries about fussy cutting this gem….in the picture below you will see that there is a framelit that cuts out this beautiful cluster of flowers. Here is another thing that you could easily do…snip off a portion of the flower and adhere it with a dimensional to add another layer of a flower for a dramatic POP!
The other thing that I think is a win-win about this bundle is the large, detail framelit that is just the “greenery” For my card today I did cut (2) different colors out, Pear Pizzazz and Old Olive. I know it is hard to see that I have both colors, but in person the variation of the green colors makes a statement.
The reason that I like this piece is that it is a great “filler” when you need to tuck a little something “here and there” to round out a design! Hopefully that makes sense…but I often finish a design and stand back and say….it needs just a little something more….and YEP – this die allows you to snip a little off if needed….a quick tuck and BAM!
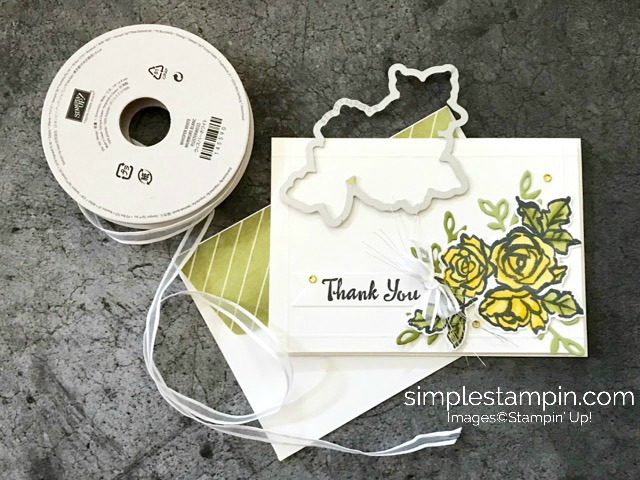
The size of this card is a good old Whisper White Notecard, so it is 3 1/2″ X 5″ . I was thrilled to be able to use this bundle with a smaller size of a card…..again, you are getting the best of both worlds! This would be a super card to make a bunch up and give it as a gift….we all know that handmade gifts from the heart are the ones that are super special!
Because this layout is so simple….I would go ahead and stamp up several of the sentiments on a 1/2″ white piece and then tuck them in with a bunch cards to give as a gift! I would put a piece of tear N Tape on the back of the sentiment strips so the recipient can simply pull off the release paper and adhere it to the card.
Trust me, this would be a gift that not only is so thoughtful and practical….but it would be one that she would remember……because YOU took the time to show you cared by making it!

We have another new product in this new catalog that totally deserves some “talk time”…and that is the 1/4″ White Organza Ribbon! WOW – this is beautiful and it makes the most “well behaved bows” – What the heck is a well behaved bow????
To me…..(because I am a bit bow challenged) it is when you can tie a simple bow just like you are tying your shoe and it works out to be perfect! YEP, this ribbon does just that…you can “fluff up” the loops and they will “behave and stay put” or you can press the loops flat and it looks perfect each and every time!
Because it is white…it works perfectly with just about any project, I am thrilled with this addition. Also remember, this ribbon you can run it across your ink pad and make your own “custom color” of ribbon. Jeanie does this all the time and the results are amazing….but then again, what doesn’t she do that doesn’t look amazing!

Can you also see that I tucked under the “behaved bow” some silver thread? This is a great added touch that take little time with a big return. Using a simple glue dot helps hold everything in place.
Did you forget about this DSP that I used for the back flap of the envelope? It is from the Delightful Daisy DSP collection. When I go to create I simply grab a swatch book and flip through to find a perfect, complementary color and feel of DSP to finish my project.
I am a HUGE believer of the swatch books as they are total time savers. My 1st wave of product shares are closed but if you want to get in the next one, please email me – you will love having a “bit” from all….without having to buy it all! I have the new Occasion Swatch Books available and trust me, once you have them….you will see what I mean about being a lifesaver.

We need to chat….a chat about the coloring and rhinestones. It is so ridiculously easy when you use the Blends…yep, that’s right…these alcohol based markers do all of the work for you without having lines. It is coloring 101 with great results each and every time.
I did not “blend” at all….all I did was put down the lighter of the color (daffodil delight and then old olive respectively) and then went over where there are the darker, pronounced areas are and used the darker shade – THAT IS IT!
For the rhinestones…you can make any color of a rhinestone by simply coloring them with a Blend….or you can also use a Sharpie Marker – it is fast, easy and no mess….leaving you with a perfect “bling” that creates that extra special something to a project!

There you go…a clean and oh so special notecard that is just beautiful! I am using this bundle this month for my monthly card kits ( I knew it the minute I saw it)….It is just a wonderful addition that is just timeless! Remember, if you purchase this bundle, you will qualify for a Sale-A-Bration item…..you see…that is why I say it is the “sweetest time of the year” – we get to pick FREEBIES!
If you are interested in my Card Kit, please email me…..I have a couple of spots open and the last day to sign up will be Thursday. I know you you will enjoy the offering and you will be a happy stamper when you can sit and create designs that I made! It is always my goal for you to feel confident about your stamping experience!
Enjoy the day and trust me, you will see me use this bundle a bunch as it is just a keeper! All of the 1st wave of my Product Shares are OUT THE DOOR today and now I am turning my time towards my Monthly Kits…… it feels great to have them completed and I know that you all will be thrilled to receive the newbies!
Until Hump Day…..go make someone smile!
by Susan Itell | Jul 28, 2017 | Blog Candy, Bundles |

Hip Hip Hooray….it’s Friday! I am feeling more like myself and I am hopeful that I have had my one and only cold this year! I am having so much fun with our week of Blog Candy fun…and today will be another keeper day as one lucky winner will win this fabulous stamp set, Lemon Zest!
Before we get to that and we have some business to take care of – let’s call it the stand up and stretch …..so how about it – stand up and give yourself a good stretch but if your name is Maureen you need to jump up and down and squeal like Daisy Mae would and then shake it – shake it….cause’ you won the A Little Wild Stamp Set from yesterday!
I ADORE the part that she said “I thought she was so talented……but I learned that SU is fun and easy” – Is that the BEST or what! So true…so true – there are soooo many tricks up our sleeves that make people say…..you really made that!!! Please email me and woot-woot to you!
p.s. – READ the comment to make sure you are the correct Maureen….this happened to me before that someone saw their name and was sooooo excited…but it ended up to be a different person as she did not read the comment….too darn funny!

I adore reading your comments and if you have not had the opportunity to do so….please consider this a huge treat to do so. Grab that extra cup of coffee and read the amazing comments that people have left as to when they started stamping. I think that you will see the general theme…once they caught the bug…it was nurtured, cherished…and still bloomin’!
The part that warms my heart is the common thread of “doing this” with a family member or friend most of you were introduced in that way….and then it happened, you were hooked.
Just think of the relationships you have made because of “this”…just think of the smile you have made because of “this”…just think of the “confidence and pride” you have given yourself because of “this”….
Guess what…“THIS” does make a difference!
O.k. – let’s get to todays card and I am SUPER excited to read your comments for todays question! I do not know about you but when a new catalog comes out….I do the usual flip through….take it in…..flip though again….take it in some more! I feel that I am a pretty good critic of picking out what I think is going to be a “keeper” in my eyes.

I like to call these items my Blue Ribbons or just “keepers” and this bundle….it’s a keeper! In my eyes there were several factors that made this bundle become an easy “keeper” for me.
- It’s a bundle…so right out of the gate it is a 10% savings and then I get an additional 25% off so here comes a woot-woot.
- The “bundle” part is a punch! (love it when SU has a new punch….fast!)
- The images are classics and the sentiments and fonts….another woot-woot! You can see a win-win all the way around!
I am sure that you have see a ca-zillion amazing projects made with this bundle but today I wanted to do something a bit different to add my own “twist” to the feel of the lemons!

What did I do to accomplish that???….“easy-peasy lemon squeezy”…after I stamped the images I crumbled them up and then opened then and smoothed them out to give our lemons some texture!
I have not done this in a while (actually I forgot about it) and when I was creating this I asked John what it needed….his answer – the lemons need some texture so PRESTO….I balled up a lemon and the rest is history!

Now how about that wee bit of Bakers Twine to add a POP….I have told you – BAKERS TWINE is the BEST…..such a quick and easy accent that is so affordable. I always like to do the “wrap” of the twine and adhere it to the back and then add the bow with a glue dot.
Once you get in a habit of using more that one strand of twine…you will never go back – it adds a bunch!
The envelope love…yep – another keeper…this is made from the Layered Leaves Embossing Folder. This one gives you such a “3D Dynamic Textured Impression” – definitely another “keeper” or “must have” in your craft stash! Thank you SU for continuing to come out with this amazing embossing folders!

Now for today’s question for you to comment on…
When you create and make a boo-boo…..do you let it roll…do you start over….do you repurpose it for another project…or do you just say – OOPS….it is Handmade – not Hallmark?
One lucky winner will win this stamp Set….
Lemon Zest….just leave a comment and GOOD LUCK!
Please leave me a comment and also let us know how you “make LEMONADE out of LEMONS” when you craft!…..and pop back tomorrow to see who won the stamp set!
There are 4 days and counting for you to take advantage of the Bonus Day offering…..for every $50.00 – you get a $5.00 coupon to spend in August….I feel like we are at Kohls as this is what they do and yep, I take advantage of it there as well! 😀

If your order of $75.00 or more….you will have a DOUPLE BONUS….a $5.00 off coupon from SU (you get $5.00 for each $50.00 increment) and then one from ME…..an opportunity to GO TO THE VAULT…..this is a private perk for you.
There are 100’s of stamp sets that have been retired and you can pick one free!!! Please use the hostess code of 4W9UWEG6 (current hostess codes are always on the right of my blog) Trust me, there are pricy stamp sets in there and if you want a bundle – no worries, I will gladly sell you the framelits that match your free stamp set at 50% off!
It is FILLED TO THE BRIM and all of the ones that were just discontinued (as of end of May) are in there…..I’ve been kinda worried about a couple of folks….they have been stuck in the vault for 2 days now….I hope you are not locked in! (your husband emailed me and he wants dinner!!!)
There is a bunch to take in as there are some amazing stamps, bundles and MORE…..

For our Weekend Post….we will be POPPING up with some DAISY’s...(and no, not my sweet swine Daisy Mae) but I have a East Coast/West Coast throw-down….stampin’ style going on…and YEP – more Blog Candy to end the week…my thanks for your amazing support to me!
Have a great day…..leave a comment and I will see you in the morning!


