by Susan Itell | Sep 19, 2018 | Blends, Fall Cards, Thinking of you |

HHD and boy do I have a super fun card for you today! I said that today I would be showing you how you can take scraps of Designer Series Paper and make an AMAZING CARD from truly MINIMAL product!
I know that many of you will “get it”...you know…the feeling inside when you create something and at the end of your “playtime with paper”….you are smiling a bit bigger and feeling pretty darn good? Well, that is how I felt at the end of making todays card!
It probably was at least 3 years ago I made a similar card using this layout but I could not find it when searching back through my posts. I am sure it was eons before I had switched over to Word Press…but I was just tickled that I found the video that inspired me with this great technique in using up those scraps!
I am not sure if you are familiar with Gina K Designs. Gina K has been around for years in both the card-making and scrapbooking industry and she is also the host of Stamp TV. Gina has, just like Stampin’ Up! the amazing ability to have super inks and papers that always match…and I find her videos very helpful when trying to learn a new technique.
If you click here, you will see the video that Gina did for todays inspiration. Now….let me condense it for you and share a tip that will make you squeal so loud….that Daisy would think she has competition!
I am working with the 2 stamp sets below….Country Lane and Rooted in Nature! Both of them are just wonderful and I love the fact that you can get so much more mileage from them as the fonts are just about the same…. working super between them. On Friday, I hope that you will pop back to see another inspiration that I have for you with these 2 stamp sets!


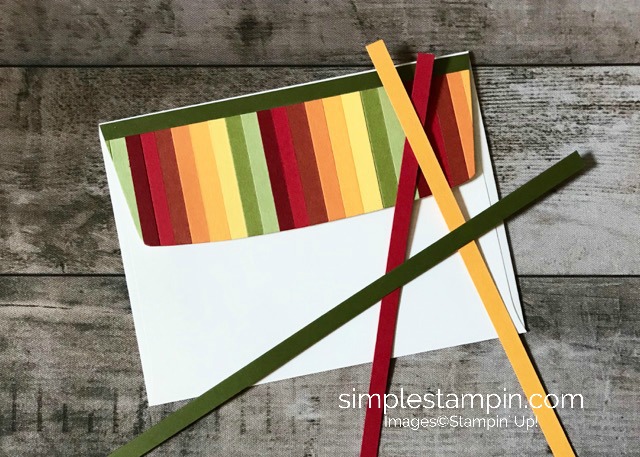
Just like I did last week…I am inspiring you to use up those scraps that I know WE ALL HAVE! This example uses 1/2″ strips of paper from the Country Lane DSP Collection. You can easily mix and match from all of your stash but this just seemed to come together – a peanut butter and jelly combo! (I love that when this happens)…
I love the fact that our DSP have a bold and POP side and usually one that is more fitting to a season…and then the flip side – usually a smaller and more subtle print that you can use all year long. Stampin’ Up! truly does their paper amazingly.

Let’s get to the tips for this super cute card. I think that you will agree with me…this card just as it is could be suitable for many themes…from birthday…to thinking of you….to Thanksgiving etc…. For today’s card, I did use the Stampin’ Blends for the simple coloring of this card. I have listed at the end of the post the colors that I used and I did not do anything fancy whatsoever. The blends just glide over the paper making it effortless to color.
I truly wish that Stampin’ Up! would have a CLICK OF A BUTTON that groups all of the collection that they have thus far for newbies to do that thing we love to do….HIT IT and just get them all! I think that the reason they do not have that as an option is that they are adding more colors….just like they did for the Holiday Catalog.
You can CLICK HERE to see the offering that we have thus far…..when first getting a new color, I would suggest that you get the combo….do not get hung up on the word light and dar….just think of them as 2 different colors as that is exactly what they are…I say get comfortable with them and then you can learn more….

I was planning on using one of the yellow patterns from that DSP collection but then when I saw that I could use (3) different papers with the same color scheme….(Blackberry Bliss)….I thought – PERFECT…..the back drip will have a monochromatic feel and then the images will even POP more….and you know what it WORKED!
I have a BUNCH of pictures for you today and please feel free to ask a question in the comments if you need clarity. It truly is SUPER EASY and FUN….there is no right or wrong way to place your papers….but I would recommend your 1st strip be in the upper right corner and then work from there. If you watch the video…you will see a great visual demo!

The one thing that I was super happy that I thought of was to cover the base with a piece of Multipurpose Sheet and then it would be EASY to place the strips of paper…..yep it was….but one thing that I did not think of….the adhesive would be sticky in between the strips!
I admit, I frowned as I thought that this was a PERFECT solution to using a glue or a snail tape runner etc….and before I started from scratch again….I thought …..
Take the EMBOSSING BUDDY and rub it over….and IT WORKED!!!!
In the below picture you will see how the beautiful backdrop came together and then you can see the other components that brought this together! I invite you to look at this…..break it down and then you can see that this is not only fun and a bit different….it is a very clean card with super fun lines!
One of my favorite new colors/neutrals in the Stampin’ Up! line is Gray Granite…it works wonderfully with so many different color combos…from the brights to the deeper tones. I matted each of the below elements with it and I think you will agree….it makes a difference.

If you already follow my blog than you already know….I truly believe in the basics! This little hobby that we do is wonderful…it is so special in so many ways and it also is a hobby that creates a WIN-WIN for both YOU (the person making the card) and then they recipient (the feeling they get when they see the time and love you put into it)
With that said….use the basics…buy the tools and products that will help you complete the projects that you like to make. I think it is fair to say….we all have a bunch of stamps and trust me, I am SOOOOOO guilty as well – I have many stamps that have never been inked up but the one thing I can say is… I do have are the basics….
When you see the below picture you can see some of them that I am talking about….the glue dots…the linen thread….the Blends…the multi-purpose adhesive sheets – you see, when they are assessable to you….things just go easier!

Can you see how “well behaved” the linen thread is? Yep, a trick that I have shared many times with you….I use bees-wax from the fabric store (it is pictured in the above photo) I buy that at JoAnn Fabric but you can get it just about any where! Again, another exable of having the right basics will back your final project shine!


Let’s get to one of my favorites…the envelope! I decided to attempt to do a similar pattern for the back flap. It was super easy and I was thrilled with the end result…what do you think? I am super excited to do one with fun and festive Christmas Colors….won’t that be fun!?!?
If you have questions about the adhesive release sheets…..PLEASE ASK…..please do not feel that there could possibly be a silly question. Trust me, I am the queen on asking silly questions….just ask my kids! Leave a comment and I will do my best to answer it but I am also sure that there will be many others that will chime in. I just love the community of you guys that follow my blog!


There you go….are you thinking that this might be too hard for you to do? If so…..I say NO WAY…..just try it – you will be SHOCKED with how little of DSP that you will use….so try it….you will like it!
If you do not have the adhesive sheets that I used…that’s ok – just use whatever adhesive that you have but I will say that using these makes it SOOOO easy…..and the dusting of the “powder bag” – PERFECT – all of the STICK GOES AWAY but the bright white is still there!
I will see you on Friday with more inspiration using these 2 great stamp sets…..just trying to be practical for you….have a great evening!!!

by Susan Itell | Sep 15, 2018 | Blog Candy, Bundles, Fall Cards |

Hi all and happy, HAPPY Friday..Saturday! (truth be told….my day ran away from me yesterday) Before I get to this FUN and oh so EASY card that I have for you…a big reach out to all that are being affected but the Hurricane. We all know, “mother nature” is nothing to mess with and my thoughts and prayers are with those being affected – be safe! Fortunately…it has been downgraded but there still is so much damage and rain still to come!
I have a FUN ONE for you today and I hope that this sweet card will bring a smile to your face and then also you can put your THINKING CAPS on and share a comment with your thoughts about the designs….perhaps some color combos that you would think would be fun…or some design layouts that would be fun with the 1/4″ strips of paper!
I am going to be offering some BLOG CANDY of a BUNCH of 1/4″ strips of Stampin’ Up! Cardstock! I have plenty to share and I know that there are going to be many of you that will be thinking….I could make this…..what a fun look! I love a simple technique like this and I hope that this post will inspire you to give it a try…it is also a SUPER way to use up scraps!
I told you I had a BUNCH already cut…can you guess WHY?

By now you know that obviously I love Stampin’ Up! but you also know that I love and use many other products for my crafting addiction that I have. I have learned so much from Stampin’ Up!, from Videos, going to classes…from YOU and just experimenting on my own but there are a “grouping of amazing You Tube followers” both SUD’s and others that just love to craft that I follow!
Keep reading and you will understand….promise!
I know that I bring this subject up quite often….the subject of CASEing….and why I am sharing this with you is that this morning Yesterday 🙂 I had a notification that one of my ALL TIME favorites uploaded a new video….well, let me tell you – when Laura Bassen shares a new video…I just about stop everything and watch!
I adore her..truly just about everything about her as she is not only super talented…she is SUPER FUNNY….and I feel like I know her and her family from following her channel. I have also leaned soooooooo much from her videos! I had something else planned for today but then I thought….this is a WIN-WIN….as I really wanted to showcase another project with the same Bundle I used on Wednesday!
I am trying to do more of that as trust me, I get it. There is practically no way we can (or really should) purchase everything when a new catalog comes out…..actually for several reasons….there would never be the time to use them all…and also, many probably do not fit your style!
If you are here at my Blog (thank you!) you know that I love clean and simple cards. I only purchase the Stampin’ Up! products that I know that I will love and use for my use so therefore….that’s what I share on my blog! I do like to share how a product can be used for many different projects so this CASE from Laura was a GRAND SLAM in my eyes!
There is NOTHING WRONG WHAT SO EVER in “caseing” and guess what, I do it as well. When I see something that perks me up and also gets me to utilize things that I have in a different way than I intended to do with it….I say, GO FOR IT! I hope that you will watch Laura’s video….she always does a great job and I just adore her style!
Let’s see this simple card and break it down…

I hope that you can see…how darn tootin’ simple this is and to me…so darn tootin’ effective! Paper and colors are all we need today to create this simple and festive card. You can make the focal area of color and width/size you need to get the concept to “set the stage” and I just build my “strips” from a base of cardstock.
The BEST TIP that I can give to you when you try this method of “stripping” (as Laura giggled about) is to USE THE MULTIPURPOSE ADHESIVE SHEETS! This product is a total sleeper with so many of you and I highly suggest you adding it to your next order.
Once you get use to it…you will say, why did I not use these earlier!!!
I have gobs of adhesives….just like you probably do and I will say that we tend to use different types of adhesives for different techniques. I do like and use an adhesive spray for delicate dies….but I find using these sheets to be easier over all with no odor or having to spray in a box……again, we try a bunch but in the end…we use what works for us!

In the pictures below you can see how I used this adhesive for this fun and festive card. I used it on the leaves….as I actually layered 5 on top of each other to have dimension. With this product…it makes it super easy to layer one over the other….with no sticky fingers!
For the card….(if you counted the strips) you can see that the center fun is 2″ wide…the real deal is…you can make it whatever your little heart desires! It also does not matter what color your “base” is….(a great time to use up colors that you do not use often) as in the end, it will all be covered up with the 1/4″ strips of cardstock!
This product DOES allow you to move it it you did not get it lined up “just right” but after you give it a good press….(I recommend using your bone folder) it is STUCK!!! This in itself is another reason that I love this product!


Below you will see a close up of the fabulous leave from the Falling for Leaves Bundle. It truly is a beauty and I encourage you to google and/or go to Pinterest to see other ideas that people have create with this bundle and especially with this classic leaf. I knew that I wanted to keep this card rather simple and flat but I also knew that I wanted to add a bit of “oomph” to the leave and it would be next to impossible to add dimensions behind.
By just cutting several of the leaves out WITH the Multipurpose Sheet on the Whisper White Cardstock before going through Mr. Big…it made the stacking process super easy…without stick! Using the design on the leaf…I simply threaded a piece of good old Linen Thread to make a simple and sweet bow!


Also, I stamped the sweet sentiment with Old Olive Ink and then sprinkle clear embossing powder over it to heat set it. This is not necessary to do but I think you can image how that extra special touch of taking the time to emboss would looks so classic and just amazing! We all know the inner magic and satisfaction we receive when we heat emboss!
Below you will see images of how I build on a base. The example to the left showcases the backdrop that I used to create the magic for the back flap of my envelope love and the one to the right shows the “release papers” from the leaf after being die cut. Again, the bone folder and also the piercing tool are fantastic to have around when working with the adhesive sheets.
Remember, it is temporary until you give it a good and firm pressing down and then you are good to go! The piecing tool makes it easy to start to get “hold of” the release paper…..heck, I would not want to hurt my nails! 😐


How about this envelope? I was super happy with the end result and trust me, at first I did something totally different. I will use the first envelope I created on a future post but after getting some advice from some dear and sweet friends….I decided to make something different!
In keeping with the 1/4″ strips…I thought – why not? The adhesive sheets are 6″ X 12″ so why not just go ahead and cover a piece of card stock…cut off the extra 1″ and go to town with my strips!
Many of you know from following my blog that when I create a card I usually go ahead and make a couple up at the same time. The way that I look at it is…I like it (or I wouldn’t have created it or blogged about it) so why not….I have the stamps and supplies out and for this envelope…this would allow me to make 5 envelopes from doing this!
Are you following me with my thoughts? I use a 1/4″ strip across the top (which is Mossy Meadow) and then the fun colorful part is roughly 2″ …so by covering the envelope….I can get 5 cuts of fun!!!
WHEW, it happened again, another long post but darn….it is hard to get it all across to you in words! (another reason that there needs to be a “Stampin’ City) for all of us to vacation to!
So…..How about some FUN Blog Candy?
Just leave a comment with your thoughts about the designs….perhaps some color combos that you would think would be fun…or some design layouts that would be fun with the 1/4″ strips of paper…or just to say HI 🙂 ….I don’t care – I just love to see the comments to get ideas and also to see how you can continue to TEACH ME….in ways to use something!
I am curious to see if anyone will leave a comment on how and why I have all of these strips of our cardstock! Put your simple thinking caps on!!! The colors that I used for the project are all listed below….in the product line up!
Let’s all have a great weekend and go and share some simple kindness!
by Susan Itell | Sep 23, 2017 | Fall Cards |

Good morning and happy weekend to everyone…Well, the calendar says that it’s fall but it sure still feels like summer on the East Coast! I don’t know about you but hands-down – fall is my favorite time of the year. When I simply hear the words “Fall” I automatically think of beautiful leaves, apples, cooler temperatures, and comfort food!
Do you remember back in the spring… Sarah had a paper pumpkin called it’s a Sarah thing! It was one hot paper pumpkin and I sure did stock up on the refills.It was so much fun because she used a technique with clear embossed images and then using watercolor crayons to blend colors together.
In today’s card I am doing something something similar but I’m using ink pads instead of the watered colored pencils today and I will show you how you can stamp the leaves from the Colorful Seasons Bundle to make the fun!

Below you can see the beautiful colors that truly remind you have a spectacular Fall scene. The colors that I used were Cajun Craze, Cherry Cobbler, and Crushed Curry. Today, I did use the watercolor paper as using watercolor paper is essential to have super blending.
Very Vanilla is my card base color as I like the softness of the the very vanilla with the fall leaves. when I see this card I smile as it truly reminds me of doing projects with my children when they were younger with coloring. Let’s get going!

I bet you’re looking at this picture and going YIKES – this looks like a MESS!!!! Hang tight as we all know there sometimes that you need to make a mess to make a beauty 🙂
All I did was stamp the leaf image on watercolor paper and heat set it with clear embossing powder. I do recommend using the embossing buddy to make sure you do not have any stray powder going where you do not want it!
Now for the fun… Grab yourself a little cup of water and a paint brush.
1 – Wet the entire area that has been heat embossed with clear water.
2 – Now, dab your paint brush into a little of the ink and simply tap it over the embossed image as shown below. This is where the magic happens as you will see the colors blend together.You will have to just play around with color combinations to get the look that you were going for.

The one color I absolutely adore but you have to be careful with that is the color of yellow.You need to “protect the yellow” as it has a tendency to get muddy and change color if you add too many other colors right next to it.
This is such a fun technique to play around with and just have fun with color. After I have colored my images I then cut them out with Mr. Big – super easy and fast.
Hopefully you can tell in the pictures that I have allowed some movement to the top of the leaves. I achieved this look by just simply using glue dots towards the bottom of each leaf to anchor them to my card. This way you can kind of pulled the ends of the leaves to make them look more natural and free-flowing.

By now you know I adore sentiments and simplicity. I could not resist using this sentiment which is from the Dragonfly Dreams stamp set. I invite you to make sure that you remember to blend stamp sets together to achieve a fun look when you are creating a card.
To me it is the sentiment that makes a card special and unique. I felt that the font typeset went well with the feeling of fall and “movement of leaves” cascading down!
If you or anything like me, we tend to use stamps that are super current like from our new catalog… (naturally that makes sense) but please do not forget we have so many good “old faithful’s” that have carried over and they need love as well!

Now I ask you,imagine if I did not use the embossing folder with this card. True… It would still look beautiful but the feel from the embossing folder gives it a rustic and natural look. This embossing folder is called the pinewood planks. They sure do add a lot of texture to a card with minimal effort and they’re so affordable.

Another tip I wanted to point out to you is look how your eye takes the whole card in from the top to the bottom. By creating different focal images throughout the card it allows your eye to naturally go up and down and take it all in.
Also, grouping images in clusters of odd numbers also help to make your eyes naturally take it all in! Are you wondering about the embellishments? These are called “dew drops” that I have in my embellishment stash that I think are fun to add a bit of bling.

Well….thoughts? I hope I’ve been able to explain to you that using a technique like this is not only fun… It is easy. I think sometimes it is great to be able to pull out an old technique and put it back into use.
I invite you to look at your stamp sets and images to see other Images that leaves and figure out a way to use it with this technique. Here’s an idea… What about taking a large heart and stamping either a geometrical image or possibly some for small flowers/hearts to it and then use this technique. Hmmmmm…..I think I have an idea for a future post!
Enjoy your day, and many thanks for popping in! I hope you have a fabulous day…
by Susan Itell | Sep 11, 2017 | Fall Cards, Uncategorized |

Hello and here is to a NEW week……Hen peckin’ pinkie here! Now I have a WOWZER for you today (and I hope that you feel the same) I am trying to focus a bit more on “techniques” to teach you and I hope that you are a sponge and soak this up!
I will be limited on words but I have some great pictures for you! Please feel free to leave a comment – I do hope that you try this as it if not only FUN but it is something that you can do with so many framelits…..
This bundle, Colorful Seasons is truly one for ALL seasons. I know that this has been blogged a bunch when it first came out…..so I waited until I had a WOW and I really like this fun and modern layout.
The layout is one that you can use with soooooo many colors and soooooo many different themes but here are (2) key products to make this a fun process.
1 – The Multipurpose Adhesive Sheets – why? – I adhere the card stock to it and then trimmed off the excess. This made it so easy to adhere it all to 1 piece. I first added the adhesive sheet to a piece of printer paper (that was 5 1/2″ X 4 1/4″) because it was super thin and I knew that I needed to cut through the cardstock, the printer paper and the adhesive sheet with the die cut.
2 – The Grid Paper – After I exposed the sticky side that was on the printer paper….I could use the grid paper to line up the card stock to ensure the lines would be straight….
You can see that I made (2) of these cards….and I tried to make the color scheme very different and unique….To me, it still is super clean but there is a fun and unique twist.

The other learning curve is the embossing. I love to heat emboss and I know that the WOW is always there with you as well, it is magic! The key is to heat emboss 2 times .I tried 3 and it was a mess…the details of this die cut were just too intricate. Trust me on this one. Below is a collage that I put together for you.
You will see that in the last picture they are warped…no worries – just put them in a book and they will get flat in no time. By doing many layers of embossing…the effect turns into a totally different look and feel of how we regularly emboss…making it an embellishment of metal fun!

I know that I am jumping ahead but can you see that I put vellum behind the leaves? Yep, I did. I truly wish that you could hold this in your hand as the vellum is stunning …I used tear -n-tape to adhere/anchor it to the color block card stock fun.
Adhering it this way it was not only easy (as we all know that the trick with vellum is the adhering part) so you do not see your adhesive. Having this wee bit of vellum really is stunning behind the leaves. It just gives a softness that does make a statement.
The fabulous sentiment, “just breathe” is also on vellum and heat set with the copper. I matted it with the vanilla (cause’ John said so) to make it show and pop! I carefully added some adhesive on the backside of some of the letters – again to hide the adhesive but the copper adhesive dots were the big help to hold the vellum.
For this card I used fun foam to raise the whole panel (the die will easily cut through the fun foam). Fun Foam is so inexpensive and you use every little piece to the end (just like stampin’ dimensionals)…I highly recommend you having a couple of sheets i your craft room…..you’ll be happy to have it on hand.


Let’s move to the other color combination. The colors I used are in the line up at the end of the post. You can clearly see the sky is the limit with color options…Have fun! ****(I noticed after I published this ,,,I have the wrong green listed – it should be Tranquil Tide…..NOT Emerald Envy)
In the second picture, you will see that I adhered this card panel to the card base making it flat. I couldn’t tell which one I liked better, do you have a preference…? They both work great but I think that I like the effect of the whole panel raised as it makes the vellum more noticeable!


Let’s chat about an envelope… I decided to do something total different and heat emboss the envelope. I was super happy with the end result and the envelope laid perfectly flat..to my surprise!
I was scratching my head as what to do for an envelope flap..so – why not, jazz up the front!

Now to another fun tip… As I am sure you have many embellishments that you simply do not use. As you can see in the picture below, I took VersaMark and applied to the embellishments and sprinkled the embossing powder over top and heat set them. Presto… a fun embellishment that works perfectly with this card.

There you go, a fun card that I hope that you can see….is doable and different. Please let me know what you think and which one is your favorite.
My thoughts and prayers are with all that are affected by the hurricane. Our Country sure has dealt with a bunch as it is so scary!
Enjoy the day and I hope this post has inspired you to take something that is very simple and add a fun twist to make a WOW! It was not only FUN but it was a great experience learning a different technique…
by Susan Itell | Sep 18, 2016 | Fall Cards, Step it up Sunday! |

Sunday….Sunday – a day for rejuvenation! Here is your “stepped up” card for the weekend! There are different elements that make me feel like it is “stepped up” but we all have measuring tools (as to what is more difficult or not) but I will walk you through! I have a bunch of picture for you 🙂 Please feel free to email me if you need help! (sometimes it is just hard to put into words when writing up the post)
Here is your picture for the week…side by side, you decide! I just love the season of “Fall” and I do not think you could go wrong with either one but I must say….I like today’s card because of the FUN burlap ribbon and the wee bit of pop of color with a Cajun Craze mat.

I just love little accents of ribbon, and today ~ this one did it for me!
All I did was to take a piece of the ribbon, make a simple knot and then “pulled it tight” to make a flat knot. I then took the piercing tool or you could easily use the paper snips and cut into the fibers of the ribbon and simply separated it. The ribbon “behaves” itself…as you can manipulate it to “just as you want it” (darn, I wish my hair would behave like this)

Below you will see a collage picture of the “how to’s” of the making of the sentiment and also the ribbon but let me try to shed some light for you as I was tickled with the end result.

Post It Tape was my friend today. If you do not have a roll of this, you need it! I find it easy to just purchase it from Amazon as I find myself running around to find it and it is usually out when I go to Staples or Target etc….(that’s why I LOVE being an Amazon Prime) – poof….a hit of the button and the brown truck comes!
After I stamped the sentiment, a simple mask to hide the entire sentiment and poof – it works! Simply peel off the post it and you have a clean area! I used the small stamp of a leaf from the Paisley & Petals ~ this works perfectly to “fill” areas!
p.s. – here is a tip ~ because then width of the stamped piece is 4″ X 5 1/4″ and the tape was 1″ wide….finding the center was super easy – I drew a faint pencil line at 1 3/4″ on the top and the bottom, looked through the stamp (love it as it is a photopolymer) and stamped it in Delightful Dijon ~ then added the 1″ X 3″ piece of post it tape so I could go to town randomly stamping my leaves!

I know from the comments yesterday that some were bummed that they did not take advantage of purchasing this great leave combo (the below stamp set and the matching framelits) when they were a bundle last year….but I still think that it is well worth purchasing both of these as they are simple a classic and the details are just unreal!

Here is a good angle of the leaves…they are super fun to do! I had many emails yesterday about how I did them….please click here to see the post that I shared the FUN way…..it is actually a great thing that you could do with children as well – let them ball up the paper…smooth it out…..ball it up again and then when it is super soft – STAMP IT with the leave image and run it through the Big Shot to make this beautiful and fun Fall Leaf! (and I hope you smile) 🙂
I used the same tone on tone for the inking but here is another thing that is stunning (hmmmm…..I should do another post with it) – stamp the leaves with clear embossing powder and then heat set it – GORGEOUS!!!!

The same envelope treatment as yesterday – I look at it this way….if it works…keep doing it! This is the easiest and best way to make an envelope shine! The strip of paper is just 1/4″ and then the DSP is 2″ and then cut the excess away!
Here is my motto – A beautiful envelope sets the tone for a beautiful card….a beautiful card with your handwriting inside makes someone feel beautiful so why not? Make yourself feel great by being the creator and touch someone as well ~ works for me! 🙂

One more look at this beauty of Fall. I normally always POP up the layer with dimension but today, I did not think it needed it! The burlap ribbon makes such a statement – we are good to go! For those of you that like measurements, the Cajun Craze is a wee bit bigger than the stamped piece, 4 1/8″ X 5 3/8″ ~ paper makes SUCH A DIFFERENCE!

Here you go with your “marked up” 411 ~ Directory Assistance picture! Pin it away for the future 🙂 I do think that this is one handsome card showcasing the beauty of fall! Once the leaves change in our area, I will take pictures of some of my favorite trees for those of you that live where there are no trees with color change!

As my late Mom always said, word of mouth is your best form of advertisement….so with that said, please share my blog and stampin’ fun with your family and friends! I do blog everyday (unless there is a “life hiccup”) so please subscribe to my blog so you do not miss a dose of Simple Stampin’ fun!
I also offer a great “loyalty/rewards program” so you can earn FREE STAMPS! (now who does not like to earn free goodies) You can find the info at the top of my blog under Paw Print Rewards, but you can click here and also click here!
Remember, this month~ one lucky person will win the WHOLE CONTAINER OF MARKERS!!!! This in itself is a $110 value so one of you will be doing the HAPPY DANCE – my way of thanking you for such a great Stampin’ Up! year!
Enjoy the day and I hope to see you tomorrow…..it is another (and the LAST CHANCE) for you to take advantage of a Paper Share from the new Holiday Catalog!

by Susan Itell | Sep 17, 2016 | Fall Cards, Simple Saturday |

Woot-woot…the weekend is here and that means that it is time for our 2 day post! Today is Simple Saturday and then POP back tomorrow to see Step It Up Sunday and the changes I make to this card!
I know that the first day of Autumn is right around the corner but for today – it is IN THE HOUSE today on my blog! I ADORE this time of the year and each year I play an “eye spy” on certain trees in the area that are always sooooo beautiful when the color changes – we are a way from that time but I like to get excited for the color!

This stamp set is in the annual catalog and it is simply beautiful! Just look at the detail on the images….simply FALL AT IT’S BEST! I was thrilled that it was carried over and I hope it is around for many, many more years! There are matching framelits….which makes if a breeze to stamp and cut!
Do you remember last weekend I shared with you how I soften the fibers in the paper? Well today I did the same ~ I balled up the paper…..worked it with the bone folder…..balled it up again and then smoothed it out, a quick stamp, a run through Mr. Big Shot – we are good to go! Just look are the soft texture – LOVE IT!

I know that I have not blogged a bunch with this stamp set below…but hang tight, my creative engine is just getting started! This might appear to be a Fall set but I see it as a super versatile one….HAVE FUN WITH COLOR and you can change the whole feel of the card!
The sentiment I used here is the TOPS, it seems to be perfect for Fall/Thanksgiving but I would encourage you to think out of the box and use it ALL YEAR LONG!
Now I say…WOW, I know that I would be beaming to receive this! The colors, the texture, the gorgeous envelope…say no more! One thing that I want to make sure I point out is…The card is on Sahara Sand Card Stock – that’s right…a bit different but the end result comes out to a super fall card! I invite you to play with other colors for your bases!


I hope to see you front and center tomorrow to see what is up my sleeve with Step it Up Sunday! I know that a sale on the clearance rack brings out the best in us…..things are being depleted so make sure that you get on in the savings!
Have a SUPER Saturday and see you in the morning!