It is “Step it up Sunday” and I made just a couple of little changes but I think that it makes a difference. I honestly cannot decide which one I like better…to me; they both are great clean and simple cards!
Every week I ask John….”Tell me, which one is Simple Saturday and which one is Step it up Sunday”…he usually gets that right and then comes the next question….”Which one do you like better?”….that is the time that he usually pleads the 5th as he always says I am setting him up!
He is my biggest fan of my Stampin’ Up! fun….and he thinks it is fun that I do these weekend posts! This week…right off the bat he said that he liked today’s because he liked the pearls!
Here are the differences from yesterdays card:
I made the Navy a bit smaller ~ and added the gold behind the navy part…the great thing about this is that you can cut the “merry” out as it is covered up!
I added pearls on the ornament and them 2 little ones by the sentiment
I changed the liner in the envelope as I was think that many of you might have said that if you bought the vellum stack and wanted to make a bunch of these cards that it would not be affordable as you only get 3 sheets of each papers!
This vellum stack does have (12) of each papers (6) gold / (6) black but today I used the vellum that is in the annual catalog…did you remember that we had this? It comes in the strips like I am showing today as well as the fun Polka Dots!
Another option that you could do is change up the gold with silver as this vellum paper is also in silver! A great and classic combination with the silver would be with Elegant Eggplant ~ wowzers….that would be beautiful.
This card is in the running for my Holiday Card this year…..I can remember a couple of months ago I did a card that I really liked and said that was in the running…I just need to write these important things down!!!!
In a nutshell – this card would be a super easy card to mass produce…. remember to break down mass producing into steps…this way you will “enjoy the journey a bit more”and have fun! Remember….this is all about having fun….no stressing allowed!
Eddie update…my little buddy turned his nose up to breakfast but held out for some chicken last night….my theory is, whatever Eddie wants….Eddie gets! (James bought him a new toy yesterday so he is super happy) He still cannot understand why he can’t go out and play ball…I have just been doing a catch and toss in the house and he is happy with that!
I do plan to do many more cards and projects with this fabulous bundle. It is just beautiful and the attention to detail with the ornaments is over the top! I did play with the new precision plate and I really like it!
I think that thing that I like best is that it gives a clean cut….not nearly the amount of "stray pieces“ that seemed to cling on to the image that you cut (hope that makes sense) and also….sooooooo much easier to pop out (like this sentiment today)….a keeper!
Thanks for popping by today and remember to use the Hostess Code of YHNMUJNJ when you place an order and with a $50.00 order, I will send you the super cute holiday box and with a $75.00 + order, you will receive the box as well as the NEW must have Embossing Folder ~ Woodland Textured …..
I hope that you are having a great holiday weekend….be safe , have fun, make memories and I hope to see you back here tomorrow! As always, you can email me ….and I do hope that you can “get inky”!
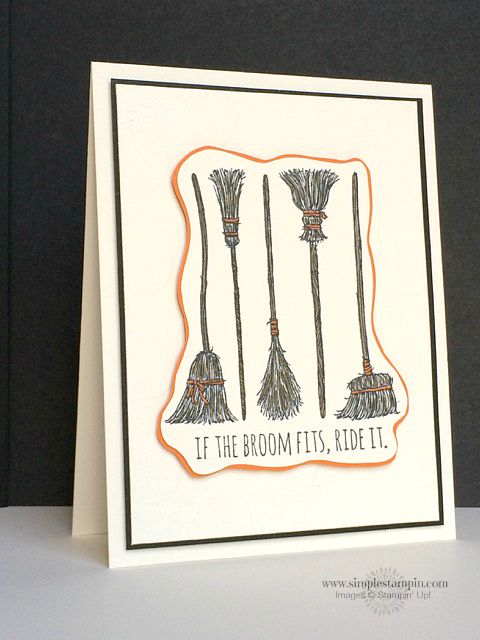
This is such a fun stamp…how can you not smile with this great stamp…but the sentiment – THE BEST! Think about how affordable the card is…there is really nothing to it and the Woot-Woot's you will receive will definitely make you a Happy Stamper!
There are 3 main changes….simple ones but ones that do make a difference and when you hold them side by side in your hands….it really is a toss up. I asked John and James….and they both liked todays card because of the Polka Dots Embossing Folder. (CHANGE #1)
The other change is that I added a peak of black paper behind and you can see in the below photo that I took full advantage of the new "Boo!" framelit that will be available on Tuesday! You betcha that I will but these to good use….the font is ADORABLE! (CHANGE #2)
Here below, you can see the polka dot folder! This is my absolute favorite folder as I call it the "HappyFolder" because it goes with soooo many different themes and it is classic!
The other thing I changed/added was I took the Soft Suede Marker and using the brush tip end ~ I did some swift and a light touched motions down across the broom and then also colored the handle in! (Nancy, youwere sooooo smart – great comment yesterday) (CHANGE #3)
It is hard to see but that is the look that you want…if it is too heavy and dark – you will loose the effect! I also used the Tangelo Twist to color in the bows on the brooms. Remember, less is best!
The envelope is the same fun as yesterday – no need to change it up when it is sooo darn cute with this Super fun polka dot paper from the Happy Hauntings Paper – adorable!
Well there you go! Another fun 2 day challenge but remember even though the changes are not drastic, I hope that I am showing you that you can add…take away….do a different technique…..to make a clean and simple card a bit different but still be clean and simple!
I do hope that you try this fun cut around a stamp ~ it is super easy and it can't be any easier – just keep those scissors moving and do not over think it – works like a charm each and every time!
I can tell that many of you are getting excited for the new catalog….it really is a fun and special one…I am super thrilled that Stampin' Up! continues to offer more and more bundles….as with the bundles you will save an instant 15%!
I hope that this stamp is on your wish list – fun, fresh, great font and the price is right!
Please remember that I am offering a product share for the new product and it is not too late for you to take advantage of the fun. Please click here to see the offerings as I will be ordering 1st thing Tuesday….(probably like many of you!!!!)…video below….enjoy! Please put in the subject line PRODUCT SHARE….thanks!
Good Morning…..hopefully we can have a cup of coffee together while we look at the Stepped Up version of yesterdays card. I am so glad that you all enjoy these 2 day posts that I do on Saturday and Sunday’s. Please click here to see yesterday’s post.
I know that it is super obvious that I added the flowers…those darn itty bitty accent punches get “worked out” sooooo much – just love how that little touch adds a pop of fun.
(click on the image to make it much larger)
Here is the main difference of the card today and it is super easy.
The base of the card is a 4 ½” square of Bermuda Bay
The white card is a 4 ¼” card and then I added another layer (that is what we stamp on) …this is a 4” square.
Now before you say what I know many of you are saying…this just uses so much paper!?!? Yep, it does BUT when you hold it in your hand…the layers of paper make it go to a quick WOW!
I adore paper and truly paper is not the expensive part to this fun that we have (some make call it an addiction….and if so than this is the best addiction one could ever have)
Think about it…you are using 1 sheet of White Paper (22 cents for a sheet and if you are using the Thick White Card Stock 29 cents per sheet…and the Bermuda Bay is 7 cents!
I am now using the Thick Card Stock for all of the bases of my cards, you can use the lightweight for the stampin’ part as the whites match perfectly! To me it makes a HUGE difference and I sure hope that Stampin’ Up! comes out with this weight of paper in the Very Vanilla.
The card is the exact same size as yesterday’s card and the envelope punch board was my friend again…amazing that this is just $15.00 today and you can see that having a pool party envelope makes it special even before you open the envelope to see the card!
I just love my envelopes! To me they are well worth the effort. It’s like I always have a better day when my bed is nice and made and the pillows are JUST RIGHT….(We have a ton of decorative pillows on our bed and John always says…are these really necessary….YEP!
Now lets talk about how I lined the envelope on the inside with the fun print….easy and it is 3 words…ENVELOPE PUNCH BOARD!
I will do my best to walk you through it and one day I am going to do a video all about envelopes!!!! I learned this from my wonderful Upline Mary Fish….she is simply the best and she has a love of envelopes as well!
After you have made your envelope with the Envelope Punch Board (for a 4 ½” card) follow the below steps…hang on – it is really easy!
Take a ruler and measure from the pointy part of the envelope flap to the edge of the flap where it folds over.
Subtract ¼” from that measurement and cut a square. (Isn’t it AMAZING how little paper you will use)
Take this square to the Envelope Punch Board and move it to the right 1/8” smaller than your square.
Push the “speech bubble”…pull it away and FLIP if over to the other side and place it right back and PUSH….
YOU ARE DONE…adhere to the inside of your envelope and SMILE!
Wasn’t that super easy. Please feel free to email me if you have and questions but it really is easy!
You can clearly see that you cannot go wrong with either card. Both of these stamp sets are super ones and it is fun to look at what you have to work with and see how you can incorporate different stamps together to get a great end result!
Enjoy your day and I cannot wait to share with you tomorrow another way to use the Envelope Punch Board! Until tomorrow!
Well…well – I am so glad that you liked yesterdays card and I hope that this one will make you smile as well! Happy Sunday to all…here is “Mr. Elephant" stepped up a bit. Not drastic changes but changes that I think him look a bit spiffier! The changes are stars…stars and his ear!
Let’s get to the changes and then you can see if you think that it is worth the extra effort. I think it is and really the only one that was a bit of a “pain in the drain” was the little stars. (you can click on the collage to make it super big)
I was hoping to use the star from the itty bitty accents pack but the scale of it was too large so PLAN B = the confetti stars border punch came in handy!
The card was created just the same as yesterdays post but I used the star from the Tin of Stamps Set with Versamark to randomly stamp around. I love the effect as I think that it is subtle enough but it also does the trick to add some pizzazz.
Let’s get to the ear….don’t you just love Elephants BIG ears!?!? I just stamped it 3 more times (just the ear area) on scraps and fussy cut them out. For 1 of them, make sure that you leave a little edge that you can fold over and adhere with green glue – (the pictures will help you)
I know that this might be a bit overkill but what the heck – it really does not take too much extra time and I think the end result is super cute.
For the stars….those darn, tiny stars. It really is not bad and this is what I did…I put a small amount of green glue on the edge of the “elephant area” and let it dry a bit so when I used tweezers to place the little stars on there would be no oozing from the glue.
Yesterday I did not show you the back of this card but how do you like the little pocket I added to the back? It is perfect to tuck a note in and then the recipient can just stand their card up! The sweet sentiment is from the Happy Happenings Stamp Set but I am sure that you have many sentiments that would be appropriate!
Well…there you go – I hope that you liked this card and I hope that I have inspired you to give it a try. It really is a fun twist and you will get rave reviews!
Other ideas that work great with this card is to add Bakers Twine and the sentiment hanging down across the top of the card . I would use a simple glue dot to hold it in place.
I did have a couple of emails yesterday asking if it will still stand up after it goes through the mail? YES….because you have used your bone folder well…the card will pop right back into place. (I have had one on my office since February and it is still standing strong!!!
Thanks for your time today and please feel free to email me if you have any questions. You will see the products that I used in the scrolling store below or you can hit that SHOP NOW button and go to town in your jammies!
I loved yesterday's card and I love today's card…you can't go wrong with either one – it all comes down to time (darn that word – time is the one thing that always seems to get the best of us)!
Here you go with the cards side by side so you can see the difference. It is not a huge difference but when you see it in person you say – "WOW…..that is so darn cute"!
When I showed John the cards and I always ask him which one is for Saturday and which one is for Sunday? (smart husband, he does get that right )…I told him that this is a football card. He looked at me with the funniest face…I said, I can cut out a bunch of soup bowls while we watch a game….( I love to multi-task)
Please click on the below collage image to make it larger….
It really is not hard, it is just one more (or I should say – 2 more steps)….the dsp for the "soup bowl" and then the little vanilla piece that you snip out and then use "green glue" to adhere it on top!
From 1 sheet of DSP you can easily have "4 bowls" of soup – I hope your hungry! I just love these paper stacks as they are 6" X 6"….and because you get (4) sheets of each print, you can line the envelopes as well!
This paper stack is FILLED TO THE BRIMwith fun prints, Stampin' Up! really out did themselves on this one and guess what, it is on the weekly deals – a total win-win! Remember that tomorrow night will be the last time for you to take advantage of the current weekly deals!
The "shine and fun" of heat embossing gives you an instant WOW – you never, ever get tired of doing this method and it is always so rewarding. Remember. keep the heat tool moving so you do not scorch your paper!
The reason I did not emboss the heart is that I wanted to POP up a heart and the itty bitty heart punch did not cover the one on this stamp so I did the next best thing – eliminated it and it works out great!
Well….thoughts my friends? Do you have a favorite? This would be a great way for you to use up printed DSP that you are not using….discontinued etc…..I think it lends itself to a wide variety of options!
It is funny…I used exactly the same products today that I did yesterday! It just goes to show you how making some alterations can make a difference. Again,you cannot go wrong either way! You can see the products I used int he "scrolling store" below….shopping in your jammies is FUN!
Many thanks for your kind words of our dear friends passing. It is just about 11 years since we have bought our farm and I always said that I think when we bought our property, it came with "Art". Art had horses here at our house with the previous owners.
When we bought our house Art simply became a member of our family. His wife had just passed away and we adopted him and he adopted us. He spend holidays with us, he went to each and every game that the kids played, taught the kids how to parallel park and Art went with Hannah and I from Florida to Vermont and in between with the horses.
Here is a picture of Hannah and Art, just about a year ago right when he found out he had cancer. Art adored Hannah and they had shared so many times together….she is a great young lady and is doing very well as it hurt her to see him "not himself". He used to love to pick her up from school…with snacks ready… and go to the barn together for a lesson…he was so special to our family.
Yesterday we just stayed at the house and had fun…something that Art would have wanted to see and be a part of….Eddie jumped in the pool to get his ball….Hannah worked down in the barn, John and James fixed fences and did odds and ends and I was a good girl!
Art was always the "foreman" telling each of us how we should be doing this and that….we were so used to it as he was a true "old timer" with old fashion remedies and advice!
We have wild red raspberries and I would always ask Art to come with me to pick berries as I am scared to death of "critters"….he would take a 4 wheeler and again, be the "foreman" telling me to reach deeper…..now go to the right…..to end up having poison ivy from head to toe (me only as he sat and told me where to pick)….but we always laughed!
We had one of Art's favorite dinners, hard shelled crabs, mussels, fresh corn and tomatoes and we talked and talked about happy and wonderful memories. He was a special person to us and we were blessed to have him in our lives.
Please make some memories today, we all have so much to be thankful for….tomorrow I have a super quick and fun 3D that will make you smile!
Here you go…..today is the day that I will show you a stepped up version of yesterday card. I must admit sometimes I do feel that it is not a huge difference and I hope that I do not disappoint you all…I am very simple and basic but I do think that there are many ways that you can make some changes to make it look different!
Remember to think of your cards as "formulas"…if you see a card style that "speaks to you" stop and look at it, break it down to see if it is something do-able for you to make and then if you can see yourself making it now and in the future with different stamp sets than I suggest that you get a binder, take notes and sketch it!
When you look at the cards this weekend they basically have the same elements:
Card stock
Stamp Set and ink
Speed Tools – (2) circle punches
Bakers Twine
Now is the fun part to see that they really are similar and I think you would be happy with either one….they just use (2) different techniques and I can honestly say, they both are very basic and easy cards to make.
The sentiment and mat was adhered to the top of the stamped part of the card.
I did not double stamp the flower image and stamped the dots
I added the loops (see below scoop) in the bakers twine behind the popped up piece.
FOR TODAY'S CARD:
I used the 1 3/4" circle punch to punch out a hole in the stamped piece
I used both the 1 3/4" & 2" punch to create a bermuda bay ring to go around the opening.
I stamped the sentiment and popped it out and then adhered it flat to the bermuda bay piece.
I made a simple bow and used glue dots to adhere
I "double" stamped…the outline was like yesterday, in Pool Party but today a used Soft Sky and stamped it off once before stamping. The centers of the flowers ate "full strength" Bermuda Bay.
I am all about clean and crisp lines, using lots of paper (but remember….SAVE THE INSIDES of your paper ifit is going to be all covered up…..you can take punches, framelits etc….WHY NOT)?
This effect - seeing the ring of paper and then the sentiment below…it just adds a special touch and it is so easy. The best tip I can give you is to make sure that your circle punch is pushed all the way up and centered to the side….this way you will have a straight circle.
I am also all about speed tools….to me that includes out punches and framelits…I love both but a punch is so fast and easy. You can clearly see how they made this card come together in a snap!
Below is the outside of todays envelope….I just adore making the mailman smile and the way I look at it is – Your stamps are already "inky" so why not?
Below is a quick collage of tips and trick that might be useful for you! (click on it to make it larger) Please feel free to email me if you need further explanation or help!
This truly is a wonderful stamp set and I look forward to making many beautiful projects with it! Being that this is a photopolymer set…it does make it easier to see but the "key"about the way that the stamp set was designed was to be very "watercoloring look" – so that means that…if you are "off" a bit – it is just fine!
I already have an idea for a future card…hmmmm – vellum??? This would be gorgeous. Enjoy your Sunday, I am going to be having a "date"with my computer…and my patient son – hopefully he can help me work through some "Susan issues"!


")


")


")


")


