by Susan Itell | Sep 23, 2018 | Blends, Embossing Folders, Thank You |

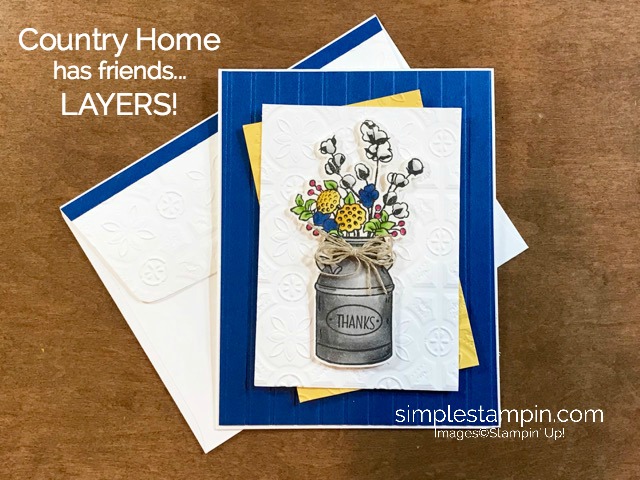
Good Morning and as promised I have another card for you featuring the Country Lane Photopolymer Stamp set….if you missed my other post with this, please click here for that inspiration. Today I have for you an example of just how adding layers of textures to make a fun, simple and classic card…. is easy to do with little effort!

I think when we go to our work space areas to create we get in the habit of using the same tools over and over and please do not get me wrong…that is truly OK and I am SOOOOOOO guilty of that but there are also many other tools that we have that can be used with our “old faithfuls” to make elements of our design….just that extra special something that will take your project up a level!
The textures that I am talking about are Embossing Folders!
My Embossing Folders are all snug in a container one a shelf in my work area. Because they are up on a shelf, I honestly just forget about them…therefore, they get skipped over many times. Embossing Folders (page 222 – 223) in the Annual Catalog and also several new offerings in the Holiday Catalog are the yummy Buttercream Icing on the cake!

WHY? – EASY…..with a simple pass through the Big Shot and just a piece of paper….out will come an amazing texture of goodness that will make a project go UP a notch instantly! For todays card, I am actually showing you (2) different embossing folders. The Simple Stripes and the Tin Tiled Textured Embossing Folder (this is a newbie in the Holiday Catalog). I know that many times we just use one Embossing Folder…but I ask you, have you ever tried 2 on a project?

I have some quick tips and tricks for you when using Embossing Folders and then I promise, we will get more into the card! You all know that it is always my goal to be able to share tips that I have found useful as heck – we are all in this crafting thing together and with that said – I say…HECK YES….the more tips always helps!
- When you use embossing folders…remember there are 2 sides (just like in life…there are 2 sides to every story) and sometimes you might like one better than the other……just like I did today…on the blueberry stripe one….I flipped over so the embossing strips are facing downwards.
- When you use a 3D Dynamic Embossing Folder like I used today for the Tin Textured (in white and daffodil delight)…you only need to use 1 plate in your “sandwich configuration” when you pass it through the embossing folder.
- I like to “mist the paper” with water when using many of the embossing folders….I suggest that you just have a mister bottle handy in your work area and play around with it. I always say that you need to play with products to get to know how they will work for you before you dive into a project….this way – you will always know the results before you get frustrated!!!
- Here is a tip and one that I know take time but trust me…it is well worth the effort. I would take cardstock (perhaps a color that you do not use a bunch) and make a sample of all of your embossing folders…hole punch it, label them and put it on a ring. I have done that and it is a great visual of what the folder will actually look like. To me, it is the same as I feel about seeing the Cardstock Swatches that I make…to have them in your hand is sooooo different than seeing pictures of what the embossing folders look like in the catalog!
- Stampin’ Up! has started to put lines on the bottom of some of the folders to give you a visual line to make sure that your paper is straight….this is a huge help for the images that if they come out crooked….YIKES.…we get grumpy!!!
- Run your embossing folders through the Big Shot with the crease of the folder in……not the open end….and lastly, the Stampin’ Up! logo should be facing up as it goes through the Big Shot.
Whew….thanks for hanging in there but I do hope that you found these tips helpful and if you have more tips and tricks that you have found to be helpful….please share in the comments as this IS HOW WE LEARN! I am a HUGE believer of sharing tips to make a process easier and I feel so blessed to have such an amazing community of Blog readers that always graciously share their tips and tricks!
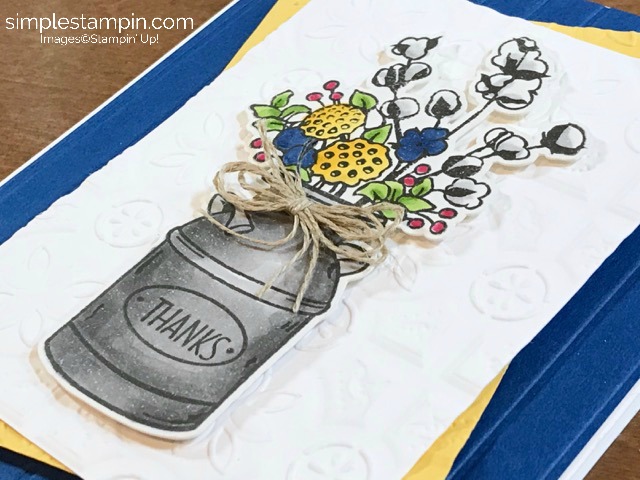
I just think that there is something super fun about this stamp set. I adore the fact that it is a Photopolymer Stamp as I find it so easy to look through….line up and stamp away! I did use the Stamparatus for this as I stamped many images at one time….I like a stamp positioner for doing this but I also like the fact that I can stamp it several times to get a good, deep and rich black image!

You will see that I cut it out…and I know…I know….it is a BUMMER that Stampin’ Up! did not make matching framelits for this keeper of a stamp set. You can easily fussy cut it out but I used my Scan -n – Cut to do the job for me today! Here is a tip when you fussy cut….thrown perfection OUT THE DOOR and just do it – trust me….no one will ever look at it and say – that is a terrible job!
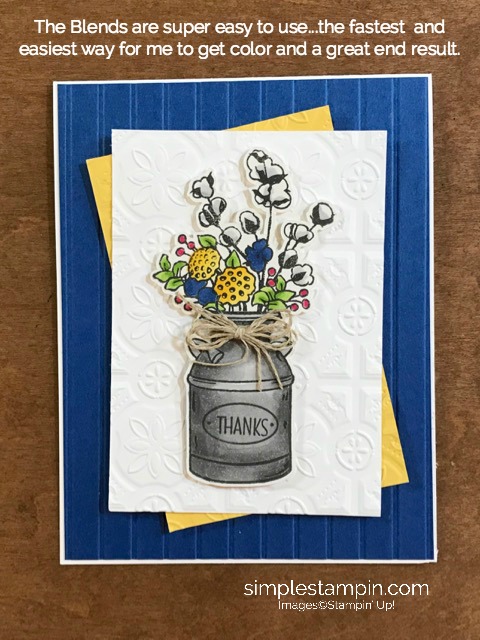
I used the Blends to color the image in and trust me again, they are the easiest and fastest way to color an image in. Being that they are alcohol markers…there are NO STREAKS in the end result! Please do NOT let the word BLEND get you flustered…they truly are the best. I also like to use the regular weight of Whisper White Card Stock when I use the blends….I just think that they absorb in the paper perfectly!
Today I tried something different and it worked PERFECTLY!!! Jeanie has always told me how much she loves and enjoys water-coloring on the Shimmery White Cardstock so today I thought I would give it a try and…..IT WORKS PERFECTLY! Always remember that you need to be sure that you that you use an ink that works with Alcohol Markers….the Memento does!
The Blends just glided on…just as it does what I used the regular weight Whisper White Cardstock….this is another product that you should have a pack of in your stash….it is a very subtle shimmer!!!

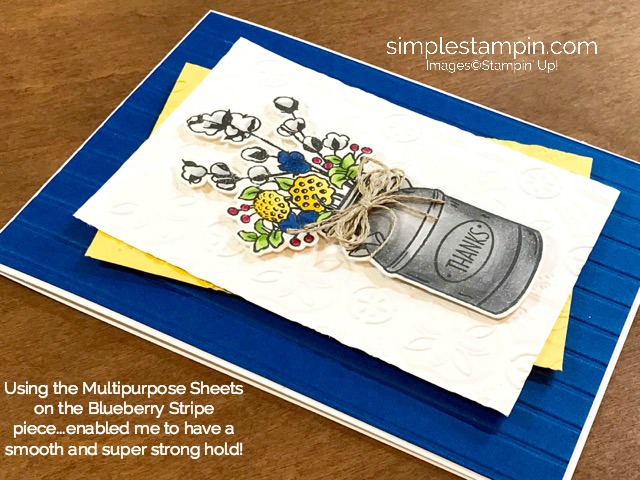
Below you can see that I commented in the picture that I used the Multipurpose Adhesive Sheets to layer the Striped piece down. YEP, I did as it lays perfectly flat leaving a very solid and professional feel to the card. Again, little tips for you! I adore this adhesive and a pack goes a LONG WAY…..to me, it is like that “little black dress” – you need to have a pack of this adhesive on your stash!

Below you will see the image of another tip….it truly is funny how the end result looks so different on different cardstocks! I know that I will easily use these for another project in the future….just wanted to share with you how I roll when I design!

A close up and sorry, not the best quality of a photo below but I think you get the message. Just look at this love!!! Envelope love is the best way to end a project that you made with your own hands!!! Once you start doing your envelopes…..you will never send a card out with some sort of envelope love! It is also a great way to use up scraps!

Well….there you go…..another bit of inspiration from me! I hope that you enjoy the remainder of the weekend and I hope that you can turn the football games on today and craft away! That is what I am planning to do…..I am trying to get a JUMP START on Halloween Treats that I love to send to family and friends!
I will be traveling a bunch over the next month so I am trying to get my DUCKS IN A ROW (as the saying goes) and I will be sure to share with you some fun and easy ideas of what I will be making…..I am not a huge Halloween person but I sure do love to send fun, festive, and yummy treats of love made with my hands!
I sure do love this fun things that we do…..handmade love is just the BEST!

by Susan Itell | Aug 15, 2018 | Thank You |

HHD (Happy Hump Day) to all! On Monday I shared with you a super fun card using the Tropical Escape Bundle from the Annual Catalog (page 121) and today I have another clean and classic one to make you take a deep breath and sigh with a smile!
I admit, when I first saw this bundle in the catalog I thought – hmmm…..I do not know and I actually waited a wee bit before hitting that button and having it come to Randall Lane! What was the turning point for me to hit that button???….
The samples in the catalog and the gorgeous font
Yep, that’s the truth and I just was itchin’ to try try the card that I CASED today! On Monday I used bolder colors and it looked great and today I switched it up using softer tones and yep, I think it looks great again…what do you think? I did use the Tropical Textures DSP Stack for today (as I adore these colors and designs) but keep reading as I have other thoughts for you regarding colors.

I also want you to think about this…in all reality we can make a card ANY color we want as many time….our cards are from a “total imaginary card land”…and wouldn’t this be yummy with Navy, Sahara Sand and White – this would also be a SUPER way to use up DSP that is a pretty busy print and then take the colors from the DSP to tone it down…I just that what I am trying to say is, there are so many options…just do not limit yourself to certain colors!
Here is another great idea….with the BONUS DAYS being this month, You could grab this bundle and this DSP Stack – (that would = $55.00 and then you will get a $5.00 off for next month). As always, all of the products I am using today will be at the end of this blog post in the line up!

One thing that I have shared many time is…I forget to use Embossing Folders on a regular basis and that is SIMPLY SILLY as these gems have a BIG CREATE WOW FACTOR with minimal effort and the price point it BINGO…..heck – you could get this bundle and this embossing folder (that would = $54.00 and you would see be at that “sweet spot” to get the $5.00 off for next month)
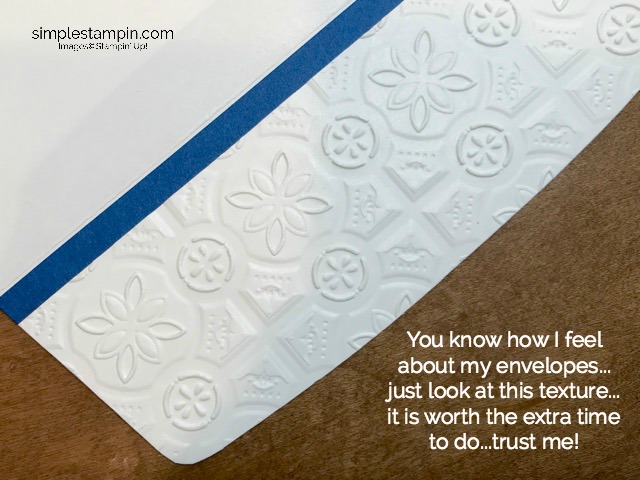
Take a look at the below picture and I want to point out to you how I used this embossing folder. In a nut shell, I ran it through Mr. BIG twice…rotating the direction of the paper to give it a super soft and doubly textured (in both directions) cardstock that truly makes it feel like linen.
Look right under the watermark and you will see it. It is just amazing and it also stays so subtle and you can clearly see how flat a layering piece of paper will adhere to it. I point that out as I tend to get a bit grumpy when paper does not lay super flat!!!


I also used the Multipurpose Adhesive Sheets to adhere the die cut tropical-like square image to the piece of Shaded Spruce. Here is another tip that is pretty nifty about this particular die…You can basically make this any size as the “cut size” will be whatever the size of paper you are using. For today, I just used a piece of 3 1/2″ X 3 1/2″ square of Soft Sea Foam and then it was a cinch to adhere it to the piece of Shaded Spruce as the adhesive was already on!
Remember, I am offering the Adhesive Sheets and also a very delicate and detailed die with the adhesive already on so you can see how easy it is to just “peel off” the release sheet and then use it right away as there will be no sticky fingers and/or oozing adhesive this month for my gift with purchase.

I have a question for you as I am just giddy about this card. It is just one of those “sunshine and smiles” cards for me when I see it…
Doesn’t basic shapes and layers of paper just add so much?
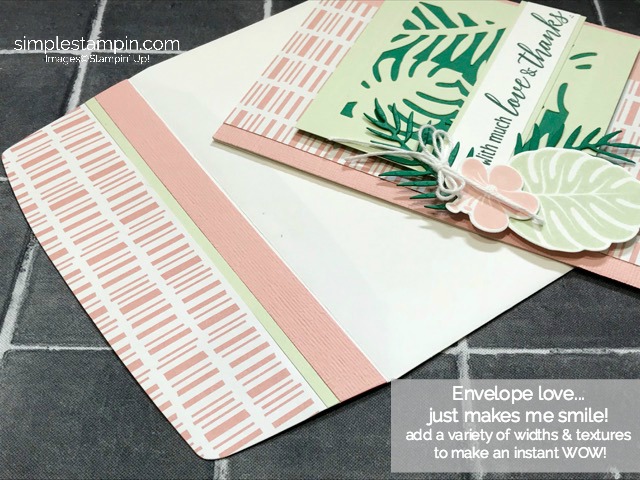
In the below picture I wanted to point out the fun envelope. I do love my envies! For this one….I really wanted to have fun and play up the color with the card so this time I used a 1/2″ strip of the pink (also with the texturing from the embossing folder) and then a sliver of the Soft Sea Foam along with the DSP. Yep, it does take a wee bit more time to do but there is no doubt that the end result is worth it!
There really is not much to the layout of this card, just a simple use of the basics that I love and use so much.There is one thing that I wanted to share but it is totally no imperative to do….
I am just lovin’ the new stamp pads as they truly do give you such a clean, crisp and solid image and because I never put away my clear embossing powder from the other day I thought – what the heck….go ahead and sprinkle some clear embossing powder over top of the stamped sentiment and heat set it.
There is just nothing like the look and feel of an embossed sentiment, truly the icing on the cake. I think that it make the sentiment even stand out more enhancing the meaning!

That’s all I have for you today….but I think that it is one of those “keepers” that I just love to make. Colors and layers make such an impact with such a little effort. We all seem to get in moods gravitating to certain colors but I invite you to challenge yourself any go out of the “standard box” we tend to get into and try the idea I said with using DSP that we have around.
The one thing that I think that we all seem to know is that Stampin’ Up! does a fantastic job in the color coordination across the entire line. From cardstock to DSP….the inks…to the ribbon offerings, we always know that they will match. That in itself is a godsend not having to worry about “is this going to match”
Have a wonderful HUMP DAY and I will see you on Friday with the offerings I have for you in another Product Shares showcasing the upcoming new Holiday Catalog!
I will be offering a couple of things from the last one as I have had requests for them. Products are the BEST WAY to get a taste without breaking your Daisy bank….speaking of Miss Daisy, she is a bit grumpy with the heat the East Coast is having!
by Susan Itell | Jul 13, 2018 | Blends, Thank You |

Woot-Woot….it is the weekend and I have a cutie for you today and guess what? This layout is one of those “formula types” that I love and try to encourage you to make! WHY? Well, there are a bunch of reasons but the one that comes to mind instantly is…they make card making super easy as all you have to do is find the formula…and adjust your stamp and color combination to whatever stamp set you are working with!
Easy and DONE! As I have blogged…I have become very picky about my purchases as let’s face it….there are soooooo many amazing crafting products out there…… that we just cannot have it all so my shopping the new catalog was very selective!
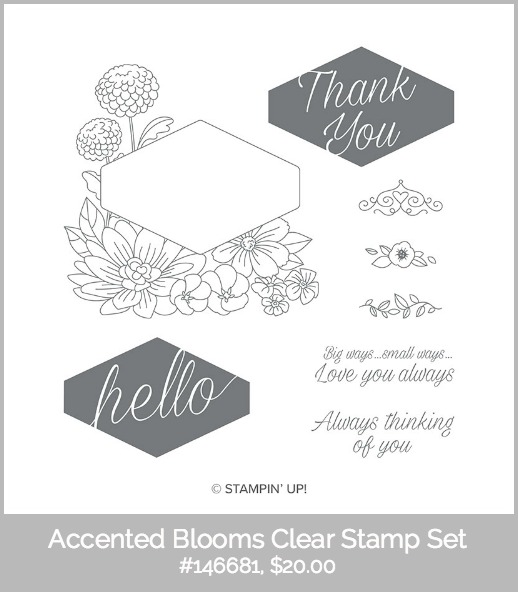
This stamp set, Accented Blooms is a keeper. I knew the minute I saw it….it would be living on Randall Lane. WHY? Well…..H E L L O….Look at that image…look at that FUN and LARGE “hello and thank you”….look at the sweet sentiments….the price is right and lastly – you see those 2 little stamps – the leaf and the flower….well I have an idea for them! (I think that it will make you smile!!!)
Today I used the Blends to color the image. Blends are the quickest method of coloring for me to do in a jif and when I made this card…I made 6 of them so I simply stamped the images out using the Stamparatus and then colored the image in when I was watching a show that I am kinda hooked on, Shark Tank!
I admit that it drives me kinda bonkers that there is just not one simple click of a button to get the blends….and/or a button to get the new ones that were just released. Oh well….(got that off my chest) – I am asked time and time again….what colors of Blends do I need…and I hold true to my answer – ALL OF THEM!
Hang tight here…..I know that you are thinking – WOW…they are expensive…and YEP, they are an investment but I was asked and I gave my opinion. The reason I say this is…it is such a hard decision to narrow it down as it all depends on the image you are coloring. One thing I will say FOR SURE is….if you are ordering them here and there….always order the combo pack (Blends are on page 205) as you really want the light and the dark of each color.

Now HOLD ON…..I am sure that many of you are thinking …I do not know how to blend!?!? Please do not think of them in this way as true…they DO have the ability to blend seamlessly but think of them just like they sound a LIGHT and a DARK….so…(2) markers in the same family but one is lighter than the other.
The moral of this story is (look at the leaf part of this card)…you cannot go wrong with putting the light color down first (light Granny Apple Green) and then where you have the lines that are on the stamp go over it with the dark one (dark Granny Apple Green) and then guess what? – YOU DID IT….as you become more and more comfortable you will begin to “be that turtle sticking your head out” and experiment with “blending” but we are not even going to go there today!
I always forget to mention this…you know that I am a BIG FAN of the Thick White Card Stock and yep, I do use that for all of my card bases but when I am using the Blends, I prefer to use the Regular White Card Stock to stamp the image on that I am coloring. I think that the thinner weight of the paper takes the markers easier and remember, the bleeding through the back of the paper is TOTALLY OK – that is what happens with alcohol based markers like the Blends are!
Whew…enough jabbering….let’s get to it! I know…I know – I am way too wordy but I am what I am! It is always my goal/intention to make sure you understand and feel comfortable with products. Trust me, I get it as we all learn from trial and error and as anything in life…it takes practice, practice and then more practice! That is exactly why I made so many of these sweet cards….I knew that the more I played with coloring this image, the more likely I would feel comfortable and have a great project!
Click on the below image to take you to all of the offerings!

As always, at the end of my post you will see the line-up of products that I used for the card. I want to remind you about the Buy 3, get 1 Free Designer Series Paper Sale that is going on for the month of July. This DSP that I used for todays card is from the Animal Expedition Paper. Great deal to stack up on the new paper….an instant $11.00 savings!
I love this pattern as it is very versatile but I was also excited to show you a practical card using this DSP Collection. Many at 1st glance think that this is a juvenile/kiddo paper…but as we all know….there are 2 sides to every paper! (ha-ha) I love it that one side is whimsical and then other…a fun clean and classic print!

Here are the dimensions for todays card. As I say with the formulas….I would make the time to make up a card using this formula even if you do not have this specific stamp….true you might need to tweak the measurements to adjust to whatever stamp you are using….but this way you will have PRACTICE (remember that IS that little thing that we need to do in life) and also write down the dimensions you used so you can quickly refer to it in the future!

Without further yada….yada…..

There you go my wonderful cyber friends! I do hope that this made you smile….made you look at the fact that it is TOTALLY OK to use your DSP to cover the whole front of a card and then PRESTO…with layers of paper and the texture from the Embossing Folder…BINGO…you have one beautiful card!
Below is this embossing folder! You will be seeing me use it a bunch this catalog…My guess is that many of you BREEZED right by it in the catalog. Please do not overlook the effect a simple embossing folder can give you. They so affordable and make a big impact!

If you are new to my Blog, 1st…WELCOME….but I also do invite you to check out my very generous rewards program that I offer when you place an order with me. Remember…..I too was a customer and I totally “get it” when you have opportunities to get a FREE STAMP! Those 2 words make my heart pitter-patter every time….FREE STAMP!!!!
Have a wonderful weekend and please feel free to email me and leave a comment sharing how you like this formula…..I KNOW YOU ALL HAVE THE DSP……no more hoarding…pull it out and USE IT UP!!! 🙂

by Susan Itell | Jul 3, 2018 | Thank You |

Hello and Happy HOT Tuesday! I have a beauty for you today that I had planned for you yesterday but heat, life….and lack of power got in the way! There is no way to sugar-coat this but….it is darn HOT! I know…I know – it is summer but this gal does not like the heat and humidity!
I just have to share this with you as it truly was one of those, “you can’t make this stuff up” and at the end of this post I will share with you my “funny” of the power going off on Sunday…it teaches you how spoiled we are and how we simply take so much for granted….all is great and I have a fun card for you today!
Let’s start by asking…did you breeze right by this stamp set on page 151 in the New Annual Catalog? It is called All The Good Things and I think it is one of those classics that can go for many card making ideas we need as well as a great masculine card. (They always seem to be tricky to do for most of us!!!)
I would bet that most of us work look at the fish and say – that’s weird but actually if you google it – there are many great meanings – my favorite –determination and flexibility…I encourage you to take some time and look at the elements of the stamp set…many great potentials! The sentiments are just wonderful and I love the way that they use 2 different fonts (both being clean and simple)

I would call this a “formula type card” – If you are new to my blog….1st, welcome and then a formula is just a layout that you can do over and over with just about any stamp set you have…just change up the stamp and the colors and PRESTO….you have a blue ribbon winner card!
Stop and look at the elements of this card. Very simple and very clean – using your basics will always allow you create over and over without feeling defeated – REMEMBER…..we did this thing we do to HAVE FUN and if it is not FUN…than you will get grumpy, it is as easy as that!
Shapes….be it a rectangle, square, circle or oval will always be your friends as they allow you to create with little fuss and keep it easy on the eye. When you create a card in a simple way…there are some tips and tricks you can do to step it up a bit and later I will share with you the 2 things I did for this simple card.

I am sure that you have seen, heard and already know that Stampin’ Up! is having a promotion on select DSP’s……with the buy 3 and get 1 free offering that will be this whole month (you can click the link) I will be putting a “SU Promotions Tab” on my blog header soon (where the Product Shares is) so it is easy for you to just click and take a look…..it’s just that darn thing called time but it is on my to do’s!
I honestly did not have one full sheet of this paper….just scraps from making up swatch books from the Product Share….but peek at the card and you will see that all I used was a wee bit! This DSP is Tranquil Textures and I think that it can go through a long span of time for projects we make throughout the year. This is just a 1 1/2″ strip of paper but it does the trick!

Do you remember when I said that I have (3) tricks to make this simple card a bit more special…..did you figure out what they were??? Well here you go….always remember that there are super simple things that you can do with little time or effort with a fun and wow end result!
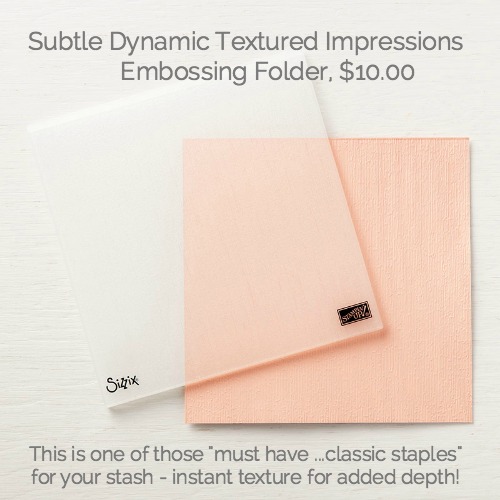
- I used an Embossing Folder for both the Tranquil Tide on the card as well as the envelope flap! This embossing folder, Subtle Dynamic Textured Impressions is a must have staple for your stash! It produces a very subtle (ha-ha, it’s name) and “non-fuss” feel giving instant texture and depth! I did run it through in both directions……
- I pulled out the Simply Scored and score the sides of the stamped image piece. I know that it is hard to see in the picture….but doing this little trick always makes a project step up a notch. When I score, I always use the simply scored tool over the trimmer as I think you can get a much deeper impression…
- I had FUN with the Bakers Twine! You know that I adore Bakers Twine and this offering…..is a home run!!! It is called Natures Twine and you get 4 rolls of twine in a pack in the colors of Blackberry Bliss, Crumb Cake, Grapefruit Grove, and Mint Macaron. I am offering this for the Host Code Gift with Purchase this Month…..(the current host code is always on the right of my blog header…)

If you peek at this picture above you will see all 3 elements! This embossing folder is just wonderful and classic….we all know that there are times that we need a little “something-something” but do not want a bunch of fuss! This DOES the trick!
When you play around with scoring….I always flip the stamped side down as I like the raised potion of the scoring to be visible to the front, but honestly….it is just a personal preference. I also like to go over the scored lines 2 times to get it nice and deep.
Lastly, the Bakers Twine… I first just anchor it down to the back of the card and then come back with the bow/fru-fru etc….a simply glue dot all balled up works like a charm each and every time! I invite you to play around and have FUN with different ways of adding accents to your projects!

Just look….doesn’t it make you smile? I love it when I can create something that it so versatile and also knowing that all I need to do is change the colors and DSP and BAM – I will have a totally new card with a new feel!
This sentiment is right up my simple alley….just having the word “kindness” makes me skip a beat. For this card I am using it as a thank you but look at this sentiment – you could easily use this as a simple “just because” card as who would not beam with joy receiving this?

Before we go…you know me and my envelopes……I adore them! Because I did not have a scrap of this paper wider than a 1 1/2″….I thought, just emboss the back flap! Works for me….and I hope that you will try it as well! I made my very own Soft Sea Foam envelope for this project. I thought that this special card deserved a special envelope!
I have blogged about the time and time again, the envelope punch board is the BEST PIECE OF PLASTIC you will get for $20.00! (ha-ha!!!) It does sooooo much more than envelopes but I make lots of square cards so I make lots of envelopes! It is so easy and for this envelope, it used a 8″ X 8″ piece of card stock.
Once you get the “bug” with how to use this, you will be making your own envelopes all the time…..it just make a difference! Well….that’s it folks! I hope that you enjoyed this project and now I will share with you the “weird funny” that happened to me on Sunday! If you are traveling….please have fun and BE SAFE!
The highway around us has been super busy…we are dog sitting again….but trust me, John and I will be having our time real soon with the Alaska Trip right around the corner. We are happy to help the kids out and would rather the dogs be with us than in the kennel!


Ok – here you go….the “simply sad Susan story of her Sunday” – my lower lip was hanging down…..but it was all good and trust me…there are a ton of other things that could happen, again….we take for granted many of this simple pleasures of dailiness….it was a good reality check but yes, I AM thankful for air conditioning…..enjoy!….
Sunday is a day that I look forward to….I am one of those routine oriented people and I love to start my day off with a cup of good coffee with no agenda….just some good old fashion “me time” to get the day going! It started just like I like it…John left for church around 7:30 a.m. and I was going to leave for yoga around 8:30 a.m……then just as I was going through emails – the power went off, it was around 7:45.
It was a normal day, no storms etc…just hotter than hades and I thought, it will pop back on….well it didn’t! It is funny how we get so conditioned to routine and that is what I continue to do – it was daylight so I just kept doing what I do….got dressed and looking forward to my class….went out to the garage – THE GARAGE DOOR WOULD NOT GO UP….dah – NO POWER SUSAN!
Plan B…..take the pick-up truck…..I went down to the barn and darn…..I forgot that it was hooked up to the trailer….I quickly put the blocks underneath the tires to let the trailer down and went to push the hydraulic lift…..DEAD – the battery was DEAD! I just thought….this is not meant to be!
Back up to the house and I looked at the dogs and they were not coming to my pity party….I looked at them and said – I look soooooooo forward to yoga with Phil on Sundays…..then I go to the Pressed Flour (a little local bakery that is only open on the weekends) to have my weekly indulgence of the best Breakfast Sandwich and then walk around the Farmers Market…to me, a perfect Sunday morning! It just wasn’t happening for me……
John returned home from church…..(I had already texted him to say that the power was out) and said….I called the Power Company and the estimated time for it to be turned back on is 10:30 a.m. – I thought – ok, I can handle that! I knew that there was another yoga class at noon that I could jump into but it wasn’t my routine….PHIL, SANDWICH and FARMERS MARKET!!! I am a creature of habit……I like my routine!
This would mean NO PHIL…a different teacher (but she is also great)….NO SANDWICH (as they sell out usually by 11 and are only opened until the sell out) and NO FARMERS MARKET (as it closes at noon). I go to this amazing little town for yoga that is called Shepherdstown, WV – it is about 30 minutes from my home….and it has become a “happy place for me”
John came home and kinda laughed as he knows how much I look forward to my Sunday mornings…….he said, let’s go to the outlet’s as they opened at 10 and get some things for the trip and then you can go to yoga….hmmmmm……great idea as that meant when I am with him and especially when we have (2) cars….I will leave and he can pick up the tab! It worked just like that……I was happy…we got lots accomplished and off I went to yoga….
After yoga…now its around 1:30 – I text him….is the power on? Sad answer….nope – they changed it to 3:30 now so back for more retail therapy as the heat and I are not friends…..Texted him around 4:30…..nope – STILL NOT ON…..so went to another area to shop…..I looked terrible but darn, I was cool and I got lots accomplished!
At around 5:50 he text me and said…..you can come home now….the power just came on! I thought whew……PREFECT TIMING as the store had just said, “shoppers…the store closes at 6 p.m.”! Life ended up to be great…..and poor John…HE WAS the one that said, just go shopping so I did what he told me to do!
When I came home I said…how was your afternoon….he looked at me and said HOT…..(well DUH I thought – I could have told him that myself)…..but he just kept thinking that the power would come on so in his “male brain” – he thought….I will do yard-work and then come in and watch golf…(his Sunday loves to do) …..
He said to me….while you were doing your “peaceful namaste thing”…and then shopping around…. it was eventful around here!
- the dogs got a groundhog….6 against 1 – the poor guy did not have a chance….
- the stupid donkey got out of his field and ran around….
- I ran out of gas on the tractor in the middle of the field…
I immediately said….oh no, how is my perfect Milo?
I wish you all could have seen his face….that wonderful 6’5″ husband of mine looked at me and said, your “little Mr Perfect” has a new name….MILO the MURDERER…..I went to see what all of the barking was about and here is this poor Groundhog….Milo has him by the neck – Leo has his back end….the other dogs are barking and trying to get into the action….and then John looks at me and says, that poor little thing was looking at me with those ugly little teeth and he tried to imitate what the poor groundhog looked like……and all I could do was BUST OUT LAUGHING!!!!
YIKES, I like the way the “female brain thinks”….RETAIL THERAPY!
Oh well….live and learn!!! Hugs to all…and if it is that darn hot where you live….I would say – STAY IN AND STAMP!
by Susan Itell | Jun 29, 2018 | Blends, Fun & Cute!, Super Easy, Thank You |

Happy Friday! I am sure that many are going to be getting a head start on the upcoming Holiday with it being a “Hump Day Holiday” next week…not us though – we are home for the weekend babysitting the “grand-dogs” and cleaning out the barn! My job is power washing and John’s is to cob-web and get rid of the barn swallows!
I am sure that you have HEARD THE NEWS……..as it has been on every blog I subscribe to…..
THE NEW BLENDS ARE IN STOCK!!!
Yep, it’s true and yep….I know many people are super happy…..soooooo happy that their hips and legs probably sore and stiff from doing the HAPPY DANCE that we tend to do…..(my pups look at me like I am nuts!!!!). I have done my cyber share therapy and they are on order ready to roll down Randall Lane!
Let’s chat about this SUPER -DE-DUPER sweet card that I have for you today! I think it is just adorable and one that I knew the minute I saw this image in the new catalog…I new it was coming to live with me! It is called the Bee Thankful Stamp and it is a single stamp (which means the price point is super…) and it can be found on page 125.

I knew that I was going to be using this gem over and over as there is something so special about many of the single Stampin’ Up! Stamps….they are usually chocked full of FUN and with some simple touches, BAM – you have a keeper! When I look at some of the retired stamps that I still have because I love them so much….many are a single stamp – Vivid Vases, Bearing Gifts (love that Polar Bear), Watercolor Than You, Get Well Soup, It the Broom Fits….yep, I do like them!
I used the Stampin’ Blends that have been out since last Fall but you bet that I am just itchin’ to give the newbies a spin! We all seem to love the new Color ReVamp and I think that the 11 new Stampin’ Blends are a PERFECT fit to the line that we already have! You will see the whole line up at the end of the post.
Today I used the Night of Navy, Rich Razzelberry, Old Olive and the Light Crumb Cake Blends to color the image. Are you wondering what I did for the BEE? Well….I thought that the Daffodil Delight was a bit off….and because I do not have the Pineapple Punch Blends yet….I pulled out the Aqua Painter and dabbed a wee bit of the ink from the matching stamp pad….it will work just fine for a small area…

Making this card was super fast as I used the Stamparatus. If you have not used the Stamparatus or for that fact, any other Stamp Positioning/Alignment Tool….than this is simple….YOU NEED TO DO SOME CYBER RETAIL THERAPY! It makes stamping and lining up soooooo much easier and if you are one that loves to mass produce cards – you’ll be doing the happy dance and this is a dream for that!
The strip of Whisper White is 2 3/4″ wide so I just went ahead and stamped (12) of these images and then I will have them ready for the future to color in. I am one that likes to take things on the go with me….so having a bunch already stamped is a fun project to do later! With this stamp, the sky is the limit with how you can color it.

I did a super quick job coloring this image and I also went outside of the lines…..now stampers…..PLEASE HEAR ME LOUD AND CLEAR!
It’s OK to “oops”….. It’s OK to go out of the lines….
First – it is A CARD….and second – IF YOU THINK THE SKY IS FALLING…well there are ways to fix it. I simply took the colored image back into the Stamparatus and RE-STAMPED IT IN BLACK….you see….another great reason to have the Stamparatus as you can easily go back and stamp a darker line of ink!
For this…I chose to sprinkle Clear Embossing Powder over the Black Ink when it was still wet and then heat set it with the Heat Tool! Not only does it help to hide my boo-boo’s….but it gives a very finished and just FUN look of a shiny black embossing with the pop of colors from the Blends!

This card is just so darn cute and so darn simple to make that you really do not need me but I know that you enjoy the tips and tricks that I give you for your card making fun! I totally believe that we do learn from one another! How about this super fun polka dot paper…..it makes me smile and it makes me smile even more as we now have a FUN POLKA DOT PAPER in each and every color of paper that we have!
YEP, that is one my most favorite things that Stampin’ Up! has done with this new catalog. You will find ALL OF THE COLOR FAMILIES on page 191 of the catalog…..and if you want to get a SAMPLING of THEM ALL….tomorrow is the LAST DAY for my Product Share offering!
Share #3 is what you would want for these DSP Paper Stacks. This way you will have the whole spectrum of the new Color ReVamp without having to break your “Daisy Bank” (tee-hee-hee)…this addition of paper makes a clean and simple designer like me super happy as we will always have something to match up with!

Below you will see a cheat sheet in how I can save the DSP….heck, we will take every bit we can! By cutting it into 1″ strips I was able to do the card and the envelope with one piece of paper and I still have another 2″ piece that I can use for another project or envelope!
You know that I use fun foam a bunch….and honestly I looked it up for someone last week as I do usually get it on Amazon. I have a big container of scraps and it gets used up just like we use every bit of scraps on the Stampin’ Dimensionals! I do adhere it with Fast Fuse (as I still have some) but I would recommend that you could use tear n tape or even green glue will work! I personally love the feel of the card when it is in your hand with the fun foam…..

Well…as the saying goes…THAT’S ALL FOLKS! I hope that I made you smile…and I hope that I inspired you to be gentle to yourself with perfection! To me, the most important part is…YOU MADE IT! That in itself is a true blue gift and one that has no price tag on it.
Please do not forget to EMAIL ME if you want to take part in the final Product Share from the NEW Annual Catalog. Shares are a great way to get the newbies without the expenses.

Have a fabulous weekend and stay safe if you are diving and also hydrated if you are out in the heat….last weekend John overdid it a bit with the heat and WOW – it really gets you! Water, Water and MORE WATER!
Many thanks to many that sent me an email asking if I was near the Maryland shooting yesterday. No, we live about 2 hours away but Jeanie and I were just there on Wednesday to see 2 other Top Dogs….they both are from Annapolis (Ramsey and Jill) and they are fine but it is sad, super sad. Our wonderful country has had way too many of these senseless shootings…..
Monday starts the DSP Paper Sale…..you can click here to see the post that I did about that and this is one more reason why taking advantage of the Product Share (share #2 for the 10 different DSP offerings) is a win-win for you as then you will be able to see if you want to take advantage of the buy 3 get 1 free of full packs!
I know that the below line up looks HUGE….but it is because the blends – it would be soooooo much easier if there was just one button to click and POOF – they are are there! I am very thankful that the newbies of Blends are here! See you Monday and I hope that each and everyone of you have a special weekend!
by Susan Itell | Apr 2, 2018 | Thank You |

Good Monday to you!
As you have noticed…I have been “unplugged” but I am here with you today! As we all know, life is life (one of my favorite sayings) and I have been needed in many directions over the past week with family, friends and Easter! I have skimmed through emails and many thanks for the emails of concern and….my Dad is fine.
Last week was a week of Doctors appointments but he is doing great….I think that I get my “keep going” attitude from him! We have all heard the saying, “one day at a time”….well – I take that one to heart and truly I have had to look at each day what I could get done and also what I needed to just say…..“not today”.
The great news is…..I have a SUPER card for you today filled with lots of pictures and YEP.…dimensions for you as this is one great layout and it is also a super-de-duper way to USE UP THAT DSP that we have stashed as you know…….right around the corner – the NEW Catalog will come out and you know what that means…..NEW DSP for us to once again purchase to feed our paper addiction!
The star stamp set of this card is Vertical Greetings…a super stamp set from the Annual Catalog! This one is a stamp that many of you have as I think when it made its debut is was so darn different for Stampin’ Up! that we all had to snatch it up! I love the uniqueness of the sentiments being vertical but the other thing I love…the price – super affordable at just $19.00

The magic of this card uses just 3 colors…..the classic Black and White combo that we all adore and then the POP is Pear Pizzazz! Truth be told I was going to use Lemon Lime Twist but I thought that Chris R. would not think of that being a fitting way to add love to this clean and classic card….and so it was the Pear Pizzazz….the color that Sonny P loves! You see….I do listen to your likes and also dislikes!
The DSP Collection is from the Petal Passion….another HUGE HIT from the Occasions Catalog. I admit….I know that there will be many more new paper collections coming out that I am going to adore…but I think that I will purchase some extras of this beauty…..I ask you – how can you go wrong with a FAB-O Classic like Black and White!?!?!

Now to the part that you REALLY WANT….the dimensions for you to CASE AWAY…..and guess what ??? I HOPE THAT YOU DO as this really is a great layout. If you have any questions, please leave me a comment or email me….I would love to hear how you like this super simple card.
I know that I have been blogging about being selective as what to purchase and what I need to pass on….I can remember when this stamp set 1st came out I looked at it and thought…...LOVE the vertical Sentiments…..LOVE the topiaries as to me, they are super clean and classic….LOVE the fact that there are many practical sentiments that I could use for many different occasions…..so YEP….it had to come to live on Randall Lane!
What makes this card unique and a bit different that what you are used to seeing me create is the fact that the front of the card has been partially cut off and also that I am using a “color of cardstock” for my base as I usually tend to go with the thick Whisper White or Very Vanilla!

This really is sooooooo darn EASY!!!!!
- The card base is an A-2 size ( 4 1/4″ X 5 1/2″ ) in Pear Pizzazz with the fold to the left and then cut off 1″ from the front Pear Pizzazz panel
- The inside is Thick Whisper White at 4″ X 5 1/4″ and then I stamped the Thank You greeting so it was centered as the card was closed.
- The DSP on the front is 3″ X 5 1/4″
- The White piece that the topiary is stamped on is 1 1/2″ X 4 1/4″ and then matted in Pear Pizzazz at 1 3/4″ X 4 1/2″
- Using Fun Foam I popped up the topiary and then also added more height with stampin’ dimensions under the pot.
- The bow was attached with a simple glue dot.
- The envelope – my good old staple – 1/4″ X 6″ and then the DSP 2″ X 6″…adhere and cut excess away!

You can see that the color combinations are endless depending on the DSP you choose. I chose the black for the pot and at first I thought that it was too stark but after it was all together…it was perfect. Here is a tip for you – when I stamped it….I just stamped the whole image in Pear Pizza….(not worrying about the color of the pot).
Next, I stamp the pot twice in black on scrap paper. WHY TWICE? Easy – you know that I am type A with details…..so after a quick snip of the pot I adhered one over the green one that I stamped and then popped up the other one over top. The way that I look at it is that this just takes seconds to make a much better visual difference in case any one see the green pot from the side.

I know that I will be seeing the new catalog this weekend when I go to Hartford, CT for OnStage but IF this White Organza Ribbon is being retired, I will purchase MANY, MANY rolls of this gem. It ties a perfect bow each and every time and they “behave” so well as you can fuss with them exactly the way that you want them to be….and they STAY PUT!
Because I adore this ribbon so much and it is just a classic staple for any cards that we make (how can you go wrong with white) – this White Organza Ribbon will be my gift with purchase this month for orders of $75+ using the current hostess code of WJQG4MWE (Please remember, you can always find the current hostess code to the right of my blog.)

I would be SHOCKED if it is walking the plank but you never know! I just stock up on things that “work for me” to make the process of creating that much more fun and rewarding! I hope that you know where I am coming from on this one! We DO this thing of crafting for FUN so I look at it like this – find what you like and just keep on using it! (the same way I feel of Fast Fuse)
One last picture for you before we go….a great picture for you to see the impact and difference it does make to give your envelopes some love. It’s kinda like the thing that I did with the pot…..it is the “little things that make the difference”
Once you get in the habit, you will never have your envelope be NAKED!!!

There YOU go….a card that you can easily be proud of to send and also a card that you can make in the masses and also use up a variety of papers that you have. This IS my kinda card and one that always leaves me feeling rewarded when I create it. I featured this stamp one month for my kits and using it again today for you just reiterated my love for this stamp set. As I say, it’s a keeper!
In closing I wanted to share a little something…..I do adore my blog and I do enjoy creating, sharing and hearing from you….but at the same time I need to remember that I need to actively embrace that “balance of life”! Remember me????, the person that got the kit to get the discount and run….well – I decided a different route…the route of blogging and sharing.
Doing blog posts takes a bunch of time and true I could just put up something to get the post “in” etc….but I am trying to give you not only fun, detailed and practical projects, but also a way for me to express “who I am and the whys” I do things with my crafting addiction that I have!
I do hope that you all had a wonderful holiday weekend and we certainly did on Randall Lane! It was not my plan to be unplugged but it was the right decision for me….I really do miss my cyber buddies when I am gone.
Have a fabulous day and for once….. I am SUPER excited for the calendar to roll this week…..as I am leaving on Thursday to be with 6 of my downline for the Hartford, CT OnStage…..we are doing a girls crafty time together and making it a bit of Creative Vacation for us as we have rented a house…..doesn’t get better than this……
Stampin’ hugs to you all!