by Susan Itell | Sep 23, 2019 | Halloween |

Hello and Happy Monday! I have just returned home from a Stampin’ Retreat in Texas that not only was a ton of fun…I was super productive in making cards (which we all know is a great feeling!!!) Even though it is so hard to gauge what to bring – I really accomplished a bunch!
It was so relaxing and super fun as my sweet friend Ramsey joined me for this adventure. I know that it sound crazy to go all the way to Texas but I am blessed to have many stampin’ friends there and it is always a treat to be with them. We stamped…we shared ideas…we laughed….it was just good old fashion fun!
I have a cutie for you today and I think the minute you see it you will agree…it is mine kinda card, super clean & simple….just like I like them! Because there is no stamping on this card I am going to offer some “mini kits” that you can purchase from me to make this card & envelope yourself at home! I will provide you all of the elements for the card and then you can have fun putting it together.
SOLD OUT!!! 🙁
Don’t Wait….I only have 14 of these kits made up!
The paper that I used for this sample is from the retired Gala Gingham collection – but you can easily visualize that there are many different papers that you can use to go with the Halloween Theme! This paper is in the Highland Heather but you can easily see how FUN it is when the Gorgeous Grape Sentiment….playing and off setting colors within the same color family are always winners!

The fabulous and oh so fun sentiment of “WICKED” is from the holiday catalog. It is part of the Wonderfully Wicked Bundle or you can buy just the Die Cut Word itself. At the retreat I had many people comment that they did not think it was a Stampin’ Up! Word Die…..but YEP…it is and it is in the Holiday Catalog on page 55.
HANDS DOWN…this is the best single word die that Stampin’ Up! has ever had. WHY??? Easy = it is BIG and BOLD….which in my eyes makes a statement! I truly am hoping that they will continue to come out with more offerings like this as it makes my stampin’ heart pitter patter!

I am a happy and fun gal when it comes to Halloween cards….I love to send treats and making a sweet card instead of scary makes me roll! Now if the weather will start to change a bit as it is still so stinkin’ hot…treats will melt but we all know it will change soon.
The dsp is just 1” X 5 ½” and then I added a wee bit stripe of contrast cardstock to make a POP happen! What is the star element that makes this card fun is the layers and the word “Wicked” as well as the layers of the spider….I stacked 3 layers together!

If you do not do this, I suggest you give it a whirl. Layering elements makes such a difference and honestly it does not take that much more time! These are the little things that I like to do to add that special touch to make a simple card go from a sweet card to a WOW – “that is a GREAT CARD” as the extra details make it!
If you would like to purchase one of these mini kits….they are $4.00 each and you will have all of the goodies in the bag for you to cut and adhere together to make this super sweet card and envelope! I only have a limited amount of this paper so HIT THIS AND RESERVE YOURS TODAY….I will ship them out on this Saturday September 28th!
SORRY…they SOLD OUT!
Please put in the subject line WICKED CARD so I can spot it and I will respond back to you. I only have 14 of them so it is first come….first serve! I know that many of you do not send out a bunch of Halloween Cards and I thought….why not offer this! I will charge $2.00 for shipping and handling….( if you buy more than 1 I will weight it and figure out the shipping)

While I was in Texas I was able to see many of my stampin’ friends that use to purchase my kits…and yep, the question is asked….are you going to be doing more kits….we miss them! Hmmmmm….time will tell but how about this offering as a baby step in the right direction!
As a Stampin’ Up! Demonstrator I am not allowed to stamp any part of a kit so this is why I thought this car would be perfect. You can have a taste of putting together a super clean and simple card and be able to see for yourself the impact there is with layering dies together. Have a great afternoon and let’s all have a super week!

by Susan Itell | Sep 29, 2018 | 3-D Projects, Fun & Cute!, Halloween |

To start this post I am warning you…YOU ARE GOING TO SMILE…and if you are brave enough to read the entire post than you will just see how my SIMPLE MIND works as the way I roll is like a math problem so to SUM it up…we need to look at this equation….(School is in session!)
Monday’s FUN Post + Wednesday’s Shop your STASH Post = Today’s HAPPY DANCE
I am using MONDAYS POST (click here for refresher) and WEDNESDAY’S CONCEPT of Shopping your Stash (click here for a refresher) to show you how making fun, festive and SUPER CUTE projects does not have to be stressful or hard!
I am just THRILLED that you all enjoyed Will’s card and the post concept of SHOPPING YOUR STASH….and today I have done the same! I had already shared with you that I did not purchase any new Halloween specific stamps this year. Stampin’ Up! did not let me down with the Paper Pumpkin Kit as I had a hunch that it was going to be Halloween related therefore no reason to get another stamp!

This kind of project is a happy one indeed for me as I just LOVE making little things that make people smile and trust me stampers…this post of inspiration will make you do the “dance” and then you will get another feeling inside when you gift these to friends & family, co-workers, teachers….or ANYONE that needs a smile and trust me….we ALL could have a stash of these in our purse or in our car to give out…..as let’s face it…
Random acts of kindness are the best….
When someone makes you smile and when someone makes you feel that “you matter”….it sure does stick with you for a long, long time! Age simply does not matter with a project like this as everyones inner child and sweet tooth always love the attention! Even though these treats are not hug in value…they ARE HUGE for the recipient as they knew that YOU took the time to create it.
You know that I always talk about the BASICS as I am a FIRM BELIEVER that when we have the BASICS readily available to us, it makes the creating process a fun one each and every time! I have a bunch of pictures for you today and also some tips that will make the process even faster if you are making the super cute clear boxes with tags from the Paper Pumpkin Kit.

I check just before I typed this post and YES, the Paper Pumpkin FULL KIT and also the refills for this kit are STILL AVAILABLE. I am just thrilled with it and remember, I blogged about it on Monday so please refer there for more scoop. I just think that the sweet stamp set that is with this kit will get the job done for many, many Halloweens to come….it is super simple and super sweet!
Last thing before pictures and tips….we need to thank HERSHEY for making the Nuggets that I am using for this project so fun and festive! I usually always put a fun piece of DSP around the Nugget to jazz them up and make them pop but this year, they have done the work for you!
I bought a big bag of these from Sam’s Club and when I saw the colors of the wrappers and also the sweet and festive images on them I immediately thought – now these will save me a bunch of time…..Here is a funny….
When I came home and shared this with John he just smiled at me and then I looked at him with that “WHAT LOOK” and then he just laughed and said to me….I am so happy that you can get so easily amused by how HERSHEY wrapped their nuggets this year! HA….MEN – they just don’t get it!!!!

I am traveling a BUNCH in the Month of October, actually 3 times in 3 different time zones so I really needed to get a grip on my Halloween projects. One thing about me is…if there is dark chocolate out that I can get to…..IT IS GONE! I can let Milk Chocolate sit there naked in front of me (ha-ha….the wrapper off) but if that Dark Chocolate one is there….I’m DONE! I am proud to say that all of the Dark Chocolate is well wrapped in treats so it is away from temptation!
LET’S GO! The secret is to have the product on hand so when you want or need to make something….YOU HAVE IT and the scrambling around is not an issue. I ask you…
Why do we create stress in thinking we have to come up with something NEW each time we play with paper? As the saying goes…oldies are goodies!
Two of these examples I have blogged about for years…and guess what – I loved the concept/technique then and I still love them now! If it works for you ….ROLL WITH IT….but make sure that you are prepared! These clear tiny treat boxes are an item that is a keeper/basic and I would put them on your next order to have them when you need them. I often think we overlook simple packaging that Stampin’ Up! offers!

Just look at these….just adorable! Many of you purchased the DSP Product Share from me (thank you!)….therefore you have the Toil & Trouble DSP – all of these projects that I am showing you today can be used with paper from your share. In the below…I have used the same paper, just flipped it over so this IS the perfect time to SHOP YOUR STASH and see how you can add odds and ends of ribbon to make it festive!

My hunch is that we all have some sort of Fall/Halloween paper in our stash and if not….I say WAY TO GO as you have either just started with this addiction or you have a tremendous willpower!
All I did was use a combination of the DSP and then the adorable tag that was in the Paper Pumpkin!

Here are some tips….
- For the paper insert…simply take a 2″ X 8″ piece of DSP and score it at 2″, 4″ & 6″ and then simply place it in the clear box…fill with TREATS…etc…
- IF YOU ONLY HAVE A 6″ width of paper…NO WORRIES – just cut it to a 2″ X 6″ and score at 2″ & 4″ and then simply put a 2″ X 2″ piece on top!
- For the tag (these work PERFECTLY!) take the tag and score it at 1/2″ and then at 2 1/2″ as this is the perfect score to wrap neatly on your box. I did use tear and tape to hold it in place!
- SHOP YOUR STASH for ribbon…I know you have it…so LET’S USE IT!

Above is another example of the fun DSP with another look. I admit, I went SHELF SHOPPING and found the Labels to Love Stamp Set….NEVER USED (shame on me) and I ask myself why did I never use this gem??? You betcha that you will be seeing this one again…as just LOOK AT IT – it is filled with some super cute images!
It does have a coordinating punch and YEP…I would definitely add that to your stash as this is another thing that Stampin’ up! does very well…their punches! I am sure that even though I have not used this stamp set before today, I am sure that I have used this punch. To me, punches are a SPEED TOOL that are practical and also time saver.

Now to some super cute alternatives to the clear boxes…Below, on the left is 3 mini DARK Kit-Kat Bars that I had to figure out what to do with so I would stop eatting them and I think I accomplished it!
All I did was wrap a piece of fun paper around and then added a simple “knot’ of fun ribbon with the paper fru-fru’s! TOO darn stinkin’ cute! I stamped a simple BOO from that paper pumpkin kit and presto….another smile maker!

Here is the “aerial view” of the goodies….these paper fru-frus are so easy to make and they always add a bunch! In the below picture you will see is all I did was tale a wee sliver of paper…wrapped it around something thin (I used a handy paint brush) and then adhered it with a glue dot, another essential basic that needs to live with you!
I know that sometimes we get short of ribbon in specific colors so this little trick does the job. The adorable project on the right…that is an oldie but goodie and you can CLICK HERE to see that…..it still makes me smile!


To see the post that I made the origami super easy fold treat that is in one of the above pictures…you can CLICK HERE to see that.
I make these all of the time and they are another great one to do for many seasons. I used the Seasonal Chums Stamp…that really got a WORKOUT last year and I am THRILLED that it was carried over! You will see me showcase this on a future post that will be making you run to the grocery store for something….keep checking back – you will SMILE!

There you go….I do hope that I sparked your attention and I know that I have said this earlier this week…I would hit that PAW PRINT below and sign up for Paper Pumpkin….even if it is just for 1 month. This way you can get this sweet kit and YES, I would also get a refill as why not….for just $9.00 you will be set for Halloween for years!
You can cancel your Paper Pumpkin the very next month if you want ….that is the beauty of it if you are not one that likes this program. Do what makes you roll! I just know that these next couple of months are going to be like a huge Steam Train coming right at me…..Holiday after Holiday and if you are like me…you love to have those little “something…somethings” ready!
For me, this Halloween one did it for me! Many thanks for all of the fabulous comments about Will’s card….he loved it and YEP, I made him laugh and then he said….I still am not a fan of that pig of yours!!! He is feeling great and is getting more mobility in his elbow! Please feel free to leave a comment about these cute Halloween goodies…..we have such a fun community of positiveness, great ideas and giggles!
Let’s have a great weekend and I hope that even if the weather is icky where you are…that you are shining inside! My TO-DO list is huge today as I leave with the chickens in the morning….but first – me time at Yoga in a couple of hours!

by Susan Itell | Sep 24, 2018 | Fun & Cute!, Halloween, Paper Pumpkin |

Before you CLICK ME OFF…..please give me a minute to explain why I am Happy about this Paper Pumpkin Kit! Really….I do know that there are many of you that do not enjoy putting together kits as you would rather make up your own original designs and you know what I am going to say….THAT IS GREAT.…and I do “get it” but for this one…..YOU NEED TO HERE ME OUT!
I am always up front and super honest with you. I am not a huge fan of Halloween and I actually did not purchase one stamp set for Halloween from the new catalog as I have several Halloween Sets that I can use to make cards for the peeps etc…..BUT ONE THING THAT I DO LOVE IS….a super sweet 3-D item that I can have fun with and make people smile and this kit….YEP…IT DID JUST THAT!

When you are a Paper Pumpkin Subscriber, you have the opportunity to purchase additional refills (basically “the guts” of the kit – no stamp set) if they have any to offer after the subscriptions are sent out! Sometime….and rarely do they offer the FULL KIT as an item to purchase and guess what…..THEY DID FOR THIS ADORABLE KIT!
I have been having my fingers and toes crossed that they would be selling the refills….and when I received a text from Mary Anne today (a fellow SUD)….I could hardly wait to get home and order them! When my box came last week I was so excited as this is right up my allet and I love the value as you can make 24 little bundles of goodness!!!
Here is a quick video from the home office…..(skip to the 1:00 mark….and then it is just a super quick 2 minute video)
I never imagined that they would also be offering the whole kit for Paper Pumpkin Subscribers but again, I was SUPER HAPPY as I wanted to get one for my son that is a teacher and also a dear friend wanted one and was sad that she let her subscription to Paper Pumpkin Lapse…and for me….I WANT THE REFILLS!!!!!
Here is the deal….IF you want to get the WHOLE KIT ($18.00) or the Refill Kit ($9.00) you need to be a current Paper Pumpkin Subscriber and then you can order one.
I think that many people think that they have to be a subscriber for MONTHS and MONTHS…..here is the correct answer….NO YOU DO NOT!
I actually dropped my subscription and rejoined in August as I was fearful that a Halloween Kit might come out super early and I did not want to miss it…..if I want to drop….no penalty what so ever! At the bottom of the post you will see the buttons for the product offerings but I ask you…..for just $20.00 to get the 1 month subscription…..it is sooooo worth it to purchase this Halloween Fun kit.
If you do not like the kit that you will be getting from your 1 month Subscription next month…..“gift it away” to someone that you think would enjoy it. They do make wonderful gifts and then you can cancel the subscription immediately….it is truly as simple as that!
In the picture below you can see that I have all of my kit ready to rumble….it was so much fun to put together but I am equally as excited about the stamp set….I love the simplicity of it and on Friday I will share with you some card ideas using it….just too sweet!!!

You will see that I did not use the fancy Bakers Twine that was given with the kit….it is beautiful but truth be told, I have “issues” trying to make a “well behaved simple bow” with the Bakers Twine that has a metallic thread though it…..does anyone else have that issue or is it just me!?!?
Here is a tip…the adhesive FUN words that are in the kit….I stuck them on and then dusted the back of them that was still exposed with the Stampin’ Buddy…..this way I tool the “stick off of it” and was able to stack all of my tags in the box….ready to rumble!
Here is another tip…the Black and White Bakers Twine is on the clearance rack…..and yep…it is just $1.20 – HELLO….I say snatch it up! This makes the type of bows that makes me smile!!! I always love to share “nuggets” with you!
Now what am I going to do with these???? Hmmmmm…..lots of things!!!!
- I adore to send a simple little something to my friends children that are in college…..
- My peeps and god-children
- I will make one for everyone in Johns Office….(43 in total…you see…that is why I was THRILLED that the refills were being offered…..it will only take 2 refills and I can make 48 of them for just $18.00!
- My Dad lives in an ADORABLE small town that had trick -n- treaters (the grandchildren and great grandchildren) so I will make some up for him to hand out and Dad also loves to give his Post Master….a goodie for being kind…..
- I like to take them to nursing homes and bring a bit of joy to those that do not get many visiters. John has a wonderful client that is in a home due to a stoke….he is sooooo capable mentally and has many other like him. We try to visit and bring a wee bit of fun to them.
- I also love to keep some on my car and if I am at a place that I go to often….like the feed store or the post office….I always try to do a fun and random act….we are never too old to enjoy the memories that we had as a child.
Ok – there you go…..I hope that you hung in there and remember, you need to be a subscriber to be able to order this Halloween Kit and/or the refills. You will be able to do so AFTER you do a one month subscription!
If you have any questions…..please leave it in the comment below…if I do not get the answer to you….I am sure that someone from the=is WONDERFUL BLOG COMMUNITY that I have and oh so cherish will be able to help you out!!!
See you Wednesday and get ready to grab a bike and go for a ride!!!! Stampin’ hugs!

by Susan Itell | Oct 31, 2017 | 3-D Projects, Halloween |

Hello and Happy Tuesday! I guess I should also say Happy Halloween to each and everyone of you. Have you missed me? I must say… I have missed you but I will also say I have been on quite an adventure! 😀
I had planned to post this for you all last Wednesday but life got in my way with trying to get all of my ducks in a row to leave to go out of town. I had a fabulous time away and I will be sure to blog about it in the future but until then… Here’s a simple goody for you!

I totally realize that today is Halloween but I also want to inspire you to pull out all of the Halloween paper the you have from not only this year but go into the trenches and find your old stuff. (you’ll be sooooooo happy that you did) because trust me– we all have a grand intentions in doing something with “our stash” only to let the crazy schedule of life get in the way!
Since I have had my cast on my arm I have tried to organize many things in my craft area that have simply been piling up. If you arw anything like me… You have a ton of old Halloween paper. I ask you… Why is it that we keep it and look at it… and smile and say wow– that sure is cute!?
I decided to pull out everything I had and put it to good use. I have blogged about this adorable origami treat container many times but if you click here you will go to a post from eons ago showing you step-by-step how to make this with a 6″ X 6″ piece of paper.

I did a quick scan over that post from eons ago and the instructions are spot on as I still make these with the exception of using glue dots instead of the green glue.
You know me… Sometimes I think I’m a little slow out of the gate and you can tell back in 2013 I never used to glue dots. Please, use glue dots as it makes the process so fast!

I had a BIG TIME making these and you can see with that huge wooden platter that I made out bunch of them. These are always so much fun to make and they come together quick… but the wow factor is always there when someone sees a little treat for them to enjoy.
I invite you to pull out all of that paper that you have and if you do not have time to make these up now at least go ahead and cut all of your paper to 6″ x 6″ and just make one so you can get the feel of how easy they are to make.
The great thing about this would be – if you go ahead and make them up and adhere them all together… simply pull out the zip lock storage bag and presto you will be ready for next year! I ask you… How good would that feel!

With tomorrow, November 1 being the day that we can order the stampin’ blends… I have been trying to practice as much as I can to get a good feel for our new product! I used the Seasonal Chums Bundle to make this adorable project.
I admit, I have use this specific stamp and frame so many times this fall season and I am just itchin’ to dive into that adorable snowman and reindeer for the holidays upcoming ! To me… you know what I’m going to say– it’s a keeper!

The color family of markers that I chose were Pumpkin Pie, Old Olive and light Crumb Cake.These alcohol based markers are super fun to play with and they make the process of coloring very relaxing and enjoyable.
You will get a blog post from me about the tips and tricks I have found to be useful when using them in the future. I am just thrilled that Stampin’ Up! has these alcohol-based markers for all of us to enjoy with our crafting endeavors that we all dive into!

Well, there you go! I am super happy to be back in your inbox.I can’t wait to share with you the adventure that I have been on since last Wednesday morning…I have been on a mission to surprise someone that is very special to me and I think I accomplished it!
I hope you have a wonderful Halloween and if you have trick-or-treaters coming to your door – I hope they fill your heart with joy. I have such amazing memories of taking the peeps around the neighborhood trick-or-treating.
Enjoy what’s left of your day and enjoy the last day of October… Yikes– time is flying!
by Susan Itell | Sep 16, 2017 | 3-D Projects, Halloween |

Happy Weekend…I told you that I was going to share some more fun using this bundle so grab a cup of coffee because I have a trio for you! I think I know my customers very well and with that said I know many of you are intimidated by doing 3-D projects.
I hope with all of the pictures that I have for you it will inspire you to think out-of-the-box in give it a try. As I shared in my last post I truly believe this is a very special bundle… and of course you need to get the bundle… as the framelits are wonderful and who doesn’t like to save….I’ll take a 10% discount!
Trust me, everyone that I give something like this to always has a huge smile with a huge thank you! They truly are so easy to put together an once you learn to make them you will use them over and over every year.
We can learn the “how to’s” and then each year pull the same concept…possibly change the stamp and DSP… and presto you have a new project!
Here’s a little secret for you…It might be the same project… On a different year… but those same smiles and thank you’s will be on the recipients faces that are lucky enough to receive them!

You know me by now… I love the watercolor using the aqua painter.Today I chose to heat emboss with black ink and then sprinkled clear embossing powder over and heat set it.
Why? Easy….I wanted to share with you another way that you can watercolor without stressing out.I feel when you emboss an image and then use the aqua painter it is very, very easy to get amazing results.
The reason that it is so easy is the embossed lines create a little “wall for your water and ink” to stay within the lines. In the second picture below you will see is super close up picture of how I use additional layers of ink and you can see the watercolor look and feel it gave!


To make this fun origami style….DSP treat holder… You can click here to an old post that I made making the exact same thing! You can easily see that this is a great example of how I have reused…and repurposed a concept… Just updating it with current product!I
In the picture below you will see that there is a great substitute if you run out of linen thread. Just remember… We always have tricks up our sleeves! I know all of us are you in the same boat…the boat that has way too many products– my biggest tip for you is look at what you have… and use them creatively!!!

Now let’s move to these adorable test tube treat holders…I am just giddy about them and with my daughter Hannah working at a research lab at Duke University…you better believe that I will be having plenty of test tubes going her way!
These gems are first made their debut in a paper pumpkin kit…You can click here if you are a paper pumpkin subscriber and still buy that kit refill….and Stampin’ up! now sells them as a standalone product – click here to see it from the NEW Catalog! (I think they are just adorable and they are the perfect little sized to put a little something in with a quick little add one of the fru-fru and Bam– you’re done!)

You can clearly see that I have a ton of fun playing with the ribbon! I basically opened up my drawer of ribbon and just pulled anything that I thought would look fabulous with this project… the only color I was missing was pumpkin pie!
I put my thinking cap on and I think I have another fun idea for you.I took a very small sliver of pumpkin pie card stock and then after using the bone folder to soften the papers fibers… I wrapped it around my pokey stick. You could easily use a pencil to get the curls and presto I have a fun ribbon like element!!!

Now let’s touch base on our final project. It is the adorable little container of a box that has the seasonal chum pumpkin on the front and his little bum on the back of the box.
Making a quick and easy box is super easy… The picture below show you exactly how I trimmed the ends to make it form into a box. I did decide to add the polka dot DSP around all four sides but you easily could skip that step if you want.You know me well enough… I love a fun presentation!


To make the box I took a piece of pumpkin pie card stock measuring 4″ x 3″…I scored it at 1 inch all the way around and cut up as shown.I like to use fast fuse adhesive to hold the box together.It is super strong and you know it will stay together forever!
Wouldn’t this be just adorable to give to an office worker… a teacher…someone in a home to have by their bed…or even a table decoration! I just think little things like this are so much fun!

Well there you go… a post filled with fun ideas for you! I hope I was able to inspire you and I deeply thank you for popping in today!
I am doing well even though I think I over did it a bunch this week. This talking to my computer is a dream in trying to keep my posts going. I look forward to posting as soon as I can!
by Susan Itell | Sep 14, 2017 | Halloween |

Good morning! I have another fun post for you today and I have a tip that will make all of you out there that have a Mac computer a very happy person… I think! Hang tight with me – we will get to the fun card today – but…
I have one week under my belt with Ms. Pinkie and five more to go… I am doing great but the restriction of not having two hands is the pits! I have shared with you before the the typing is the thing that really bothers my hand.Wait to you see what I found!
I just have to share this with you before we get to this fun post because I was super excited! You know that I feel that I’m very technologically challenged…well –
I drive my kids nuts as I use Siri all the time for text messages (and as they say most of the time they make no sense).Look below with what I found! Needless to say I was doing the happy dance…I highly recommend this YouTube channel as I find their instructions incredibly clear and concise.
Okay… Now let’s get to this fun card!I was so excited that in the new holiday catalog Stampin’ Up out came out with another fabulous stamp set that has images in the both front and back that make tags. It is appropriately called Seasonal Chums! There are so many things you can do with these besides tags.
The minute I saw this sweet pumpkin image I knew that I wanted to make a suspension card. You are know that I adore Square cards and today is no different!
This is one that you just have to purchase as a bundle! The framelits are over-the-top and just look at the extra framelits you get to coordinate with the Larger tags… I will be using them later on a post! EEK – Look at that adorable spiderweb and bat!
The overall size of this card is a 4 1/4 ” card.I will have to be honest and share…I made a huge mistake but I was able to make “lemonade out of my lemons”! When I point it out to you you are will totally laugh…but in hindsight it actually worked to my advantage… Let’s get going!
The elements of this card is all about using the basics…Naturally you need the trimmer… the big shot with the circle framelits and a wee bit of patience and creativity! You are know how I feel about the basics… They will never let you down!

Start by using the aqua painters and coloring the images as you desire. You can see in the picture below it is so much easier just to go ahead and do several at one time as you will have many cards at your fingertips!

Use the coordinating framelits to cut the images out. Because it was super hard to try to hold the thread down with Ms. Pinkie I used washi tape to help anchor it to my work surface.
The best tip I can give to you is make sure that it is very taunt and also that you use a good strong adhesive to hold the images together.You can simply snip off the hole punch area where it was meant to be a tag.
For this card I actually used some fishing line.You could easily use silver thread or white Bakers twine if you wish – I just wanted to be clear.

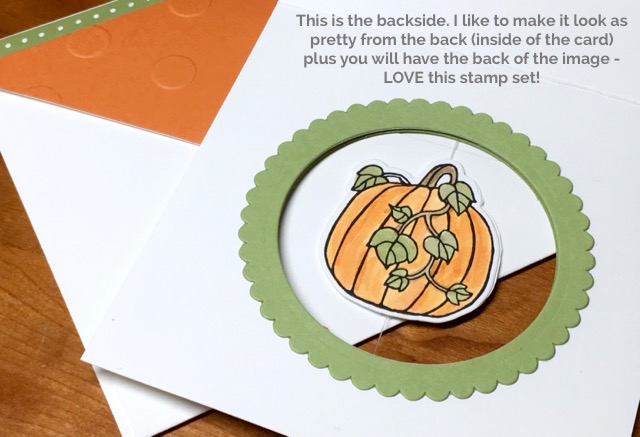
Here comes the funny of my post.I thought I was so on top of it but I totally forgot that this piece should have been ON THE CARD FRONT…and I should have cut it out. SILLY SUSAN….
PLAN B – I just went ahead and adhered this to my square card base and took a pencil to draw a line as to where I needed to cut a circle.
You can see in the below picture that I placed a very small piece of tear n tape.I adhered my fishing line and pumpkin image to it and snipped it off.

I actually like the way “my fix” looks better than what my original intention was.You can see that I used the Circle framelit as well as a scallop framelit to make a ring around the opening! It worked out perfectly.
You will need to make two with these as you will also want to cover the inside circle of the card so when the recipient opens it it looks clean and finished. Adhere these rings over the front and back and add white dots for some simple bling.
The sentiment is very straightforward. I simply stamped it on a scrap piece of paper trim the ends and added a wee little bakers twine bow.

Here is one more look at this sweet card.What do you think?I just love the uniqueness and being able to spin a little pumpkin around…..It is cards like this that make you feel so good inside as you know you will make the recipient smile!
Remember… This card would easily fit into one of our regular envelopes but you know me– out came the envelope punch board. It is the perfect finishing touch for a special card.

Before we leave I just had to share this picture.Jack came up to my work area and I could not resist.He is such a good boy – You can see he has that one I open keeping a watchful eye over me!
Enjoy your day and I can’t wait to share with you two more projects using this same pumpkin framelit. We can see how fast the calendar is rolling…I am showcasing Halloween to let you see how fun this stamp set is.You can clearly see that it will be useful later on this holiday season as well.

Have a great day…look at that calendar and if you are wanting to make some goodies for Halloween…..get your products ordered….it will ZOOM by fast~
Shopping in your pajamas’s fun …shopping in your pajamas is in style ….shopping in your pajamas is super easy!


