by Susan Itell | Feb 2, 2018 | Just Because..., Stampin' Blends |

This is my kinda card….sweet and simple that makes you smile! I know that you have heard me time and time again saying…It’s all about the basics….and YEP, I will say it again…It’s all about the basics!
I just love this card base….how about you? It is one of the FREEBIE options from Sale-A-Bration called, Tutti Fruitti Note Cards and Envelopes and they are just a breath of Spring to me on a blustery cold day like today! Guess what? Stampin’ Up is going to be offering more options for Sale-A-Bration……I preordered them yesterday so next week you will get a peek….(they are super cute)
Now let’s get back to that basics thing….look at the simplicity of this card….simple shapes with matting and DONE!. The sweet focal stamp is from the Flying Home Stamp from the Occasions Catalog. Images like this are super simple to color in and we all know we have many options in how we can color….today I used the Stampin’ Blends as they are hands down the fastest for me to do!


I have blogged about these Note Card before and you can click here to see that post….but one thing that I love about this offering is that you get 16 card bases and the coordinating envelopes are not only a FUN color but they have a great liner that coordinated with the Tutti Fruitti DSP Stack that is in the catalog….win-win!
Whenever you can get a POP of color in a simple way like this I say…..GO FOR IT as you can keep the rest of the card rather simple. The card base sets the tone letting the sweet floral and bird house POP!

Can you see what I did after I colored the image in? I took a white get pen and added some dots to the bird house and also some on the flowers! I know that it is hard to see but when you hold it….it does makes a difference – just a quick and simple touch that adds a bit of pizzazz!
Speaking of a wee bit of umph……I ran the So Saffron Circle thru Mr. Big with the Confetti Textured Embossing Folder before I adhered them together….another quick and easy way to add to a simple card!

Now to a stamp that I have honestly not seen blogged much of…..it is a Hostess Offering Stamp called Yay You….I say YAY because it is a photopolymer…..I say YAY as it was just $10.00 and I say YAY once again as I think that it is super simple and the fonts and Sentiments are YAY!
After I pulled this off the shelf I noticed the sweet little hearts…..you bet that they will get inked up this weekend as I plan to make Valentines and I call a little cluster like that a “filler” as stamps like this are perfect to add here and there to spice things up!

When I create a “fish tail” sentiment strip like this I like to do so on a much longer strip of paper….stamp the sentiment and then make a snip in the middle of the strip and then cut on either side to meet the middle cut…..
This is one of those silly things that we always seem to over analyze making sure the ends match perfectly etc…(sound familiar to anyone) when actually no one would ever notice…..you know my motto on making dots and dashes…..JUST DO IT!

One more peek at this sweet card and did you notice the inside liner on the envelope? Yep…just that little bit of crumb cake from the bird house pulls the whole thing together.
I think that next time I use this stamp I will do it with using the Aqua Painter for you to see the difference in the coloring. The one medium of color that I rarely use and know that I should give it some more love is the watercolor pencils…..I admit – I actually forget about them as my first go to os the Stampin’ Blends.

Have a great weekend and if you are a Super Bowl fan……well – I hope your team wins! We do adore watching big events like this as it always seems to be a great reason to have some yummy food…..so BBQ Ribs are our Football pick!
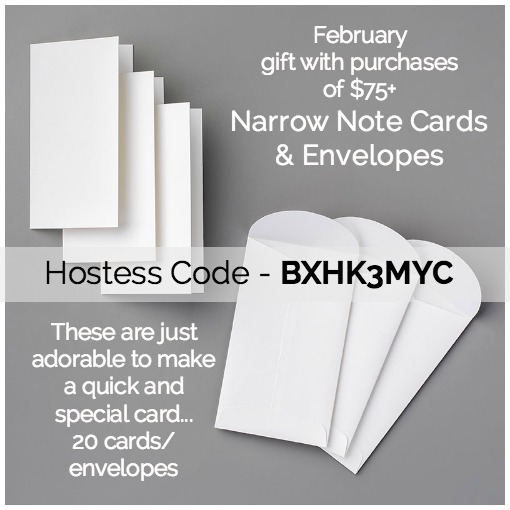
Stay warm….be safe and I hope that you can squeeze some “me time” in over the weekend and play with stamps and paper! Below you will see the new Hostess Code as well as the Gift With Purchase for the Month of February……

Next week I am going to wow you with a fun post using and highlighting these adorable notecards & envelopes….You are going to agree, they truly are super fun and unique! It was an idea sent to me from a super de duper stamper and I loved it soooooo much, I had to purchase the stamp set that coordinates with it!
I just LOVE IT when someone enables me! Have a super fun weekend…….

by Susan Itell | Jan 31, 2018 | Stampin' Blends, Uncategorized |

Happy HUMP Day and I have a post for you that will bring COLOR to your world and trust me…..ANYONE can do this and the END RESULT is ALWAYS stunning with the help from our Stampin’ Up! Stampin’ Blends!
Yesterday I went to a Copic Coloring Class with a super fun team member, Ramsey…and we had a ball! I called our “continuing education” time together the best L.L.L. time together (Lunch, Learning and Laughter)….and while we were having some crafting fun naturally we chatted…..and naturally one topic came up about – Stampin’ Blends vs. Copics. I will share with you my thoughts….
Today I want to flood you with pictures that were all created with the Stampin’ Blends
I was doing the “happy crafting dance” when Stampin’ Up! came out with our own branding of an alcohol based maker last Fall….called Stampin’ Blends! They are a great addition to our line of products. I hope that you can see with these pictures the beauty and vibrance of these markers and the best thing…..
The Stampin’ Blends match our Stampin’ Up! colors…no thinking – one bit!
Currently the Stampin’ Up! Collection of Blends have 12 of our color combinations available and I am hoping that they will continue to add more colors as we go forward. Below you will see the offerings as of now. We all know one of the KEY FACTORS of Stampin’ Up! that we all love is our amazing color coordination throughout our line of products! I know that many of you have a sticker shock with them but hang tight and read on!

Each color has a light and a dark of the color family. I think that the biggest misconception of these markers is that you need to know how to blend…NOPE….and guess what – This post is for YOU if this is your thought….
These markers are simply “dream machines” as an alcohol based marker simply glides over paper….with no start and stop marks (streaks) and just absorbs into the paper you are coloring. You can use our regular or thick whisper white cardstock. The important thing to remember is that you do need to use a proper ink…..Memento is a perfect ink for the Blends.
Later in the pictures you will see that the “bleed through” is totally normal so I suggest that you always have a scrap piece of paper under what you are coloring. When I am at home coloring, I always use the Grid Paper, (one of the most useful SU products we have) to protect your work area.

Do you remember that John and I went to Durham to help Hannah move earlier in the month? While we were driving I had a ball coloring these cards! When I pulled out my markers and got all settled in the front seat….I can remember John looking over and said, “You are going to try to color?”….I said – YEP…I think I can do it and SHAZAM…..I was able to do it with no problems!
For my monthly card kit I made this card as a thank you for the people that bought my kit. I just adore to color as it not only is rewarding, it is relaxing. I used a 4 x 4 piece of paper that is from the Petal Passion DSP which will result in (9) cards yielded from one piece of the DSP. This collection of paper is fabulous to color but this particular patten is my favorite.

I sat there with my trusty board that I like to color on and this container with all of my Blends in them. If you are wondering what the tape is on my markers….it is a way I can identify what set I have as I do have (2) complete sets of these. I really do love to color and I like to keep one in this container that I can just grab and go and the other set is up in my work area.

You can see that anything goes and that is the FUN part to me. I did NOT blend once and I think, they look great (if I must say so myself) All I did was color a section with the light marker within the color family and then took the dark one and if there was a black line in the DSP image, I would do a swipe with the darker color and THAT IS IT!!!
Below you can see a visual of a finished card…I admit, I love to mat….so the one to the left is my style of preference but truly….they are all super-de-duper with a HUGE WOW FACTOR and a card that would definitely make anyone smile!

Because I did 54 of these cards in the brights……I thought – what the heck….pull out the Crumb Cakes, Smoky Slates and neutrals (the Ivory and the Bronze) markers and give them a whirl…..below is the result and I still think that it is stunning! I colored the white background of the DSP with the Dark Pink Pirouette and the result – woot-woot!
I was a bit sad as I finished all that I had to do while driving to Hannah’s as I had no idea how long it would take….and I was a little toddler with her lower lip hanging down as I had nothing to do on the drive home…..

Now…..let’s go the contrast….my stash of Copic Markers…..I KNOW…I KNOW…I have a ton of them but heck, I do love crafting and I do love to color. After Stampin’ Up! had to pull the blendabilities several years ago (which WAS THE BEST DECISION) I had already caught the Alcohol Marker bug….
I continued my love and started with Copic Markers. These are fabulous markers but they are expensive. Actually….they can rang from around $5.25 to $7.50 a piece and the color range….endless – there are many, MANY more colors than what I have but I just wanted to show you my stash.
What can I say but I do love to craft and crafting truly is therapy and joy to me and the people that I have met along the way….PRICELESS!

When Stampin’ Up! reintroduced an alcohol markers I knew that I would still purchase them as after all, I am a Stampin’ Up! Demonstrator….and I do love the concept and feel of an alcohol marker.
The Stampin’ Blends ARE a fabulous product and Stampin’ Up! nailed it with their debut. When I am asked…which ones do you recommend…..I sigh as that is a super hard question to answer and guess what – you probably are not going to like my answer…..
I would get them all….
Yep, I do realize that it IS an investment but it is an investment that you will not regret. You can clearly see the investment that I have put into my Blends (2 sets) and also all of my Copics that I have but….heck, some people like to buy shoes….I like to invest in quality crafting products.
Now is the BEST time to get them all. We all know that Sale-A-Bration is the best time of the year with Stampin’ Up! and during Sale-A-Bration you can choose to get the complete set of Blends as your starter kit and just pay $99 and it would ship for FREE…(that in itself is another savings of $12.50) plus you can pick ANY (2) stamps that your heart desires. (what would you pick)
There are no obligations what so ever to do anything other than enjoy your product, continue to order with a discount or simply get the deal and be done….please feel free to email me if you have any questions…..
My addictions in life are the 3 C’s – Critters, Crafts and Cooking….and I have fun with them all…please do not be fearful that you have to do anything like sell, teach or blog…..I adore hobbiest as I get it – you like to craft and you like a good deal……ME TOO!
Ready to get the deal now…..click here and you will be a happy stamper!
by Susan Itell | Jan 29, 2018 | Birthday, Stampin' Blends |

Well…did I get you with the subject line? Yep, I preformed some “SS” (Stampin’ Surgery) with my trusty scissors to break up this foursome. I admit I was feeling a bit guilty as my eyes looked at their smiling faces but after the first cut …I knew I had to keep going!
I am sure that many of you are gasping and say….I could (or probably would say would) never cut up my stamps….and I get it (in a way) but when you can get more mileage out of a stamp I say….why not ….GO FOR IT!
I am on a Leaders Group where Stampin’ Up! Demonstrators share thoughts and ideas….and this is where I saw this idea. I immediately when to this stamp (and the 4 critters were screaming) …pulled out my trusty scissors…..put a good light onto the foursome and went to town right on my workspace! DONE – I now have 4 stamps but if I still want to stamp them together….no worries – just push together!!!


This stamp set, We Must Celebrate is in the Occasions catalog. I blogged using this sweet stamp earlier (click here) and I loved it then….and again, I love it today! What do you think? It is super cute and it can be paired with so many sentiments that I think you can see the mileage you will get from it!
Here is another tip that is great about this stamp…look at the little “filler” stamps as I like to call them…the confetti and the little leaf are both great additions to tuck and add here and there with projects. To me, fillers are the little extra touch that makes projects “twinkle” and make that lasting impression!
You can see with the product line up that this sweet card came together with 3 different stamp sets. I wanted to encourage you to look at what you have and use it in a different way. For example, the Heart Happiness stamp is a very classic and useful stamp as we know that a “heart” is a classic that can be used all year long but the minute I saw the 6 little hearts….BAM – I knew that they would be used just like I did today….floating up!

Let’s get to the real scoop and the tips and tricks that I did to make todays inspiration for you. I used a technique that I know seems a bit scary but actually it really is not – I simply masked the bear and raccoon. You know what I am going to say to YOU….
YEP, you need to practice…you just need to try!!!
When I mask I prefer to use a masking paper but you can easily use a simple post it note. The reason that I use a masking paper is that this paper can be used several times and I simply tuck the mask in my stamp set so if I want to do it in the future, my mask is ready to go.

If you are using a post it note…make sure that when you stamp the image…you are stamping on a part of where the “sticky is” as this is how it will hold tight when you “mask” and stamp the next image!
Below you will see a picture of the image sheet of the Stamp-a-ma-Jig….and yep, it is a critical part of making precision for adding my fellows! Because I used the “jig” I am able to see and tilt the critters to exactly where I want the next one to go. I think “tilting them a bit” adds a fun element.

I can hear many of you are sighing about the “jig” but it IS one of those basics that every stamper needs to have. I know that we do not use it a bunch but trust me, when you need it…it is not only a time saver…it is a frustration saver as with this simple piece of plastic…you can get PERFECT placement every time!
The coloring was a cinch with the Stampin’ Blends…these alcohol based markers make coloring FUN and don’t let that would “BLEND” get you in an uproar….you DO NOT have to blend when using them…just color if that is a comfort level to you….and if you want to blend…great – no rules…just do what YOU are comfortable with.

The best parts about these markers are that they color without streaks making simple coloring a rewarding experience and the other thing…they match our color palette perfectly, something that Stampin’ Up! does brilliantly! Make sure that when you use these that you are color over another piece of paper as the natural “bleed through” is a natural process of an alcohol marker!
Sentiment time…..where did this come from???? The Happiest of Days…which is in the good old Annual Catalog! I don’t know about you but….there are times (actually many times) that I feel bad for the Annual Catalog…..we all get soooooooo excited for it….it gets revealed to only have the Holiday Catalog steals its thunder and then the Occasion Catalog doing the same….remember – look in your stash and use what you have!
I have showcased this stamp set many time….click here and then click here….both some of my all time favorite cards…the simplicity of the open designs of this stamp make is great to create! Also…..the “jig” helped me make the placement perfect. (I know…many of you do not like this tool…but it really is not a bad guy)

A fun card like this can use a bold DSP to make the envelope shine. This is from the Tutti-fruitti DSP Stack, a fun and colorful pack! I admit, the picture does not do this pack justice as I think it appears super busy…but when you look at the paper (singularly) there are some fabulous finds….definitely a go to for my style of card making.


I hope that this post makes the start of your week with a beautiful smile on your face! I was super happy with it and I do encourage you to try your hand with masking. We all have sooooooo many stamps in our stash to mask with.
I will see you on Wednesday with another coloring fun project that I have been working on…..speaking of coloring – tomorrow I am having some “coloring therapy” with a dear friend that is on my team and we are doing some “continuing education” (I like the way that sounds…and John laughed when I told him) as we are going to a Copic Coloring Class. We can never stop learning and crafting…right????
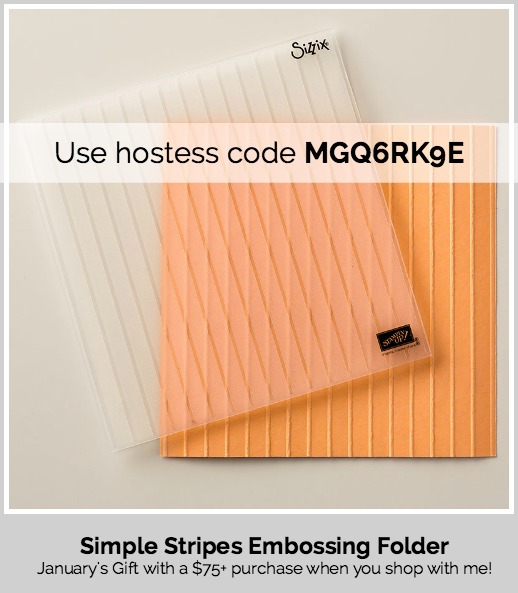
I would love to send you this card and also this embossing folder…..they are my thank you gift for when you order with me this month. My current hostess code can always be found on the right side of my blog…but here you go to copy and paste – MGQ6RK9E….and please remember, I offer a very generous (well I think so) rewards program for shopping with me – it is a joy for me to send you freebies as heck – we all love a gift!
by Susan Itell | Jan 26, 2018 | Birthday, Super Easy |

Happy Friday….this week has been about Birthday Cards as lets face it…we each have one of those special days each year and we also love to send Birthday Cards…..well, we love to when we have a great idea or a stash ready – but trust me, I get it!
In November when I went to On Stage in Salt Lake City I can remember the first time I saw this kit in the display area…needless to say I was wowed! Not only was I doing a “happy dance” with the sheer beauty of the fun box but it didn’t stop there as when I saw the sheer quality and design of the cards…and then…the monthly dividers – I loved it!
The lightbulb that went off in my head was…WHAT A GREAT GIFT!
Let’s face it, I think that it is pretty fair to say that most of our “WANTS IN LIFE” are very minimal as I think we all feel very blest but I don’t know about you…I love to share my love of crafting with family and friends and what a fabulous gift this would be for that hard to buy for person.
The beauty of this is…it is timeless – being that no matter when you would “gift this” to someone… they can always use it. You could either give the Kit as a gift and have you and your friend put it together for a fun time spent together or go ahead and make it up and give it as a gift!
I have a BUNCH of pictures for you today but before you peek at them….watch this short video that Stampin’ Up! did showcasing this kit and you will see 1st hand what a blue ribbon winner it is!
I always try to give you a “heads up” for tips and tricks when I recommend a product. I followed the instructions to a tee with the exception of the placement of the Dapper Denim Bakers Twine and I also did not use the tassel stickers that were to go onto the balloons. Just some personal preferences in placement.
The kit is VERY generous with the amount of ribbon and twine. You can see in the below pictures that I doubled up on the twine for all of my bows (again, just a personal preference) and I had plenty. I always like to share these tips as I realize how frustrating it is to keep thinking while you are creating….can I use more…or maybe I’ll run out!
Below is a great visual of the kit contents…..

The next several pictures are close-ups of each of the cards that I put together. Not only were they super easy to put together, this are super cute and oh so practical cards!
The stamp set that is used to create these cards is called the Perennial Birthday Stamp Set. THANK YOU Stampin’ Up! for creating not only great outside sentiments….but also the ones that coordinate for the inside of the card. WOOT-WOOT…..we all LOVE that!
Remember, this below stamp set is sold separately from the kit but I think you will see and agree, it’s a keeper! After these photos I will share with you what I did with this kit…and trust me, it has been a huge hit!


Before we get to the last 2 cards let’s peek at the dividers….they ARE key to me…as this will KEEP US FROM MISSING someones Birthday! I just do a little wiggle of excitement when I can be more “on top of it” and having a “key” with Birthdays filled in does it for me!
Even though the kits makes 16 cards….you can easily put more in the box and also throughout the year as you make cards they can be added! I like to think of it as my stash of ready to rumble!

Here are the last 2…they are just adorable and being able to stamp a coordinating sentiment to the inside of the card is a time saver!


Now you know me….I adore my envelopes. To me, the envelope is the FIRST GLIMPSE of the presentation of the card. My Mom always taught me that if you take a bit of time for the presentation of something….than the recipient will feel special from the minute they see it….and let’s face it ladies….we all love to feel special cause’ guess what….WE ARE SPECIAL!
I used the Sweet Soiree DSP to add some love to the envelopes! The colors work perfectly for this kit and it gave me the extra special trademark touch that I love to give.
You can see in the picture below that using my DSP Swatchbook from the Product Shares made the picking out the paper a breeze. To me, they are the 911 when creating!
You can also see that I have a pack of gold candles…I purchased them for a whopping .97 at Walmart along with some simple balloons…after I made up the kit….I also tucked in a pack of candles and the balloons….just another sweet touch that costs sooooo little but will make someone feel super special and add so much!


One last peek of the entire kit and also an idea for you…. and then one from my sweet John…..
After I put together the first kit and saw the WOW of it….I thought – what a perfect gift for my girlfriends. I admit, most of my friends have no clue what I do but they know that I am crafty. (I do not teach locally as the bulk of my Stampin’ Up! fun is cyber) I purchased a bunch of these and had a ball making up these kits! I tied a beautiful white bow around it and strategically placed a long skinny cluster of gold candles thru the bow.
They are all stacked in a closet and PRESTO….a perfect gift that will only be super special and practical to them…but they will see firsthand what I do…. (the truth be told…I have a fear of teaching that I am afraid no one would come) I have already had 3 Birthdays this month with friends…and they have loved the kit!

My sweet John is an Accountant and this is his time of year of craziness. When he saw this kit is was amazed. He was also amazed when I told him that many of my customer simply do not purchase the Stampin’ Up! Kits….he asked me why and I said…..I really do not know as they sure do like my kits…..
He then said – this is perfect….I’ll take 8 of them for my ladies! Every year when it is Business Administrators Day (it is April 25th this year)…John takes the ladies to lunch. It is always a highlight for them as John is great in taking time to make his employees feel special. These people make the whole system work in cranking out the workload and it is his way of saying thanks!
He said… can you put a big bow on each of them and we can put it at their place. (I usually always put a little potted Spring Flower at their place setting) and then I will let them know that at 4 p.m. that day they will be treated to a special time with you in helping them put the kits together! Doesn’t this sound like fun!
I told you he was a keeper (and actually the best blind date I was ever on).….naturally I am THRILLED with the order….but I also know that his ladies will love it as well! The moral of the post is….this IS a keeper kit and it is also priced right!
How perfect to get the kit or kits…..the stamp…take advantage of some FREEBIES from Sale-a-Bration…WOOT-WOOT all around!
Have a wonderful weekend…..I have another idea for you on Monday that will make you say….now that is soooo darn cute! Thanks for shoring some time with me and thanks for being YOU!
by Susan Itell | Jan 24, 2018 | Birthday |

Happy Hump Day! This week I am posting about Birthday Cards as it seems like one “intention” we attempt to do in the New Year is…..vow to send more Birthday Cards! I get it as this is something we all have each and every year and let’s face it…when we receive a card in the mail…we are touched!
Click here to see the Birthday Card from Monday…I thought that it was super sweet and it focused on how you can make a fun card using a minimal amount of DSP to make a POP of a statement. Remember, there are always tricks and tips on how you can create in a simple way and also without breaking the bank!
Today’s card is what I like to refer to as a “Formula Card”…what the heck is that? Well they become a lifesaver when you are having a creative block or simply have a specific amount of time to create as you can simply use the “formula” to dictate the focal part of the shapes and then you have the fun part of picking the theme, the papers, and the stamps!
Above you can see that I have (2) of the same cards but just tilted the square a bit and changed the base color but the end result is the same….A FUN CARD! When you have a good thing going….don’t change it!

When you are working with a great stamp set, today it is the Picture Perfect Birthday and then a fun grouping of paper, today it is the Picture Perfect Party 6 X 6 and then the FREE…yep FREE Card Bases which are the Tutti Frutti Cards & Envelopes from the Sale-A-Bration offerings.


I know that you love it when I give you the measurements for a formula…so here you go! If I were you ….I would make a formula card up today and then write the measurements on it so you can always just grab it and reuse the formula!!!

- Card Base – good old A-2 card, 4 1/4″ X 5 1/2″
- The DSP Square 3″ X 3″ and then matted in 3 1/4″ X 3 1/4″
- Placed a piece of ribbon and tied a simple bow around the square piece
- The DSP Circle is a 2″ (I used the 2″ punch) and then matted with a 2 1/4 Circle, again…I used the 2 1/4″ punch.
- Stamped the sentiment on a piece of scrap and then matted it.
- Adhered the shapes and then POPPED all of them up!

We all know that we are in FULL SWING with Sale-a-bration, (the sweetest time of the Stampin’ Up! year) but I think that there are readers that sometimes do not know what Sale-a-bration is……in a nutshell….for every $50 you spend….you are able to pick a FREE SAB ITEM and then this year…Stampin’ Up! is also offering a 2nd tier of freebies…..with a $100 order you can pick from here or you can pick (2) from the $50 tier. (I just love choices!!!)
Personally….I think these cards that I am using today from Sale-a-Bration have been breezed by many. Remember, these Tutti Fruitti Cards & Envelopes are not only fun and festive….but the envelopes are a huge woot-woot! It simply does not get any easier than this…I think that you all LOVE getting a new stamp and again, I do “get it” but I felt the need to showcase these today as I just adore them!

I hope that you pop back on Friday because I have another Birthday inspiration for you….let’s recap….Monday I used the Birthday Wishes for You Stamp Set….today I used the Picture Perfect Birthday Stamp Set….can you guess what I am going to use on Friday? (pssst…..here is a teaser…..I think you are really going to like it)
Here is something that I thought after making todays card….I stood back and thought…hmmmmm – this is kinda boring….kinda plain but then I thought – NO SUSAN….just STOP – it looks fine as isn’t this what you want to share….a clean and simple card that can be whipped up in a jif….but I invite you to see that you could easily add more to this great card IF you wanted to….
What could you add? Hmmmmm….
- Make a party horn from the stamp set and add it by the sentiment
- Add some simple rhinestones for a quick bling
- Add some loops of thin silver thread under the sentiment
- Make a simple candle from the stamp set and add that by the sentiment
You see…there are ALWAYS ways that you can add to a project. I hope that these tips can help you see that there are soooooo many ways to design and that YOU CAN design with what you already have…..just put that thinking cap on!

Have a great day and always know….I believe in you every STAMP YOU MAKE….as this wonderful thing that we do….is not only fun & rewarding – IT DOES MAKE A DIFFERENCE and so do YOU!


