by Susan Itell | Sep 14, 2017 | Halloween |

Good morning! I have another fun post for you today and I have a tip that will make all of you out there that have a Mac computer a very happy person… I think! Hang tight with me – we will get to the fun card today – but…
I have one week under my belt with Ms. Pinkie and five more to go… I am doing great but the restriction of not having two hands is the pits! I have shared with you before the the typing is the thing that really bothers my hand.Wait to you see what I found!
I just have to share this with you before we get to this fun post because I was super excited! You know that I feel that I’m very technologically challenged…well –
I drive my kids nuts as I use Siri all the time for text messages (and as they say most of the time they make no sense).Look below with what I found! Needless to say I was doing the happy dance…I highly recommend this YouTube channel as I find their instructions incredibly clear and concise.
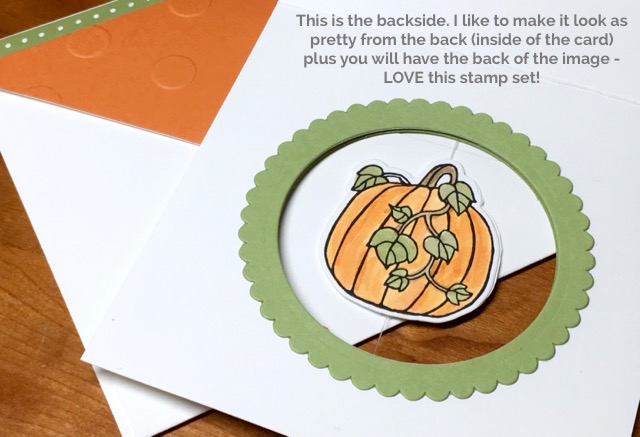
Okay… Now let’s get to this fun card!I was so excited that in the new holiday catalog Stampin’ Up out came out with another fabulous stamp set that has images in the both front and back that make tags. It is appropriately called Seasonal Chums! There are so many things you can do with these besides tags.
The minute I saw this sweet pumpkin image I knew that I wanted to make a suspension card. You are know that I adore Square cards and today is no different!
This is one that you just have to purchase as a bundle! The framelits are over-the-top and just look at the extra framelits you get to coordinate with the Larger tags… I will be using them later on a post! EEK – Look at that adorable spiderweb and bat!

The overall size of this card is a 4 1/4 ” card.I will have to be honest and share…I made a huge mistake but I was able to make “lemonade out of my lemons”! When I point it out to you you are will totally laugh…but in hindsight it actually worked to my advantage… Let’s get going!
The elements of this card is all about using the basics…Naturally you need the trimmer… the big shot with the circle framelits and a wee bit of patience and creativity! You are know how I feel about the basics… They will never let you down!

Start by using the aqua painters and coloring the images as you desire. You can see in the picture below it is so much easier just to go ahead and do several at one time as you will have many cards at your fingertips!

Use the coordinating framelits to cut the images out. Because it was super hard to try to hold the thread down with Ms. Pinkie I used washi tape to help anchor it to my work surface.
The best tip I can give to you is make sure that it is very taunt and also that you use a good strong adhesive to hold the images together.You can simply snip off the hole punch area where it was meant to be a tag.
For this card I actually used some fishing line.You could easily use silver thread or white Bakers twine if you wish – I just wanted to be clear.

Here comes the funny of my post.I thought I was so on top of it but I totally forgot that this piece should have been ON THE CARD FRONT…and I should have cut it out. SILLY SUSAN….
PLAN B – I just went ahead and adhered this to my square card base and took a pencil to draw a line as to where I needed to cut a circle.
You can see in the below picture that I placed a very small piece of tear n tape.I adhered my fishing line and pumpkin image to it and snipped it off.

I actually like the way “my fix” looks better than what my original intention was.You can see that I used the Circle framelit as well as a scallop framelit to make a ring around the opening! It worked out perfectly.
You will need to make two with these as you will also want to cover the inside circle of the card so when the recipient opens it it looks clean and finished. Adhere these rings over the front and back and add white dots for some simple bling.
The sentiment is very straightforward. I simply stamped it on a scrap piece of paper trim the ends and added a wee little bakers twine bow.

Here is one more look at this sweet card.What do you think?I just love the uniqueness and being able to spin a little pumpkin around…..It is cards like this that make you feel so good inside as you know you will make the recipient smile!
Remember… This card would easily fit into one of our regular envelopes but you know me– out came the envelope punch board. It is the perfect finishing touch for a special card.

Before we leave I just had to share this picture.Jack came up to my work area and I could not resist.He is such a good boy – You can see he has that one I open keeping a watchful eye over me!
Enjoy your day and I can’t wait to share with you two more projects using this same pumpkin framelit. We can see how fast the calendar is rolling…I am showcasing Halloween to let you see how fun this stamp set is.You can clearly see that it will be useful later on this holiday season as well.

Have a great day…look at that calendar and if you are wanting to make some goodies for Halloween…..get your products ordered….it will ZOOM by fast~
Shopping in your pajamas’s fun …shopping in your pajamas is in style ….shopping in your pajamas is super easy!

by Susan Itell | Sep 11, 2017 | Fall Cards, Uncategorized |

Hello and here is to a NEW week……Hen peckin’ pinkie here! Now I have a WOWZER for you today (and I hope that you feel the same) I am trying to focus a bit more on “techniques” to teach you and I hope that you are a sponge and soak this up!
I will be limited on words but I have some great pictures for you! Please feel free to leave a comment – I do hope that you try this as it if not only FUN but it is something that you can do with so many framelits…..
This bundle, Colorful Seasons is truly one for ALL seasons. I know that this has been blogged a bunch when it first came out…..so I waited until I had a WOW and I really like this fun and modern layout.

The layout is one that you can use with soooooo many colors and soooooo many different themes but here are (2) key products to make this a fun process.
1 – The Multipurpose Adhesive Sheets – why? – I adhere the card stock to it and then trimmed off the excess. This made it so easy to adhere it all to 1 piece. I first added the adhesive sheet to a piece of printer paper (that was 5 1/2″ X 4 1/4″) because it was super thin and I knew that I needed to cut through the cardstock, the printer paper and the adhesive sheet with the die cut.
2 – The Grid Paper – After I exposed the sticky side that was on the printer paper….I could use the grid paper to line up the card stock to ensure the lines would be straight….
You can see that I made (2) of these cards….and I tried to make the color scheme very different and unique….To me, it still is super clean but there is a fun and unique twist.

The other learning curve is the embossing. I love to heat emboss and I know that the WOW is always there with you as well, it is magic! The key is to heat emboss 2 times .I tried 3 and it was a mess…the details of this die cut were just too intricate. Trust me on this one. Below is a collage that I put together for you.
You will see that in the last picture they are warped…no worries – just put them in a book and they will get flat in no time. By doing many layers of embossing…the effect turns into a totally different look and feel of how we regularly emboss…making it an embellishment of metal fun!

I know that I am jumping ahead but can you see that I put vellum behind the leaves? Yep, I did. I truly wish that you could hold this in your hand as the vellum is stunning …I used tear -n-tape to adhere/anchor it to the color block card stock fun.
Adhering it this way it was not only easy (as we all know that the trick with vellum is the adhering part) so you do not see your adhesive. Having this wee bit of vellum really is stunning behind the leaves. It just gives a softness that does make a statement.
The fabulous sentiment, “just breathe” is also on vellum and heat set with the copper. I matted it with the vanilla (cause’ John said so) to make it show and pop! I carefully added some adhesive on the backside of some of the letters – again to hide the adhesive but the copper adhesive dots were the big help to hold the vellum.
For this card I used fun foam to raise the whole panel (the die will easily cut through the fun foam). Fun Foam is so inexpensive and you use every little piece to the end (just like stampin’ dimensionals)…I highly recommend you having a couple of sheets i your craft room…..you’ll be happy to have it on hand.


Let’s move to the other color combination. The colors I used are in the line up at the end of the post. You can clearly see the sky is the limit with color options…Have fun! ****(I noticed after I published this ,,,I have the wrong green listed – it should be Tranquil Tide…..NOT Emerald Envy)
In the second picture, you will see that I adhered this card panel to the card base making it flat. I couldn’t tell which one I liked better, do you have a preference…? They both work great but I think that I like the effect of the whole panel raised as it makes the vellum more noticeable!


Let’s chat about an envelope… I decided to do something total different and heat emboss the envelope. I was super happy with the end result and the envelope laid perfectly flat..to my surprise!
I was scratching my head as what to do for an envelope flap..so – why not, jazz up the front!

Now to another fun tip… As I am sure you have many embellishments that you simply do not use. As you can see in the picture below, I took VersaMark and applied to the embellishments and sprinkled the embossing powder over top and heat set them. Presto… a fun embellishment that works perfectly with this card.

There you go, a fun card that I hope that you can see….is doable and different. Please let me know what you think and which one is your favorite.
My thoughts and prayers are with all that are affected by the hurricane. Our Country sure has dealt with a bunch as it is so scary!
Enjoy the day and I hope this post has inspired you to take something that is very simple and add a fun twist to make a WOW! It was not only FUN but it was a great experience learning a different technique…
by Susan Itell | Sep 9, 2017 | Thinking of you, Uncategorized |

Good Morning….HEN PECKIN’ PINKIE here…Before we get to this simply beautiful card (if I do say so myself) I want to say a big thank you for your sweet comments, emails etc….about my “bump wrist” I am doing fine but I admit, I am not a good candidate to be in slow mode. This “pinkie” is not the best for a card maker…..Oh well…..I will be fine!
Ok…I love this stamp set, Count My Blessings. I blogged about it before and I will blog about it again as I just think it is lovely. The “sketchy images” make it a breeze to add a bit of color and BE DONE! The below picture from the catalog was my inspiration for todays project.

I was proud of the end result that I did and I will say…it was FUN to make but it was even better to have the feeling inside that I stuck it out to make that background…and it really was not bad at all! Gotta love your stamp-a-ma-jig! That darn piece of plastic IS your friend, it is just one of those things that you really need to learn how to use….as it does come in handy!

Because it truly is a pain to type, I will let my pictures tell the story! Please leave me a comment and let me know how you like it….I was super happy with the end result and I will make more with a variety of colors to have on hand! A classic in my eyes….
To create the backdrop, I simply used the “jig” and Pear Pizzazz was the focal color of the day! I did use Very Vanilla as my base….I love it for Fall….Layers of paper, simple bits of color….creates a classic!


I know the last time I used gold for some splatter accents I had emails about it. I purchased it from Amazon, here is the palette that I like to work with but if you do not want to invest this much, I am sure any “gold” paint will work.


Enjoy the day….I hope that this “brighten your day”….you know what I call it….”a keeper”
p.s. – I hope that you know it is “killin me” not to type my heart out….it truly is a pain….(in both ways)
by Susan Itell | Sep 7, 2017 | 3-D Projects, Halloween |

Here is a FUN idea for that “hard to think of what to get” friend. Let’s face it, we all really do not need anything BUT there are times that we like to make someone’s day!
I took full advantage of the game board this week and went straight across the top – ACETATE-BOX-CELEBRATE! Make sure that you pop over to the Tic-Tac-Toe Challenge Site to see what the other designers came up with!

I hope that you can “get this idea” as it is a great concept and just think of all of the “products/enclosures” that you could put in this little box of fun. First, the White Box is on CLEARANCE and how can you go wrong, (let me answer it…YOU CAN’T) for $3.20 and you get 8! HIT THAT BUTTON!
This box has the the makings for someone to make (5) gift enclosures with adorable envelopes and eat some yummy chocolates while doing it…and heck – the chocolates look super cute as well!

It was super hard to get a good picture if the inside but it does fit in there perfectly. Are you wondering why I put an odd number (5) of enclosures in the box?
Let me share my method to my madness….I chose that number because I have (5) of the squares that I used to decorate the box! I used a temporary adhesive to mount them so all you would have to to is take them off….add some adhesive and PRESTO…..someone can make a sweet enclosure in a jif!
I also added the banners of Trick or Treat as well as some dimensionals….. so all Suzanne has to do is trim the ends and she is good to go! This really is a DIY gift of fun!

To me, this is the best Halloween Stamp we have in this catalog. Not only is it a super stamp set….but the BUNDLE part is a punch…..now that makes ALL OF US happy!
There is a little something for everyone but the real star is….THE CAT PUNCH! I knew that this cat would be flying off the shelf and yep….you need to purchase this as a bundle….a win-win all the way around! Punches make life so fast and easy.
I did not use the cat punch on my enclosures today but you can see that I did punch a bunch out…..tied a white bakers twine bow around and popped it in my box. Susanne is a huge cat lover and I know that she will put them to get use!
Don’t forget, the punch will pop out the cat image on the DSP….how clever!


One thing that I love to give as hostess gifts are tags. Wouldn’t this be an amazing idea to do making Holiday Tags?
I do not worry one bit if I am giving Holiday tags to someone and it is super close to Christmas….the way that I look at it is….they will ALWAYS get used and trust me, it would be a HIT of a GIFT~
Think about birthday enclosures…I just was squealing with excitement when I created this – it is a win-win because it is super clever but it is super useful!
Remember, handmade will TRUMP a store bought gift any day…and not only will you feel great….the lucky recipient will love it as well! You see…it’s FUN to think out of the box!
by Susan Itell | Sep 6, 2017 | Uncategorized |
Happy Hump Day! Silly Susan has a new PINK friend for the next 6 weeks – I broke my wrist. I wish that the story of how could have been more exciting but….the truth be told – I tripped over Daisy (my dear piggie) while I was walking Colin out (a horse) to a field!
All is good and my wrist will be fine but I am in that “figuring out” stage with PINKIE! So far PINKIE and I are not feeling the “peanut butter and jelly love” but it has only been less than a day!
I do have a super FUN post for you tomorrow (I am really excited with it) as it is Tic-Tac-Toe and I needed to have that completed before PINKIE came to live with me!
This one hand “pecking the computer” is for the birds but I will figure it out and find a groove! See you tomorrow…


