Super Cute…Super Fun…Super Practical….Super that it is on SALE…but today is the LAST DAY!
I have blogged about this die many times and click here to see one of post that I have showcased the ins and outs of this fabulous die. Same principles as I have blogged about before but you can see that I switched up the paper and themes!
This die is a true keeper and whenever Stampin’ Up! is so kind to have it on sale….I always get many of you to take advantage it it and I do not blame you one bit. I totally realize that dies are $$$$$$ but when they are on sale, snatch them up! Remember, TODAY IS THE LAST DAY for it to be on sale with the weekly deals!
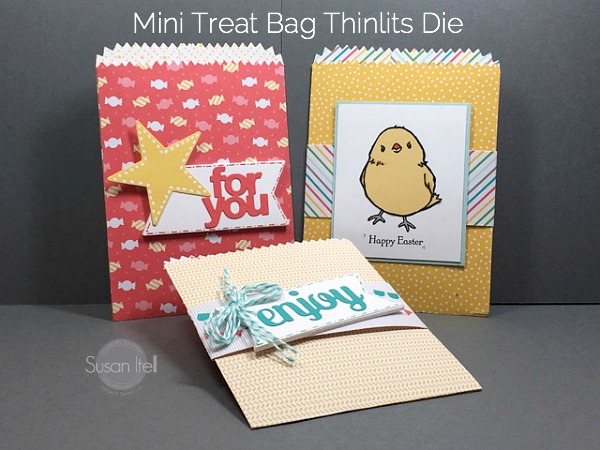
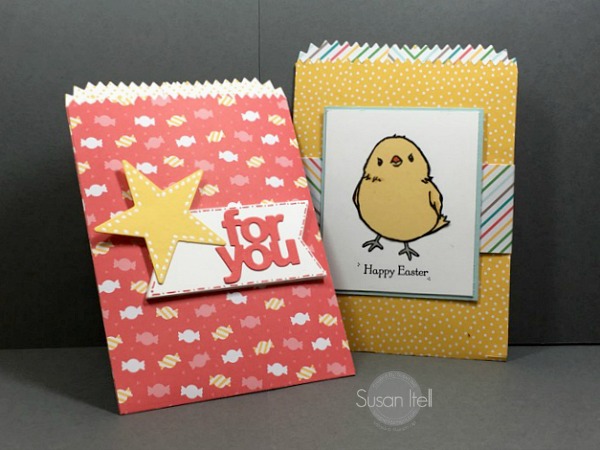
You can see that I used one of the Sale-A-Bration Stamps….Honeycomb Happiness – a very popular one with many and that little chick is just the cutest! All I did was stamp it on a piece of So Saffron and then to the So Saffron marker over the black lines for additions depth and the sentiment is from the Teeny Tiny Wishes Stamp Set….a perfect stamp set that is a HUGE help when looking for the perfect sentiment!
When you read my previous post you can see that this adorable bag is perfect with out 6″ X 6″ paper stacks but it is also a FABULOUS way for you PAPERHOARDERS to CLEAN HOUSE and the best news….you will smile and the person that receives it will smile!
Look at all of the pieces that are in this die……the sky is the limit of using your creativity but even more…you will use the other pieces in this die with card making!
You can see how close you are to earning a FREE Sale-A-Bration item…I say go for it! Click here, grab this gem of a die while it is on sale but remember…it is only today as every Tuesday you wake up to new weekly deals!
Thanks for popping in…I truly hope that everyone had a fun and safe weekend and until tomorrow!!!! Let me know how you like this fun project….the sky is the limit with what you can fill in your bag!
Wow…it is still a lot of snow but we are getting through it! Tractor died…YIKES – my washer machine is SICK.…but life is good and I hope that we will make out out today! Darn, I hope so -Yesterday, John worked from the house and if he is happy…I am happy (after all it is tax season)
Click on the below video and you will see how Party Poppers ARE like Potato Chips…..once you have one…you simply cannot stop! They are FUN….they are EASY.…they are ADDICTIVE and you an fill them with a multitude of goodies – think out of the box – true it can be sweets, but it can also be inspiration quotes or even a message of affirmation to the specific recipient!
I hope that you are able to find some “me time” and make some of these fun and festive poppers. I know that you will smile. The FUN thing about this is…THINK OUT OF THE BOX – I am sharing with you ideas that are also non-traditional with a typical Valentines color/stamp theme!
Here is a quick scoop for you to reference!
The size of the paper is 4 1/2″ x 6″ (this is why the paper stacks are great)
On the 4 1/2″ side, score at 1″, 2″, 3″ and 4″ – use the bone folder to give a good score.
Starting with the 1/2″ side folded down, put in the envelope punch board and at the 1″ line…punch. FLIP the entire piece over nd again, at the 1″ line…punch.
Fold down to the next score line and do the same….1″ Press….FLIP 1″ Press…..continuing to do this the whole way.
To adhere, I use the Fast Fuse along the 1/2″ piece, a glue dot on each end, FOLD to adhere – DONE!
Please watch the video to see the entire process if you are confused or also feel free to email me and I will be glad to help you!
For the belly band:
The paper size is 2 1/2″ X 4 3/4″
Using the Stampin’ Trimmer and the scoring tool, take this piece and score a teeny tiny larger than 1″…so this 4 more times….(I like to use the right hand side of the trimmer as I think it is easier to see)
If you want to stamp something….do it now and also stitch or add dots….(just try it – it is FUN)
Place adhesive on the end, fold over and SMILE! 😉
I hope that you have fun making these and I hope that you agree…..it IS like potato chips….you will need to have more than one! These sweet 3-D treats are always a hit and I know that you are going to have fun making them!
It is Tuesday and you know what that means….NEW weekly deals –please click hereto see the offerings this week – do you have a favorite???? Please feel free to leave me a comment and also, let me know how you like the video! (I am really, really trying)
Here are the products that I used to create these fun treats….remember, think out of the box and work with what you have! Stampin hugs to all….until tomorrow!
Good Tuesday morning to all! Are we getting over the hustle and bustle of the season? It sure is fun but it sure is hard to get back into the routine. I have a super fast and fun project for you today but before we get to it….
I wanted to say that many people have emailed me about not being able to see the blog etc….my address is still the same www.simplestampin.com ~ my guess is that you need to “clean your cookies” in your computer for it to pick up the automatic link. (I must say – I feel like LOOKS WHOS TALKING!!! ~ as when I was told that my face was priceless….COOKIES???? REALLY???? I didn’t know my computer could bake!)
Time to think and play with ideas for Valentines Day! This is a super fun and quick project that takes no time at all to make. I know that you will be seeing in the new catalog some super sweet Valentines Day Stamp Sets but I also realize that there is a very limited time for you to use them!
This is a super cute little treat that does not take any stamping…just 2 punches and PRESTO! This is what I used for these goodies!
Scalloped Tag Topper Punch
Sweetheart Punch
You really do not need me on this one…but you know me – I love to share and help you complete projects! Using the Paper Stacks is so easy as you can cut them into 2″ strips and then use the scalloped tag punch on both ends…simply fold it in half!
I am so happy that Stampin’ Up! is continuing to come out with these paper stacks…for todays post I am using more of the “Valentines side” of the paper but remember, they are double sided! You simply cannot go wrong with getting (48) 6″ x 6″ sheets for just $8.00.
Remember, I am offering this paper in my Product Share….you can click here to see all of the details – Shares are simply the BEST way to get a great taste of everything before you take the dive and purchase a whole pack of paper!
Here is a tip…fold up the edges of the Chocolate Squares and then they will fit perfect. I also used a glue dot to hold it in place so it would not slide out. Have fun stitching around the heart and then 2 dimensionals and you are DONE…just add a simple piece of ribbon or twine and you are good to go!
Can you see yourself making these? I sure hope so as they really are super quick and easy to do! They would be perfect to have on your desk to give away, a little something “just because” – I am going to include one in the products shares when I mail them out! I always like to tuck a little goodie inside.
You know what today is…Tuesday, the magical day that Stampin’ Up! offers us new weekly deals!
Click here to see the goodies. Enjoy your day and please share my blog with family and friends….as my Mom said, word of mouth is the best way to grow! Until tomorrow!
***p.s. – I just woke up and saw the weekly deals...you could easily use the ornate tag topper punch for this. I personally use the scalloped one more but if you are looking for a bargain, this is a great deal!!!
Good Monday and here is to a GREAT week!I am coming back and adding to this post as Stampin' UP! just revelled the retiring list of products for thecurrent Holiday Catalog. This is a fantastic time to get this Santa….
Remember, it is only while supplies last for the retiring goodies so if there is something that you have been looking at and on the fence about…..DO IT!!!
I want to give you all a HUGE shout out for the wonderful comments that you have left on my blog the past 2 days.We have another lucky winner!
To me, it is a wonderful way to "hear where you are" with what you like and would like to see with Stampin' UP! but then yesterday was a fabulous glimpse of how you became "hooked"with this fabulous and healthy "obsession" we have in creating cards!
I will share with you my thoughts about the past 2 days posts after we chat a bit about this "hands down" adorable Santa!
If you click here you will see the post that I did at the beginning of the month with the curvy keepsake box that was a Thanksgiving Theme…..because of that darn calendar rolling forward so fast, the Santa is replacing the Thanksgiving for any orders that I receive from today until the end of the month!
This adorable Santa was totally cased from the super talented Mikaela Titeridge and you can click here to see the tutorial that she graciously has on the Internet (thank you Pinterest)!!!
I am sure that you would love to receive this adorable guy and I would love to pack him up and send him to you!Yes, he does have a "window" on the back side that you can take a peek inside to see what goodie you have. (Yep, I did M & M's again)!
These would also be SUPER CUTE to have as name settings for your Holiday Table. You could write the persons name on the little tag….I am going to do this and also for my sons class (I know that his kids will love them)
Again, click hereto see the post with all of the specific on how you can get this adorable Santa plus an opportunity for you to get the Silicone Craft Mat from me absolutely free!
Please remember to use the
Hostess Code of 4JUNK3R7
to take advantage of both of these FREEBIES from ME!
Way to go and I am soooo happy for you! Please shoot me an email and I will make a trek to the good old Post Office and send them to you! I think that it is wonderful that you remember your 1st stamp set and that it still makes you happy!
Now to some fun thoughts from me! I want you all to know how much I enjoyed and appreciated your comments and as I said yesterday, we have similar thoughts…if I had a "magic ball"some of my very first thoughts of what I really, really would like to see are….
stitched framelits
more sentiment dies
Thick Card Stock in Very Vanilla
Notecards and Envelopes in Very Vanilla
adhesive strips for shaker cards (like the ones that are in the Holiday Shaker Cards, I will be blogging about them next week)
I "hear you loud and clear" about more sentiments for the insides of cards and I know that I need to do a better job sharing and helping you with ideas – thanks for sharing your wishes…
Shipping….I hear you and I feel your pain! I will say that I HOP on the train when I hear FREE SHIPPING (with a favorite store/website).…and yep – it would be a great if SU offered that….(Iwill say, since I have been a demonstrator they did have it once….who knows – maybe they will do it again) I think that there were some FABULOUS ideas for shipping price suggestions and trust me, I will pass them on!
I know that I want to share with you my introduction with Stampin' Up! but we will do that another day, (This post is already long) and guess what, I am not going anywhere as I LOVE what I do and I ADORE helping YOU! Please have fun shopping awayand I will be happy to "pack up a Santa and silicone mat"
Guess what tomorrow will be….a small but hopefully exciting "sneak peek" of the new goodies…..I am very happy with the new catalog and Sale-A-Bration….wowzers – get ready to be doing the happy dance!
You all are the best and I soooooo appreciate you….(so does Eddie and all of his friends)! Until tomorrow!
I know that last week I shared with you that I was doing the HAPPY DANCE when Stampin' Up! released the refill kits from the September Paper Pumpkin Kit. There are just no words to convey how cute this is and equally how fun it is to put them together – EVERYTHING IS INCLUDED!
Because I am a Paper Pumpkin Customer I am able to order these and we are allowed to "cash and carry" them, so I am able to offer them to you! You cannot go wrong = you will be able to make 8 of these for just $8.00
If you want a refill kit for you to make these fun items, please email me and put in the Subject Line PaperPumpkin Refill, and I will send the refill to you and just charge you whatever the postage is.
For those of you that ordered some last week – my order is to be in today…YIPPEE!!!
I did use the sketched tag a bag gift bags as well – I told you….these are great to have on hand and are PERFECT to keep homemade goodies in the treat bag to keep them super fresh!
Look at the stamp sets on your shelf and use think of how you can "add your own flair" to this adorable bag! I think the other thing that I love about this refill kit is that everything is included! The "fringe" piece is "easy aspie" to adhere as there is a strip of tape adhesive already on! Just peel off and stick – so easy!
Here you can see a picture of the goodies….so easy to make – go and make a bunch up! I just put a pretzel of a baking sheet, add a "disk" of chocolate and put it in a 250 degree oven for about 4-5 minutes to just soften the chocolate and then take them out of the oven, push a M & M on top! DONE, FUN & FAST!
Guess what today is TUESDAY DEALS! Click here to see the offerings, what is your favorite this week? It is wonderful that they do this each week, we all like a great deal!
That's it – short and sweet but I think that it is a great product and it is my pleasure to offer this to you…..for just $8.00 – you will be so glad that you emailed me and it is a great way for you to see the "quality"of the Paper Pumpkin Kits….
TODAY is the perfect time to hit that SHOP NOW button(or go to the end of the post and click it right intoyour cart) and purchase this must have, classic, timeless and oh so versatile die as it is 25% off! I know…I know – that dies are very $$$$$ but that is why this is the perfect time to take advantage of this!
Yep, that's right….this Mini Treat Bag Thinlits Dies is on the weekly deals and this is one of those things that you will never regret purchasing! Stampin' Up! had this on weekly deals back in June and it was a huge hit and I am thrilled that they brought it back!
In June, I did a 2 day post on this special gem so this post is rather short as you can click here to see all of the scoop and measurements on how to minimize your paper usage and then you can click here to see how I stepped it up a bit to make it even more fun, (if that's possible)
On the 2nd day that I posted this I showed you how you could take this little gem of a bag and add a super cute card and trust me, you can even still stick in a treat! Todays bags are filled to the brim with treats only!
The thing that I adore about this framelit is….you can easily use it all year around…with the amazing paper that we have at our fingertips, you are surely going to be doing the happy dance all year long creating all sorts of fun!
Here you go…..how about a fun parade of pictures…..you will see the supplies I used at the bottom of the post…the new tear tape is a dream machine putting this together!
I am not a scary Halloween person but I do think sweet and happy Halloween things are fun. To me, this is FUN to the max and I know that it would bring a smile to anyones face!
Do you see the threads of the bow that I put ontop of the Rich Razzelberry one? These are from pulling the threads from the stripe in color ribbon, further down you will see that I used the Tangelo Twist on the other treat bag – this is a fun and oh so easy effect!
Don't you love the sparkle on the witched hat – a bit of bling! Remember, the fun glitter paper is available in my Product Share! I like to only use it if "little doses"
You know I love my sentiment framelits – what a statement they make and yes, I did use 2 layers of the vanilla coaster board….makes all the difference in the world and truly does not take much extra time!
Here is a close up of what I was talking about before…this ribbon is a dream ribbon, it is so easy to work with and being able to use it in another way by pulling the strands is a win-win! (remember, this ribbon is on my product share)!
I hope that this brought a smile to your face! I think that they are super cute!
DOG UPDATE: I need to include all dogs on this one….John comes home late tonight so I had to break it to them….the slumber party is over! We have had a blast all week at our slumber parties and Eddie is doing just great! The little sneak – he found another stash of tennis balls and I swear there must be 20+ all around!
I have a friend that works at a tennis center and she gives me all of the balls that they can not use anymore…so trust me – our yard/barn areas look like a permanent Easter Egg Hunt….I need to get a quick video of Eddie trying to get 2 balls in his mouth at the same time – PRICELESS as he really, REALLY tries hard to do it and he is a HOOT barking with a tennis ball in his mouth….he sounds like a dolphin!
Please remember that today is the last day to order anything from the new Holiday Catalog Share. You can click here to see the post and feel free to email me if you have any questions on specific shares.
Until tomorrow!
Here are the weekly deals…and then below that will be the products I used for the post today!