by Susan Itell | Mar 14, 2018 | 3-D Projects, Birthday |

Happy Hump Day!
I am thrilled that many of you enjoyed the card from Monday and today I have for you the “icing on the cake” to tie the whole thing together! Please click here to see that post from Monday and then this will make sense to you. I am carrying the color scheme and theme over to this post. You know me…I love extra special touches as I truly think that the little extras are what people remember.
My Mom was the queen of extra special simple touches…so I guess I have learned from the best! I have blogged many, many times about party poppers and YEP…you are going to get it again as they are ALWAYS A CLASSIC…and ALWAYS A HIT!!! I will also share with you what I put inside as there are ALWAYS clever things that you can put inside depending on what the event is!
Today is another opportunity for you to win some BLOG CANDY….
This is the 2nd of 4 posts that I am going to see if you can figure out what items that I have used today (they will all be listed at the end of the post like I normally do) that I would pick to be in my ULTIMATE PERSONAL BUNDLE . Remember I can pick up to $125 worth of product and I will only be paying $99…
In the list at the end of the post…what tools/aids would I pick that equal $124.25 that I could choose for my ULTIMATE PERSONAL BUNDLE ? I just love that you have the opportunity to put ANYTHING you want up to $125 and only pay $99!
Playing games like this is FUN!….put your thinking caps on and leave your picks in the comments at the end of the post and what will you win? How about something that WE ALL can always use….a roll of Tear & Tape! I will give away up to 3 rolls so if there are many that guess my picks….I will pick 3! (This will be interesting to see if you all read this entire post)
Let’s get going on these fun poppers! I have blogged here and here before on them…but here is a super short and handy cheat sheet to make these for years and years! The magic of these are the Envelope Punch Board…yep, the $20.00 piece of magic plastic that makes sooooooo much more than envelopes! Truly a MUST HAVE in your crafting stash!


Here you go….your cheat sheet. What I would do is write these down or better yet – make one today using a solid piece of paper that you can actually write the measurement on. I caution you, these are like Potato Chips…..very addictive! You can see that 6″ X 6″ paper packs makes this project a cinch as you will also be able to use the “extra piece” to wrap around Hershey Nuggets!

- 6″ X 4 1/2″ piece of DSP or Solid Card Stock
- Score at 1″, 2″, 3″, 4″ & 4 1/2″ – use the bone folder and score well!
- Starting on the 1/2″ fold place at 1″ mark on the Envelope Punch Board and PRESS TO CUT… FLIP and place at the 1″ mark again…..PRESS TO CUT… FLIP (do this for all of the scored lines, folding down the paper on each fold) The key part is the PUNCH and the FLIP!
- Use a strip of Tear & Tape on the center part and simple glue dots on the little end pieces.
- Tie off one end with ribbon of your choice…fill and SMILE!
I cannot tell you how easy these are to make…just remember the important part is the 1″ mark and then flipping the paper to do the same on the other side. I did do a video a long time ago click here to see that but really, they are fun and oh so festive!

What did I fill these with???? A super simple party horn from the dollar store (I actually cut it down for it to fit) and then these super fun cards that have great conversation topics to truly make it fun but before seeing all of these…..you will hear and actual SNAP because I put a Cracker Snap in the popper. I think when I bought these….I went ahead and bought 50 as these truly are fun and so easy to make even just 1 to make someone feel special!

The Chat Pack Questions I bought at a store I frequent but unfortunately they do not have a link for them……you can see that I linked them to go Old Faithful, Amazon but when I did google them….I saw that Walmart came up about $1.00 less and trust me…not to have to make the trek to Walmart, I would gladly pay and additional dollar!
The Blow Horns, I was able to get (8) of them for $1.00and I just took off the sports theme thingie and used the horn, the CHAT CARD and chocolates – a perfect and festive way to make a table setting special! These cards are really fun to have on hand and/or tuck them in like I did today!
Well tomorrow is Ramsey’s Dad’s 90th Birthday so I am hoping that my festive bundle of love will brighten his day! I loved it that his wishes were to just have his family with him for several special days of family time…..it doesn’t get any better than that….speaking of better than that…
How would you like to also win an Envelope Punch Board?
Now this will be really, really fun to see if anyone can guess my 2 answers…..in the picture where I showed the CHAT CARDS…you can see 2 sample questions. What would MY ANSWERS BE? I know that the 2nd one – the saying/quote will be super hard to nail so I will let you slide a bit but there is ONE KEY WORD that is in my saying/quote……that you need to have correct….(if multiples win….I will pick one randomly – just in case you can not read the cards….below is what they say)
- If you could be anywhere in the world for New Year’s Ever this year, where would you most want to be?
- What is your favorite saying or quotation?
I hope that you found this post fun and interactive. You know….I became a SUD to get a discount and trust me I do love that….but you know what I also love?….the relationships. I wish that you could hear my dings on the phone when the “puppies” start chatting away…..many of my stampin’ friends and demos are in group texts with me….and one thing that is always sure to happen is a smile….they make me laugh…they make me smile…always!

I am sure that some of you are wondering how in the heck did I cut my Party Horns so perfectly…well, I didn’t…..I have a Scan & Cut and I do use it for things like this…as it made this project come together in a fraction of the time if I had fussy cut them. Even as an adult, I still adore Santa! I have not mastered it yet, but I am workin’ on it!
I am tellin’ you all…there is so much to this paper craftin’ addiction that we share….I am blest with this people that I have been able to meet on this journey. I am sure that many of you notice that I only blog 3 x’s a week now….I started that when I broke my wrist and I decided to continue it this way…..for me, my blog is so much more that Stampin’ Up! – it is a way to share/shed some light as to what makes me roll….
I adore Stampin’ Up! for many reasons… the sheer coordination of products and colors but what I have really learned about this little thing that I do is….I love the relationships even more! We can all “buy things” but we cannot “buy relationships”

I use products from MANY COMPANIES (just ask Jeanie) and guess what, that’s ok…..heck, we all do not shop for our clothes all at the same store…..I like to share my love, passions and creative outlets that make me happy!
Let’s see if you are still reading….as the bone folder is not in my pick for my personal ultimate bundle for this challenge today, I like another bone folder and I will share it with you on Friday when I post and announce the winner (s)! Good Luck and have fun!
There you go for your HUMP DAY! There are so many ways that we can do “extra touches” each and everyday that will make you smile, feel good about yourself and make you stop and say….I am glad that I did that! I challenge you to do something “extra today” ….it’s a great habit to get into and one that will make you smile inside! I will see you on Friday!

by Susan Itell | Mar 12, 2018 | Birthday |

Well…..did anyone forget to turn their clocks forward?
I have a long post for you to read today and I hope that you can find some “me time” to read and take it all in! Personally, I look forward to this time of the year as to me…it makes me feel like old man Winter will be leaving us and time for that glorious Spring to arrive….chirping birds, blossoming trees, green grass….longer days…just a time that makes us feel alive!
I have a cutie for you today and if you pop back on Wednesday you will see a complimentary goodie that I added to this care package for my dear friend and downlines Dad! Ramsey’s Dad is turning 90th this week and naturally that in itself it a milestone and a time for celebration! When Ramsey speaks of her Dad….she instantly “lights up…has that beautiful smile…and you can instantly see sheer joy” when she talks of her sweet and oh so active Dad!
Several weekends ago when I went to an “Adult Therapy Weekend” at Ramsey’s house in beautiful Annapolis Maryland…(that’s what I call a fun girls only (and Milo) crafting time) we naturally chatted the weekend away with “life happenings” between us and her Dad came up! She was working on many different cards to shower her Dad with and I thought….I want to do something for him as well!
Heck, when you turn 90….it calls for a special card and I think that I have a fun one for you today! I am working with the stamp set, Picture Perfect Birthday from the Occasions Catalog. I think the first thing that you are going to know about this that I love is……it is a photopolymer stamp!

Yep, when I see that it is a Photopolymer….it instantly has some “brownie points” in my eyes and if I like the other elements that I look for – it goes right to the top! Do you remember some of the elements I have been sharing with you in how I look at stamps to see if I really want to invest in them?
Seriously readers…..I have become more and more selective with my stamp purchases as I am the first to admit…it can get WAY OUT OF CONTROL! Look below and see some of the things that I ask when I decide….
- Photopolymer – YEP….I adore the ease of stamping….seeing through for perfect placement….they are easier to see and work with with a Stamp Positioning Tool!
- Great Font and Sentiments – YEP again, these are fun, flirty and smile makers…..very unique and I adore the fact that they use 2 different fonts within one sentiment!
- Will I get mileage ? – DAH….this is one thing we ALL have…..a Birthday! The mileage you will get from these simple candle, sweet bows and festive party horns will last you through many, many Birthdays….and switching up colors….TIMELESS!
There is simply no way that I could ever use all of the stamps that I have and ready for this…..???!!!???!!! I think that there are many…and I mean MANY times that we just keep purchasing stamps and overlook tools and techniques to continue to teach ourselves new ways to craft!
This post today is to show you that you can achieve a great end result by using a “tool” whether it be a Stamparatus…..A Stamp-a-ma-jig….or the squares from grid paper! The reality of it is…we can do things many ways with what we have. I say this because I totally understand and respect that we all just can’t get all of the “newest and latest” out there.
I think what happens is….we turn and look at all of the STAMPS that we have collected and all of a sudden get that feeling over being overwhelmed….perhaps defeated….and guilty! Am I on this Island by myself??? Please leave a comment if this is making sense to you…..That is the very reason that I am becoming more selective in my purchases – this stamp IS a classic and I know that I will enjoy it for many, many Birthdays!

I know that you have popped on my blog to see a card and to be inspired…..but to me, my Blog is even more to me than that – it is a platform for me to be totally honest and to let you know and see how and why we do the thing that we do! It is simple…we love to work with our hands and we only have so much time to do so….I truly try to give you ideas and inspiration in many ways!
Ok – ONTO this sweet card…(sorry…..I just cannot help myself sometimes as I am just trying to teach and let you know that “I get it”) – I am with you that it can be kinda crazy…. the items we collection with this crafting addiction we have – but you have to admit…it is FUN! This WAS the one and ONLY reason I signed up to be a Demonstrator….to get a discount for my habit!
Hopefully you all have heard to AMAZING BUZZ that Stampin’ Up! has developed and I do know some of you already have it from the pre-order….the STAMPARATUS! The WHAT???? I know – it is a crazy word but it is a fun word.

This is a stamp positioning tool to make this thing that we do….not only that much easier, but with precision of stamping, great coverage and saves time! Now if that didn’t sell you…..email me! This will be in the New Catalog that will be unveiled at the beginning of June.
I have had it for several months now and I do love it. As I have blogged before, I do have a MISTI as well as the Tim Holtz Stamp Positioning Tool and honestly, our STAMPARATUS is going to be a game changer for the industry as having that (2) plate system allows you to do so much more in one fell swoop!
Can you see….again, I am being totally honest with all of the things that I have to make this fun thing that we do “real” to you and even though I admit I was super skeptical about the STAMPARATUS….I was wrong – it truly is a game changer, they did a fabulous job.
If you DO NOT have a Stamp Postioning tool…NO WORRIES – you can still make this card with the simple grids from the Grid Paper as the spacing between each candle is 1/2″ (I moved over 2 little squares). Now if you do not have the Grid Paper …..you need to hit the button below and get it – truly a MUST HAVE for this addiction we have and it will be the best $11.00 you will spend.

I knew that I wanted to have 9 candles across (for the 90th plus I like odd numbers with a stamped image) so I just took a piece of white paper and stamped a candle in the middle of my paper….and then kept moving 2 to the right…..and then 2 the left of the center candle!
After I stamped the basic candle image in Lemon Lime Twist I was able to use the 2nd plate of the Stamparatus to either do the polka dots or the stripes on the candles! I used Bermuda Bay and Pool Party. Lastly, I flipped on of the plates and stamped the flame in Crushed Curry.

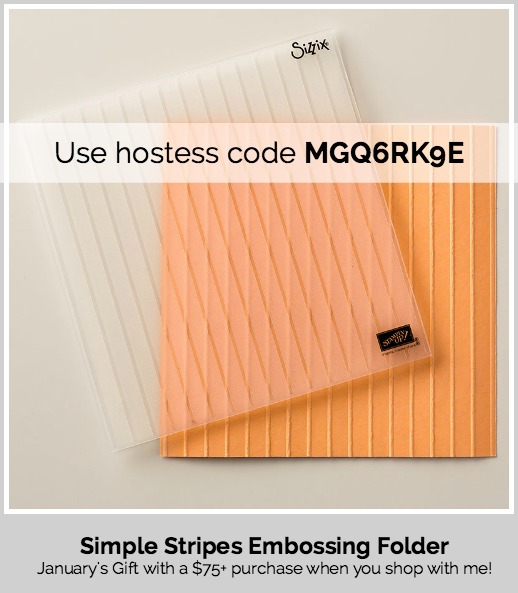
After I did all of the Stampin’ fun…..I eye-balled the sentiment (whew…that was brave) and finished the focal part of the front. I trimmed that down to 3″ X 4 1/2″ and then matted it a smidge larger in Rich Razzleberry! The 2 other rectangle behind at the exact same size but I ran them through Mr. Big with the Simple Stripes Embossing Folder. Texture always brings a classic interest!
I admit I forget about Embossing Folders and heck – they are right beside Mr. Big…..but when I remember, I am super happy as that extra dimension and effect it gives is perfect.
Here is a peek of the inside of the card…..I forget about doing this for you….but I thought that it was the perfect accent for this card and trust me….when you pop back on Wednesday you will see how I took it a step further for my sweet friends special celebration for her Dad and family! Can you guess?????
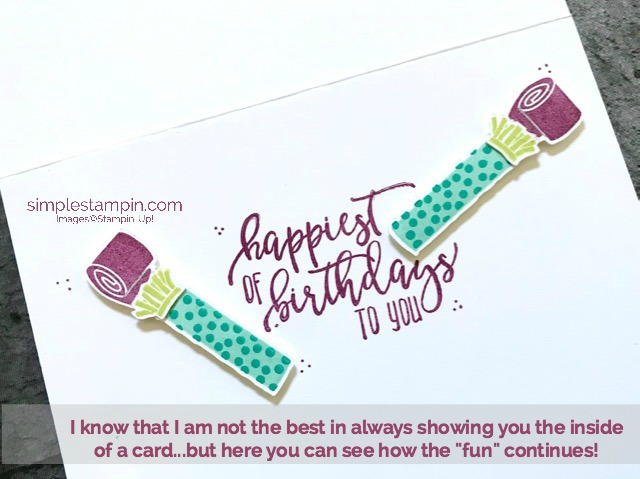
One last peek before I go today. I was just super happy with the fun & festive colors and I guess….the total feel of the card! I do hope that you can see that there are many, many ways that we can accomplish a great end result with using totally different products,
The BEST TIP I can give you is….PRACTICE – this is something that we all know that we need to do to “get it” but I do hope that you allow it to sink in. We are all at different levels and that is what is great….any of us can accomplish anything with practice and a positive mindset.

Sorry for this super LONG post but I do hope that it finds you well this Monday! Even though I am super happy that the time has changed…..that silly hour can make a difference……I keep thinking – it’s only an hour!!!!
Below you will see the products listed for this project and I hope to see you on Hump Day so I an unveil the remainder of FUN for Ramsey’s Birthday Celebration for her Dad!
by Susan Itell | Feb 19, 2018 | Birthday |

Good Morning and here is to a new week! I have a super simple card for you that I think would make anyone smile and just think of the color choices that you could use….simply endless! For today I let the color palette come to life with inspiration from the fabulous DSP 6 X 6 pack, Picture Perfect.
We chat about this often….Birthday cards are always high in demand for each of us and I think you can see that this beauty has the best of both worlds….easily duplicatable and one that will go for just about any age group. So….the moral of this sweet story is...it’s a keeper!
Below you will see the 3 product images of the “goods” used for the card and then I will give you the simple recipe of measurements (I know you all like when I do that) but really…..it is all about the basics! This is one of those “FORMULA CARDS” that I love to pull out….change the stamp and colors…..works like a charm!


Here you go, the measurements of this fun card! Paper, layers, textures….all simple elements that add up to a fun card. If you have never used versamark ink to do a tone on tone stampin’ effect….I highly suggest you give it a whirl – it gives a super effect will little effort!

- The Card Base is an A-2 Vertical card (4 1/4″ X 5 1/2″) in Bermuda Bay and then the confetti stamp was inked up in Versamark
- Whisper White piece is 2 1/2″ X 3″ and then the candles were stamped in Lemon Lime Twist (candle base) and then the stripes were stamped in Bermuda Bay with the flames in Daffodil Delight.
- The envelope love was a simple 1/4″ X 6″ strip of Bermuda Bay and then a 2″ X 6″ piece of the Picture Perfect DSP….instant fun!

It really is as simple as that! The reason that I call this a Formula Card is that the above measurements can easily be adapted with so many stamps we have stashed and also so many fun papers we have. Paper, layers, lifting with dimension….and a simplistic stamped image = a great and useful card!
I do not know about you but….I always forget about Embossing Folders….and I almost forgot about this one as well until I was reading the sentiments from this stamp set and when I saw the word confetti…the lightbulb went off in my brain and thought….go find that Confetti Embossing Folder!

Here is a tip and one that I hope you try as it works! To get the most from your Embossing Folders, especially the Dynamic Embossing Folders like this one….mist it with water before you run it through the Big Shot…I do a mist on both sides…
WHY??? are you asking??? – easy…the mist helps break the paper fibers down so the Big Shot can do its magic with the folder to give you the deep and detailed embossing! You will be amazed with the results.
Going back to the sentiments….did you notice that I just used the word “celebrate”….it wasn’t planned that way but it worked out! I am pointing this out to you as it happens to me all the time (things not working out as you had planned it to be)..but you CAN make the most of it…just be creative.
In the inside, I stamped the “happiest of Birthdays to you” in Black…very clean and crisp and a perfect sentiment that again for do the job for anyone that is having a Birthday.
There you go…a quickie to get your week rolling! Formulas are your friends and even if you do not have the products that I used to make this card right now….I encourage you to make a card using this formula with products you have.

I would also write down the dimensions on the back of the card and file it away with other formulas you have made….there is simply nothing like being able to pull out a formula when you are having a creative block and create! Works for me and I know it will work for you!
Let’s all have a great week….below you see the list of goodies I used to create this sweet card! See you Wednesday!
by Susan Itell | Jan 29, 2018 | Birthday, Stampin' Blends |

Well…did I get you with the subject line? Yep, I preformed some “SS” (Stampin’ Surgery) with my trusty scissors to break up this foursome. I admit I was feeling a bit guilty as my eyes looked at their smiling faces but after the first cut …I knew I had to keep going!
I am sure that many of you are gasping and say….I could (or probably would say would) never cut up my stamps….and I get it (in a way) but when you can get more mileage out of a stamp I say….why not ….GO FOR IT!
I am on a Leaders Group where Stampin’ Up! Demonstrators share thoughts and ideas….and this is where I saw this idea. I immediately when to this stamp (and the 4 critters were screaming) …pulled out my trusty scissors…..put a good light onto the foursome and went to town right on my workspace! DONE – I now have 4 stamps but if I still want to stamp them together….no worries – just push together!!!


This stamp set, We Must Celebrate is in the Occasions catalog. I blogged using this sweet stamp earlier (click here) and I loved it then….and again, I love it today! What do you think? It is super cute and it can be paired with so many sentiments that I think you can see the mileage you will get from it!
Here is another tip that is great about this stamp…look at the little “filler” stamps as I like to call them…the confetti and the little leaf are both great additions to tuck and add here and there with projects. To me, fillers are the little extra touch that makes projects “twinkle” and make that lasting impression!
You can see with the product line up that this sweet card came together with 3 different stamp sets. I wanted to encourage you to look at what you have and use it in a different way. For example, the Heart Happiness stamp is a very classic and useful stamp as we know that a “heart” is a classic that can be used all year long but the minute I saw the 6 little hearts….BAM – I knew that they would be used just like I did today….floating up!

Let’s get to the real scoop and the tips and tricks that I did to make todays inspiration for you. I used a technique that I know seems a bit scary but actually it really is not – I simply masked the bear and raccoon. You know what I am going to say to YOU….
YEP, you need to practice…you just need to try!!!
When I mask I prefer to use a masking paper but you can easily use a simple post it note. The reason that I use a masking paper is that this paper can be used several times and I simply tuck the mask in my stamp set so if I want to do it in the future, my mask is ready to go.

If you are using a post it note…make sure that when you stamp the image…you are stamping on a part of where the “sticky is” as this is how it will hold tight when you “mask” and stamp the next image!
Below you will see a picture of the image sheet of the Stamp-a-ma-Jig….and yep, it is a critical part of making precision for adding my fellows! Because I used the “jig” I am able to see and tilt the critters to exactly where I want the next one to go. I think “tilting them a bit” adds a fun element.

I can hear many of you are sighing about the “jig” but it IS one of those basics that every stamper needs to have. I know that we do not use it a bunch but trust me, when you need it…it is not only a time saver…it is a frustration saver as with this simple piece of plastic…you can get PERFECT placement every time!
The coloring was a cinch with the Stampin’ Blends…these alcohol based markers make coloring FUN and don’t let that would “BLEND” get you in an uproar….you DO NOT have to blend when using them…just color if that is a comfort level to you….and if you want to blend…great – no rules…just do what YOU are comfortable with.

The best parts about these markers are that they color without streaks making simple coloring a rewarding experience and the other thing…they match our color palette perfectly, something that Stampin’ Up! does brilliantly! Make sure that when you use these that you are color over another piece of paper as the natural “bleed through” is a natural process of an alcohol marker!
Sentiment time…..where did this come from???? The Happiest of Days…which is in the good old Annual Catalog! I don’t know about you but….there are times (actually many times) that I feel bad for the Annual Catalog…..we all get soooooooo excited for it….it gets revealed to only have the Holiday Catalog steals its thunder and then the Occasion Catalog doing the same….remember – look in your stash and use what you have!
I have showcased this stamp set many time….click here and then click here….both some of my all time favorite cards…the simplicity of the open designs of this stamp make is great to create! Also…..the “jig” helped me make the placement perfect. (I know…many of you do not like this tool…but it really is not a bad guy)

A fun card like this can use a bold DSP to make the envelope shine. This is from the Tutti-fruitti DSP Stack, a fun and colorful pack! I admit, the picture does not do this pack justice as I think it appears super busy…but when you look at the paper (singularly) there are some fabulous finds….definitely a go to for my style of card making.


I hope that this post makes the start of your week with a beautiful smile on your face! I was super happy with it and I do encourage you to try your hand with masking. We all have sooooooo many stamps in our stash to mask with.
I will see you on Wednesday with another coloring fun project that I have been working on…..speaking of coloring – tomorrow I am having some “coloring therapy” with a dear friend that is on my team and we are doing some “continuing education” (I like the way that sounds…and John laughed when I told him) as we are going to a Copic Coloring Class. We can never stop learning and crafting…right????
I would love to send you this card and also this embossing folder…..they are my thank you gift for when you order with me this month. My current hostess code can always be found on the right side of my blog…but here you go to copy and paste – MGQ6RK9E….and please remember, I offer a very generous (well I think so) rewards program for shopping with me – it is a joy for me to send you freebies as heck – we all love a gift!
by Susan Itell | Jan 26, 2018 | Birthday, Super Easy |

Happy Friday….this week has been about Birthday Cards as lets face it…we each have one of those special days each year and we also love to send Birthday Cards…..well, we love to when we have a great idea or a stash ready – but trust me, I get it!
In November when I went to On Stage in Salt Lake City I can remember the first time I saw this kit in the display area…needless to say I was wowed! Not only was I doing a “happy dance” with the sheer beauty of the fun box but it didn’t stop there as when I saw the sheer quality and design of the cards…and then…the monthly dividers – I loved it!
The lightbulb that went off in my head was…WHAT A GREAT GIFT!
Let’s face it, I think that it is pretty fair to say that most of our “WANTS IN LIFE” are very minimal as I think we all feel very blest but I don’t know about you…I love to share my love of crafting with family and friends and what a fabulous gift this would be for that hard to buy for person.
The beauty of this is…it is timeless – being that no matter when you would “gift this” to someone… they can always use it. You could either give the Kit as a gift and have you and your friend put it together for a fun time spent together or go ahead and make it up and give it as a gift!
I have a BUNCH of pictures for you today but before you peek at them….watch this short video that Stampin’ Up! did showcasing this kit and you will see 1st hand what a blue ribbon winner it is!
I always try to give you a “heads up” for tips and tricks when I recommend a product. I followed the instructions to a tee with the exception of the placement of the Dapper Denim Bakers Twine and I also did not use the tassel stickers that were to go onto the balloons. Just some personal preferences in placement.
The kit is VERY generous with the amount of ribbon and twine. You can see in the below pictures that I doubled up on the twine for all of my bows (again, just a personal preference) and I had plenty. I always like to share these tips as I realize how frustrating it is to keep thinking while you are creating….can I use more…or maybe I’ll run out!
Below is a great visual of the kit contents…..

The next several pictures are close-ups of each of the cards that I put together. Not only were they super easy to put together, this are super cute and oh so practical cards!
The stamp set that is used to create these cards is called the Perennial Birthday Stamp Set. THANK YOU Stampin’ Up! for creating not only great outside sentiments….but also the ones that coordinate for the inside of the card. WOOT-WOOT…..we all LOVE that!
Remember, this below stamp set is sold separately from the kit but I think you will see and agree, it’s a keeper! After these photos I will share with you what I did with this kit…and trust me, it has been a huge hit!


Before we get to the last 2 cards let’s peek at the dividers….they ARE key to me…as this will KEEP US FROM MISSING someones Birthday! I just do a little wiggle of excitement when I can be more “on top of it” and having a “key” with Birthdays filled in does it for me!
Even though the kits makes 16 cards….you can easily put more in the box and also throughout the year as you make cards they can be added! I like to think of it as my stash of ready to rumble!

Here are the last 2…they are just adorable and being able to stamp a coordinating sentiment to the inside of the card is a time saver!


Now you know me….I adore my envelopes. To me, the envelope is the FIRST GLIMPSE of the presentation of the card. My Mom always taught me that if you take a bit of time for the presentation of something….than the recipient will feel special from the minute they see it….and let’s face it ladies….we all love to feel special cause’ guess what….WE ARE SPECIAL!
I used the Sweet Soiree DSP to add some love to the envelopes! The colors work perfectly for this kit and it gave me the extra special trademark touch that I love to give.
You can see in the picture below that using my DSP Swatchbook from the Product Shares made the picking out the paper a breeze. To me, they are the 911 when creating!
You can also see that I have a pack of gold candles…I purchased them for a whopping .97 at Walmart along with some simple balloons…after I made up the kit….I also tucked in a pack of candles and the balloons….just another sweet touch that costs sooooo little but will make someone feel super special and add so much!


One last peek of the entire kit and also an idea for you…. and then one from my sweet John…..
After I put together the first kit and saw the WOW of it….I thought – what a perfect gift for my girlfriends. I admit, most of my friends have no clue what I do but they know that I am crafty. (I do not teach locally as the bulk of my Stampin’ Up! fun is cyber) I purchased a bunch of these and had a ball making up these kits! I tied a beautiful white bow around it and strategically placed a long skinny cluster of gold candles thru the bow.
They are all stacked in a closet and PRESTO….a perfect gift that will only be super special and practical to them…but they will see firsthand what I do…. (the truth be told…I have a fear of teaching that I am afraid no one would come) I have already had 3 Birthdays this month with friends…and they have loved the kit!

My sweet John is an Accountant and this is his time of year of craziness. When he saw this kit is was amazed. He was also amazed when I told him that many of my customer simply do not purchase the Stampin’ Up! Kits….he asked me why and I said…..I really do not know as they sure do like my kits…..
He then said – this is perfect….I’ll take 8 of them for my ladies! Every year when it is Business Administrators Day (it is April 25th this year)…John takes the ladies to lunch. It is always a highlight for them as John is great in taking time to make his employees feel special. These people make the whole system work in cranking out the workload and it is his way of saying thanks!
He said… can you put a big bow on each of them and we can put it at their place. (I usually always put a little potted Spring Flower at their place setting) and then I will let them know that at 4 p.m. that day they will be treated to a special time with you in helping them put the kits together! Doesn’t this sound like fun!
I told you he was a keeper (and actually the best blind date I was ever on).….naturally I am THRILLED with the order….but I also know that his ladies will love it as well! The moral of the post is….this IS a keeper kit and it is also priced right!
How perfect to get the kit or kits…..the stamp…take advantage of some FREEBIES from Sale-a-Bration…WOOT-WOOT all around!
Have a wonderful weekend…..I have another idea for you on Monday that will make you say….now that is soooo darn cute! Thanks for shoring some time with me and thanks for being YOU!
by Susan Itell | Jan 24, 2018 | Birthday |

Happy Hump Day! This week I am posting about Birthday Cards as it seems like one “intention” we attempt to do in the New Year is…..vow to send more Birthday Cards! I get it as this is something we all have each and every year and let’s face it…when we receive a card in the mail…we are touched!
Click here to see the Birthday Card from Monday…I thought that it was super sweet and it focused on how you can make a fun card using a minimal amount of DSP to make a POP of a statement. Remember, there are always tricks and tips on how you can create in a simple way and also without breaking the bank!
Today’s card is what I like to refer to as a “Formula Card”…what the heck is that? Well they become a lifesaver when you are having a creative block or simply have a specific amount of time to create as you can simply use the “formula” to dictate the focal part of the shapes and then you have the fun part of picking the theme, the papers, and the stamps!
Above you can see that I have (2) of the same cards but just tilted the square a bit and changed the base color but the end result is the same….A FUN CARD! When you have a good thing going….don’t change it!

When you are working with a great stamp set, today it is the Picture Perfect Birthday and then a fun grouping of paper, today it is the Picture Perfect Party 6 X 6 and then the FREE…yep FREE Card Bases which are the Tutti Frutti Cards & Envelopes from the Sale-A-Bration offerings.

I know that you love it when I give you the measurements for a formula…so here you go! If I were you ….I would make a formula card up today and then write the measurements on it so you can always just grab it and reuse the formula!!!

- Card Base – good old A-2 card, 4 1/4″ X 5 1/2″
- The DSP Square 3″ X 3″ and then matted in 3 1/4″ X 3 1/4″
- Placed a piece of ribbon and tied a simple bow around the square piece
- The DSP Circle is a 2″ (I used the 2″ punch) and then matted with a 2 1/4 Circle, again…I used the 2 1/4″ punch.
- Stamped the sentiment on a piece of scrap and then matted it.
- Adhered the shapes and then POPPED all of them up!

We all know that we are in FULL SWING with Sale-a-bration, (the sweetest time of the Stampin’ Up! year) but I think that there are readers that sometimes do not know what Sale-a-bration is……in a nutshell….for every $50 you spend….you are able to pick a FREE SAB ITEM and then this year…Stampin’ Up! is also offering a 2nd tier of freebies…..with a $100 order you can pick from here or you can pick (2) from the $50 tier. (I just love choices!!!)
Personally….I think these cards that I am using today from Sale-a-Bration have been breezed by many. Remember, these Tutti Fruitti Cards & Envelopes are not only fun and festive….but the envelopes are a huge woot-woot! It simply does not get any easier than this…I think that you all LOVE getting a new stamp and again, I do “get it” but I felt the need to showcase these today as I just adore them!

I hope that you pop back on Friday because I have another Birthday inspiration for you….let’s recap….Monday I used the Birthday Wishes for You Stamp Set….today I used the Picture Perfect Birthday Stamp Set….can you guess what I am going to use on Friday? (pssst…..here is a teaser…..I think you are really going to like it)
Here is something that I thought after making todays card….I stood back and thought…hmmmmm – this is kinda boring….kinda plain but then I thought – NO SUSAN….just STOP – it looks fine as isn’t this what you want to share….a clean and simple card that can be whipped up in a jif….but I invite you to see that you could easily add more to this great card IF you wanted to….
What could you add? Hmmmmm….
- Make a party horn from the stamp set and add it by the sentiment
- Add some simple rhinestones for a quick bling
- Add some loops of thin silver thread under the sentiment
- Make a simple candle from the stamp set and add that by the sentiment
You see…there are ALWAYS ways that you can add to a project. I hope that these tips can help you see that there are soooooo many ways to design and that YOU CAN design with what you already have…..just put that thinking cap on!

Have a great day and always know….I believe in you every STAMP YOU MAKE….as this wonderful thing that we do….is not only fun & rewarding – IT DOES MAKE A DIFFERENCE and so do YOU!


