by Susan Itell | Jul 17, 2016 | Step it up Sunday!, Thank You, Uncategorized |

*****UPDATE**** – I have sat at the hotel this morning going back to posts over this week and responding to many comments….I apologize that I am behind on that but if you wish to go back….please do so, I so appreciate and value your comments! LOVE your responses for today with the Dogs Name….this is super fun~ off to the Horse Show!
Good Morning and I hope that you are having a fantastic weekend! Here you go with the Step It Up Sunday card and right out of the gate – THIS IS MY PICK for our 2 day challenge!
Please read to the end of the post and I will give one person a chance to win this card (or yesterday’s if you prefer) with a fun “guess for you” and also a story behind the makings of the card!
The main difference between the 2 cards this weekend is that today I stamped the “thank you” in Versa Mark across the diagonal of the card~ this is super fun, super easy to do BUT you need to promise me that you will not stress in getting them lined up perfectly – JUST DO IT!

Several weeks ago I used Versa Mark to stamp and I had many questions about why did I do that rather than stamping in the same color? I guess the best answer I can give you is that certain colors (in my opinion) look better with the versamark than stamping it with the tone on tone.
We know that we use versamark when we heat emboss but when doing it in this fashion as I did today…it is nothing more than a simple stamp. The versamark just dries on its own with no smearing etc…
I personally love the look that this shows today. I would invite you to try it on a scrap piece of cardstock – first stamp it in the Sweet Sugarplum and then stamp it with the versamark and see which one you like better! I often do this will papers as I will say sometimes I like the versamark, sometimes I like the ink!
The other difference I did today was the mat of black paper – a simple yet effective POP factor! A POP of Black or a dark paper always adds interest.
Here you go…the thing that you love….dimensions! Please case away as it is a super cute card and you can have a ton of fun with different colors.
- The base is a 4 ¼” Thick Whisper White Card
- The Sweet Sugarplum is a 3 7/8” square and then stamped with the “thank you” in versamark. The best tip that I can give you is….GO FOR IT! True, it is easier to do this method if your stamp is a photopolymer as you can “see through it” which makes it easier. I also used a piece of computer paper to put under the square as it keeps your work surface tidier.

- The Jar of adorable flowers is made with scraps (love this about this bundle) and the colors that I used were Basic Gray for the jar, Soft Sky (stamped off) for the water, the flowers were stamped with Sweet Sugarplum (the larger flower stamped off once) and then the smaller flower was stamped full strength!
- The little accents on the flower were stamped with good old basic black.
- For the linen thread, I ran a line of Fast Fuse against the back of the jar and then I wrapped the twine around. A simple bow was added to the front and secured with a glue dot!
- Just like yesterday, the envelope was made with the envelope punch board…love that piece of plastic!
So…do you have a favorite? I would love to hear your thoughts! Now to a story about this card.

When I received this “limited edition” bundle that YOU will be able to order starting August 2nd I went head over heels creating cards to post for you over the next several weeks.

Below is you pin-pic for you to save for a rainy day….I recommend you to do this….have a file that keeps the in’s and out’s of cards for you to make in the future!

Several days ago, I decided to head north to a horse show and I saw today’s card and said to myself – this would be a perfect card for a Sunday as I could easily whip up one for Saturday (yesterday’s post) I am super excited for this bundle and I know that many of you are excited as well.
Now for some fun…I ADORE going to horse shows because I get to see my “horse friends” and at shows there are ALWAYS a ton of adorable dogs! I simple cannot stop myself from taking pictures of adorable dogs but this one…made my heart skip a beat because of his priceless expression!

Leave me a comment and guess what his name is…I will give you a hint, as I know that there are so many options – it is a form of transportation and it is 2 words…when you hear it – you will say, THAT IS A HOOT OF A NAME. If no one guesses it, I will randomly pick the most cleaver guess.
Thank you for popping in and thank you for doing what we all LOVE to do, share handmade kindness. I am ALWAYS amazed at how a simple gesture of a handmade card with a heartfelt note can make a difference…I THANK YOU for making a difference to me!
by Susan Itell | Jul 10, 2016 | Baby, Step it up Sunday! |

Here you go and I am going to say right out of the gate….my pick is today’s card! You know that this is always not the case but I am simply goo-goo over this card!
One thing that I would suggest is….if you have a card that you really, really like – make many of them. This is definitely one that has a very high “CUTE FACTOR” and having some for girls and some for boys would be a lifesaver

The basic changes for to today’s card is the matting of the focal part and also I matted the onesie ! I will give you the dimensions for the card below but I hope that you can see that cutting down the part that was embossed make the “onesie” in the middle of the card even POP more!
Yesterday I shared with you how rewarding it is to do Heat Embossing. There are 3 tips that I can give you that make embossing work!
- Use an embossing buddy. They last forever and you will be so happy that you did as it takes off any static that is on your paper so when you use the versamark, you will get a clean and crisp image.
- Turn your Heat Tool on before you get started to get it good and hot. This helps to eliminate warping of the paper and it makes the embossing powder react much faster.
- Go to the store an purchase an inexpensive paint brush that will help flick off stray embossing powder from the image.

Thanks for the comments yesterday and I agree that I am so happy with the “little” stamps that are in this set. This flower and dots can be so useful for many of our projects, you just need to remember that they are in this stamp set.

Here you go with the dimensions!

- The Card is a Vertical A-2 in Crumb Cake
- The Blushing Bride Piece is 4” X 5 ¼”, go ahead and cut a onesie from the center of this piece and cut it in half vertically so you can mount it to the embossed one. Add dimensionals .
- The Crumb Cake that you will emboss is 3 ¾” X 5”

When I emboss and part of the image is going to go off the side of the card…I like to put a piece of computer paper under the piece that I am going to stamp. REMEMBER to use the Embossing Buddy before you stamp your stamps in versa mark and stamp
I like to also fold a piece of computer paper in half so I can liberally sprinkle the embossing powder over the stamped image as it is super easy to pour it back in the little jar. Use a paintbrush to remove and unwanted embossing powder before you heat set it with the Heat Tool.
I took the blushing bride marker and use the brush side to color the spaces. When you 1st look at it, you think it looks a little dull but hang tight, finish coloring and you will see the POP happen, especially once you mat it to the blushing bride.
The sentiment was super easy….just a ½” piece of scraps and remember to use that embossing buddy again so your sentiment will heat set crystal clear. A simple snip-snip with the paper snips to flag the ends is the perfect finishing touch.
Simply 1-2-3 mount the layers and I like to use Tear –n- Tape or Fast Fuse to make sure that the edges will not come up. Place dimensionals under the onesie and also place one on the outer edges of the sentiment so it lays at the same height.
The envelope, same drill as I always do, a ¼” strip of paper and then place a DSP 2” X 6”, adhere and cut the excess way!

Whew, this was a bunch to type up so I do hope that you found it helpful. This truly is a fun stamp set and I think that the sentiments are super! For you animal lovers out there….the bunny will be super cute for Easter and that little kitten, SOOOOO darn cute!
You just have 5 more days to take advantage of the DOUBLE PAW PRINTS that I am giving to you with orders places with me. Again, you can find the details of my loyalty program underneath the header of my blog!
Bonus days are here and a great way to save in August, especially for that bundle that I know many of you are “eyeing up”. Please remember to keep your code that Stampin’ Up! emails you, I have no way of getting them if you misplace them.

I think that you will like tomorrows post…I sure think it is super cute and I have a feeling that this bundle will be very popular. I am talking about the limited edition one, Thoughtful Branches ~ available starting August 2nd (while supplies last). It is adorable and one that you can really use all year around. As a demonstrator I was able to pre-order it and have fun with it to share ideas to YOU!

Please let me know your feedback on this 2 day post. I know that I do not do a bunch of baby cards but this one sure did get me “charged up” Just think, you could do it for a boy in blues and put a tie from the framelit on the onesie – too cute! I think that I would also switch out the flowers and use the stars to heat emboss….PRESTO – there you go, another card!
Until tomorrow….have a special day!
by Susan Itell | Jul 3, 2016 | Birthday, Step it up Sunday!, Uncategorized |

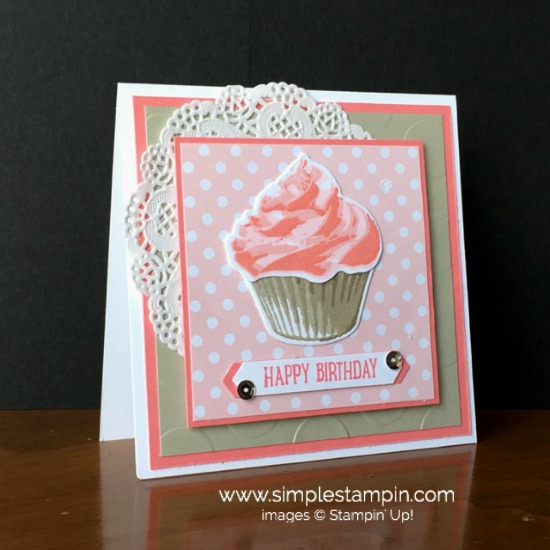
Here you go…the same delicious cupcake with just a little extra products to make the interest and feel of the card a bit different! Cupcakes sure are a “smile factor” as you just can’t help but smile when you see one!
Emerson and I had a great breakfast together and she adored her card…feel free to leave me a comment and I will pick one person that guesses which card I gave to my 18 year old sweet god daughter! (I will actually send the lucky winner the other card because naturally I gave Emerson hers with her giftie!!!!)
The changes I made today were:
- I added the white doilie (now this is something I rarely do and I admit, I kinda liked it)
- Added Wink of Stella shimmer to the icing (hard to see in the pictures but a great touch)
- Added sequins, just a couple to make it sparkle (again, something I rarely do)

As I said yesterday in my post, sometimes I think that we get a bit nervous when we see a “layered stamping” set. I know that I felt that way as I thought YIKES, THAT LOOKS HARD….but the real truth is – it is NOT….especially when the stamps are marked with a (1), (2), & (3)….this way you can not mess up…just have fun!
There are 24 stamps in this stamp set and naturally you can see that the sentiments are very practical for many fun cards! I know that today I did not use the sentiment framelit words, but you know I am a total “must have them” when I see a word framelit. In this bundle you get the words “wish” and “sweet”!


Before I get to the measurements today, I wanted to give you the color combination I used for the icing and the wrapper. Again, super easy to do because the stamps are labeled with the numbers:
For the icing I used and stamped in this order: (also, this bundle is great to use up scraps). You can see that I went for 3,2,1 and the colors were going from the lightest to the darkest – have FUN using different color combinations!
Stamp #3 ~ Pink Pirouette, Stamp #2 ~ Blushing Bride and then Stamp #1 ~ Flirty Flamingo
For the Wrapper:
Stamp #3~ Sahara Sand, Stamp #2 – Crumb Cake and then Stamp #1 ~ Tip Top Taupe


I say, one adorable and fun card! Here are the dimensions that I used for this card. They are the same from yesterday and I hope that you can see that you can have a blast customizing your own cupcakes in your craft bakery! Have FUN!
- The card base is a 4 1/4″ Square in Thick Whisper White
- The Flirty Flamingo Layer is a 4″ square.
- The Sahara Sand layer is 3 3/4″ and embossed with the super fun Polka Dot Folder.
- The Pink Pirouette Dot paper is a 3″ square and then matted in the Flamingo just a smidge larger, 3 1/8″.
- Scraps were used to create the cup cake and the sentiment. I used the new Classic Label Punch for the sentiment ~ a very handy punch to have in your stash! 🙂
- The custom envelope was made with the envelope punch board and remember, here are the measurement for this size of envelope….they are NOT on the punch board so I would jot them down for a 4 1/4″ card and tape your “cheat sheet” to the bottom. The size is a 7 1/8″ piece of paper and then punch and score ar 3 5/8″ 🙂

One more look at this fun card…pink always seems to be a hit but if you google this bundle and also go to Pinterest, you will see soooooo many great ideas used with this bundle. A timeless bundle to make birthdays special!
Below you will see the supplies that I used for this card! Remember to leave me a comment and let me know how you liked this 2 day post and also guess which card I gave to dear sweet Emerson…I will pick one person that guessed it correctly and send you the card that I have left! Heck, I do not think that you could go wrong with either one!
Have a fabulous day, go make some memories! Hannah gave me a riding lesson on Oscar yesterday and it was super fun. She actually gave me very positive comments so I guess I have been doing a good job with her horse! We are going to go ride again today and then have a “spare rib feast” – a special request from the peeps! We love to grill!
by Susan Itell | Jun 19, 2016 | Step it up Sunday!, Uncategorized |

Here you go! A couple of simple changes that make the “feel of the card” a bit different from yesterday! Both work for me, it just comes down to time and product. I am a firm believer that we can create amazing cards with the basics, the classics.
With that said, I can look at a stamp set and say, “I can use that a bunch” and then there are other stamps that I can easily say….“That is just not me” – and guess what – that is TOTALLY ok – that is what makes each of us roll!

There you go…side by side, you decide! The definite agreement is that the stamp set is a BLUE RIBBON KEEPER, we can always use a great thank you stamp set and with the great sentiments, (both for the outside as well as the inside) makes this a stamp that needs to be on your shelf!

Now we will get to the differences of the cards….today I used the FUN Swirly “what-evers” shine! I love these as they can go both ways, modern and classic. I used the “green glue” to adhere them to the dot DSP. Just little dots of this adhesive does the trick!
The other change that I did was the addition of the silver thread. This gives an instant fun factor and whimsy to a card. It is really easy to work with and the best tip that I can give you is to make sure that you have a good amount of adhesive to the back that you are adhering it to. I like to use Fast Fuse and then I press it into the adhesive – then flip it over so I can see it….fuss with it to get the loops just the way I want them to be and then give a good press….DONE!

Do you remember that yesterday we chatted about the new Big Shot Platform? Well….I used it again today but I also added the precision plate. This is another must have for the things we do.
With all of the more intricate dies out there, the great combo of the precision plate and the Big Shot Die Brush make cutting these dies a breeze, each and every time.

I would love this sentiment on a square card and the boldness lends itself to a square card but I know that many of you rather have a good old A-2 card. Hopefully you can see that it will work both ways!
This also would be a great easel card, click here to see the one I did and then you can see that you would be able to do the same with this stamp set.


Thanks for sharing your Sunday morning with me and a HUGE HAPPY FATHERS DAY to all of the great Dads and mentors we have out there. I am blessed to have a GREAT Dad and John is a GREAT Dad to our peeps…..it is to be a beautiful day on the East Coast and we plan to be at the best place on the earth – HOME!!!!
John wants to be here and we will grill…..play with the critters and I am sure also do work – but working outside on a beautiful day is FUN when you can do it together! I hope to see you back here tomorrow…I will share with you what I made Stanley (the horse) for his Birthday!!!!
The products I used for today’s post are below, shopping from home is FUN and oh so easy! I hope that you have enjoyed this 2 day post and that I have shown and inspired you to see that there are always options out there! Have a fabulous day and make some memories!
by Susan Itell | May 22, 2016 | Step it up Sunday!, Uncategorized |

Now please do not click me off….I know that there are no “Bells & Whistles” to this post BUT.….it is jazzed up a bit and sometimes you have a bit of extra time to why not?
I have a confession when I was making this…..“type A Susan” did not like the way that the dots were lined up so I decided to make lemonade and make it work! By adding the additional dots and making the overlay 1/4″ smaller….made it stepped up…a bit!

You can see that adding the extra row and overlapping the dots gave instant dimension, so fast yet so fun! I know that I have blogged a bunch about how I like to use fun foam when lifting a rather large image like this and yep, I did it today!
Trust me, dimensionals work great but again, type “A” me does not like saggy cards and using the fun foam eliminates that – I purchase it from Amazon and here is the link. I am sure that you can find it in craft stores but I like the thickness of this and using Fast Fuse or tear – n- tape works great!

I just adore this stamp and on June 1st when the new catalog rolls out, I will have a FUN challenge for you to see how well you know me and one person will win a stamp set from me….it is a keeper like this! 🙂

I have not made a bunch of posts using the below stamp set…but watch out, I am going to do so – with my son being a teacher, I thought that I could make some fun cards for him…this stamp set is so on trend and as I have said before the ideas are creative and endless

Here is your fun picture that you can save foe reference for the future, Yep, I used the envelope liner framelits and if you do not have it, you need it. So fast and easy!

The hour glass has turned over to get June 1st here – are you excited??? I am just excited to be able to share some ting that I want to teach – educate on….like the new framelits for squares, hearts etc….I was 1st thinking – wow, the ones that we have will be obsolete? Well…truth be told yes, they are walking the plank but “I GET IT” and I am excited to share with you the in’s and out’s of why Stampin’ Up! did this!
Enjoy the day,,,make some memories and make sure you laugh….the best medicine one could have!
by Susan Itell | May 8, 2016 | Step it up Sunday!, Uncategorized |

Hello to all….the sun shined yesterday afternoon and that made me happy! We have been having lots of rain this week and it is great to have a break from it. I am so happy that you all enjoyed yesterdays card and I hope that you like the simple changes I made today!

I know I tell you this often, but I get worried that the little changes that I make…will disappoint you – but please know that you do not need to make dramatic modifications to give a new life and feel to a card! You know me…Simple Susan!
It is all about stretching yourself to try something that you do not usually do…and if it works – great…if not, you tried!

There are 3 changes that I made:
- Using the spatter stamp in the stamp set (YES – love it) in Daffodil Delight (I stamped it off once to make it lighter)
- I added the linen thread behind the sentiment
- I added some sequins – now this is something that I rarely do but I like it….just a little touch that adds interest.


Here you can see a good side angle to show you the additions. This is a super fun bundle and one that there are many options and opportunities to have fun!
I can only imagine once the catalog goes live that there are going to be LOTS of fun ideas with this stamp set.

I adhered the sequins with the “green glue”…just put a dab, let it set up a bit and then you are good to go! I do think that it adds a fun and artistic flare!
Below is one more look – fun I think!

Envelopes love makes me happy and today I did the same, using the new Washi Tape across the top and then adding the Dapper Denim embossed with the FUN polka Dot Folder!

Here is your 411 to save for future reference….
I tracked when my catalogs are coming…the Brown Truck should be rolling down Randall Lane on Wednesday and I have already printed up labels for those of you that have ordered from me in the past year…and have no fear – JOY will be arriving to your door.
If you are new to Stampin’ Up! and are not working with a demonstrator…I would love to earn your support. Please email me and provide for me your address and I will see that you receive this special catalog!

Have a fabulous day….and a HUGE Happy Mothers Day to those of you out there!!! Being a MOM is one of the most important roles one could have….and I am super proud to have 3 peeps call me MOM!


