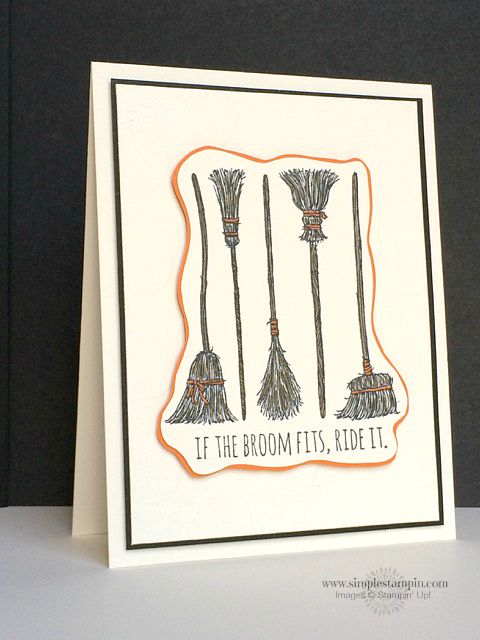
This is such a fun stamp…how can you not smile with this great stamp…but the sentiment – THE BEST! Think about how affordable the card is…there is really nothing to it and the Woot-Woot's you will receive will definitely make you a Happy Stamper!
There are 3 main changes….simple ones but ones that do make a difference and when you hold them side by side in your hands….it really is a toss up. I asked John and James….and they both liked todays card because of the Polka Dots Embossing Folder. (CHANGE #1)
The other change is that I added a peak of black paper behind and you can see in the below photo that I took full advantage of the new "Boo!" framelit that will be available on Tuesday! You betcha that I will but these to good use….the font is ADORABLE! (CHANGE #2)
Here below, you can see the polka dot folder! This is my absolute favorite folder as I call it the "HappyFolder" because it goes with soooo many different themes and it is classic!
The other thing I changed/added was I took the Soft Suede Marker and using the brush tip end ~ I did some swift and a light touched motions down across the broom and then also colored the handle in! (Nancy, youwere sooooo smart – great comment yesterday) (CHANGE #3)
It is hard to see but that is the look that you want…if it is too heavy and dark – you will loose the effect! I also used the Tangelo Twist to color in the bows on the brooms. Remember, less is best!
The envelope is the same fun as yesterday – no need to change it up when it is sooo darn cute with this Super fun polka dot paper from the Happy Hauntings Paper – adorable!
Well there you go! Another fun 2 day challenge but remember even though the changes are not drastic, I hope that I am showing you that you can add…take away….do a different technique…..to make a clean and simple card a bit different but still be clean and simple!
I do hope that you try this fun cut around a stamp ~ it is super easy and it can't be any easier – just keep those scissors moving and do not over think it – works like a charm each and every time!
I can tell that many of you are getting excited for the new catalog….it really is a fun and special one…I am super thrilled that Stampin' Up! continues to offer more and more bundles….as with the bundles you will save an instant 15%!
I hope that this stamp is on your wish list – fun, fresh, great font and the price is right!
Please remember that I am offering a product share for the new product and it is not too late for you to take advantage of the fun. Please click here to see the offerings as I will be ordering 1st thing Tuesday….(probably like many of you!!!!)…video below….enjoy! Please put in the subject line PRODUCT SHARE….thanks!
Happy Weekend and do I have a fun and simple card for you!!! When I saw the new catalog, I knew that this was coming to Randall Lane! I just LOVE those single stamps…so affordable and this one is over the top FUN!
I realize that there is a very "short window" for Halloween and this Tuesday when the new catalog is available to order from….ORDER THIS!I have to admit, when I was stamping this image I did love the "feel" of a wooden block ~ maybe we need to have another blog post about how we are feeling about the choices of wood, clear and photopolymer!
You can clearly see that this makes a super cute card…but this would also be great using a "single broom" along with another Halloween stamp or even with a house warming card with a gift card from Lowes or Home Depot…that would be a fun idea!
So simple….you do not need me (well, I hope that you feel that you need me) – but really ~ this is an A-2 Vertical Card in Very Vanilla….I chose this neutral as it works perfectly with the A M A Z I N G Happy Haunting Designer Series Paper….There is not one print in this pack that I do not go nuts over – just fabulous!
You can see that I stamped the fun image on a piece of scraps and then did a random cut….LOVE doing this – it is a trick that I used to do when I scrap-booked as I could not cut a straight line….so random worked! Matting it on Tangelo Twist was easy-peasy!
The layer is 1/4" smaller, 4" X 5 1/4" and then I used the Simply Scored and scored 2 lines on each side….SUPER EASY….SUPER EFFECTIVE! The stampin' dimensionals were a huge impact to add fun and interest to the tone on tone of the very vanilla.
Below…just "gander" at this A M A Z I N G collection of paper….this is another MUST HAVE on Tuesday!
You have heard me say this time and time again….do not stress about making the "free~hand" cutting ….just do it and do not think about being perfect – trust me – it ALWAYS works out….just keep going until you get to your starting point!
Do you agree…the double scoring really makes this card? So fast, so simple, so easy, so cute!
Remember, creating a card does not need to be stressful – it needs to be FUN and it needs to be fulfilling. This is such a basic card that carries a big punch!
The finale – the beloved envelope! IS this so stinkin' cute – and look how fun! Please email me if you do not smile when you see polka dots….it's like an instant party!
The stripe of Tangelo Twist is 1/4" and then the 2" DSP adhered with the "Green Glue" is the recipe! (This way I can get 12 envelopes from a sheet of DSP)
Well…..thoughts my friends????Please leave me a comment and let me know how you like today's card! This is a "Susan Card" – holding true to my style of paper crafting but please make sure that you pop back tomorrow to see the stepped up version!
Thanks for all of the super sweet comments for Aunt Jean – guess what that dear James did…..he sent her an Edible Arrangement (fruit) and WOW – she was soooo touched – I told you he is a keeper! Guess what? She is leaving with a friend on Monday to go to Canada for 10 days….I think that is just GREAT to be 88 and still have so much life ahead!
Enjoy the day, email me if you need me…..feel free to shop away on my online store….(I am like Walmart – open 24 hours a day!!!!)
I know…I know – this is a weird title for todays post but today is a very special day for a very special person….my wonderful "Aunt Jean" and she is turning 88 today! I have blogged about her before and trust me…if we are all so fortunate to be 88 – you want to be like "Aunt Jean" ?
I knew that a sweet card like this will not only make her smile, she will look at it for days and days with joy. She misses James so….as he lived in Raleigh, the city where dear Aunt Jean lives….I have shared with you what a "keeper" James is…he would have dinners with her….go change light bulbs for her….clean the gutters for her….they truly had a special relationship (which totally warms my heart)
There are 2 stamp sets for today….the FUN You're Sublime and Endless Birthday. Don't forget that we have so many different stamp sets that can work well together and I also think we go through times that we "have acreative block" so mixing things up makes you "pep" up!
You can see in the above image, there is a sentiment above the adorable wheel barrel of flowers. I simply took a piece of masking tape (I just use that blue low tack tape) and then stamped it up with Versa Mark as before we get to watercoloring, we are going to heat emboss this on the Watercolor paper.
I love to heat emboss when I am using the Aqua Painters as the "embossed edge" as a "dam" and the watercoloring does not seem to run as much. (now realize there are many times that we like that messy look, but today I wanted to try to keep it contained!)
Please do not get overwhelmed when you see the long list of products that I used for todays card. The best analogy that I can give you is….when you see a recipe that has a TON of ingredients….most of the time we shy away – BUT – if we try it and through the process we say, "Now that wasn't too bad" than you will come back and do it again! The same is with these products.
When you are watercoloring…you seem to use lots of different colors to get the "just right look"BUTGUESS WHAT? – any look is great – no stressing just practice and practice and you will get more confident and be super proud of yourself!
I had lots of fun coloring this for Aunt Jean. Coloring is soooooo relaxing to me – I have absolutely no clue as to what is right and what is wrong….I just GO FOR IT and I hope that you give it a try as well.
When you are trying to get a different contrast in colors…let the lighter shade dry quickly (it doesn't take too long) before adding a deeper color. In the list below, you will easily be able to tell the colors that I used.
To add ground, I used the Sahara Sand and then went over with the Crumb Cake. Because the Endless Wishes Stamp set is a photopolymer, it is super easy to curl the sentiment to get it "just right"
The overall card size is a 4 1/2" Square (I've been hooked on this size lately) and I think the color combo (Pool Party, So Saffron and Soft Suede work together well.)
I wanted a special little touch so I thought that a button and a simple Bakers Bow would be perfect….what do you think – was it a fun touch!?!?
I know that having a fun envelope in the Pool Party with these fun polka dots will make Aunt Jean smile.
Here is a fun fact that will make you smile – she is a DIE HARD "Tar Hills" Fan…..as she went to Chapel Hill and still goes to watch Basketball Games and even drives a TAR HILLS BLUE Car….is that too cute or what!
Later in September I will be driving Stanley (the horse) to Raleigh for a show and Hannah will come to meet me and guess what??? – we will stay with Aunt Jean as we both think that she is the best thing since sliced bread!!! It is not only FUN to stay with her, it is a joy as she is so beautiful in many, many ways….being with her is a life lesson!
Bring some sunshine to someone today and I do hope that you are blessed to have a special person like Aunt Jean in your life!
Until tomorrow!
p.s. – HJ….if you are popping on today, can you please email me…..I had an issue with your address and do not know how to get in touch with you!
Good morning and if you follow my blog regularly (and I sure hope so) you have heard me blog recently that I have had "special requests" from my PEEPS for specific cards….it is Will's turn today – he asked if I would make him a card for some friends that are getting married!
I accepted this challenge with pride and it makes me totally smile that my PEEPS like to come to me for something that is made from their Mom's hands! I do not make many Wedding cards but I think that this worked out just fine!
The size is a 4 1/2" square card ( one of my favorites) and I used my handy paper swatches to dictate the color scheme for todays card. The pick of the day is…..Farmers Market — this is a paper set that YOU NEED TO SEE IN PERSON….and it is gorgeous!
I had some fun today and used the square framelits to cut a hole out of the center of the Very Vanilla (4") and then I ran it through the Big Shot with the FUN Large Polka Dot Folder (just love this one) and then using the #3 & #4 Framelit, I made a "frame" square and snuggled it in the hole that I cut out.
Because the sentiments were rather small, I thought it would be fun to put a small card (2"square) inside the frame! It was super easy and it was fun to do! I used the Tear & Tape Adhesive to hold the "frame and mini card" in place!
The stamp set is Happy Happenings and it is full of fun sentiments! An easy stamp on both the inside as well as the outside made this easy-peasy!
I simply could not resist to add my dots all the way around, I thought that it was fitting to pull together with the DSP . I wish that you could hold this in your hand as it is super fun that it is flat and then you can see that I POPPED the whole thing up on top of a piece of Black Berry Bliss.
Now you know that I love Bakers Twine but we do not have Bakers Twine in natural….or do we??? I used the Gold Twine Bakers Twine and "pulled out" the gold thread and then just did my double strand bow….adhered it with a glue dot….PRESTO!
To me, the beauty of this card is that you are getting a 2 for 1! The message of congratulations is clear but then you have the whole inside of the card to write a wonderful note to the newlyweds!
You could use this layout with so many different themes…just a fun and different twist!
Next….my favorite – the beloved envelope! The envelope punch board and then I made a liner with the matching DSP that was on the card!
On Sundays post, I shared with you how I made the liners for custom envelopes and it really is easy! To make this liner I only had to use a 3 1/2" square piece of DSP!
I am going to do a video for you on this method as maybe it will be easier to see….you know that I love my envelopes so I am sure that I can entertain you with many, many ways to make your envelopes both festive and fun!
I am sure that Will will appreciate this card and his friends will think it is special that it is not a "Hallmark" card. This was a fun card to put together and I know that I will make this again.
The hour glass is slowly getting closer to September 11st – the magical day that you all can SHOP AWAY from the new catalog! If you would like a hostess code, please email me and I will be more than glad to get you one! This way YOU can get the benefits from ordering and if you have friends and family – go for it…..let them know the hostess code!
Let's have a great day…until tomorrow – I hope to see you as I have a sweet card for a SUPER sweet person!


