by Susan Itell | Aug 9, 2017 | PALS Blog Hops, Uncategorized |

Welcome to the August 2017 Pals Blog Hop. Thank you so much for joining us today. This month we’re going to “Cut It Out”. Participants will feature projects with “cuts” from punches, dies, Framelits, Edgelits, or Thinlits.
Whether you’re just starting the hop, or have come from a previous Pal’s blog, you’ll find the line-up toward the end of my post to help you move along.

Happy Hop & Hump Day to YOU!!!
The PALS monthly Blog Hop is always a day of sunshine and inspiration and I am sure that today is no different! Have fun hopping from Blog to Blog and I suggest that you be a sponge and soak it all up!
I was super excited about this theme as I think that Stampin’ Ups! “Cut it out” stuff is the best! We have so many options and today…I went for many – the trimmer, Mr. Big, Framelits and still more framelits ….DRUM ROLL…a NEW punch! WOOT-WOOT….I think that I hit them all!
At the end of the post you will see the whole line up of products! I am going to keep this post short ’cause you have a bunch of hoppin’ to do and let the pictures tell the story…I adore simple shapes…and today – it is totally hip to be square!
The focal sentiment is from the Ribbon of Courage Bundle. Now let’s quickly chat about this font….is it OVER THE TOP or what?! Not only is the sentiment amazing but the whole “feel” of it just makes you smile!

Are you smiling? I bet that you are thinking….this is hard?!?! Now take a deep breath and then look at it. It is all about the basics….sometimes I feel like the elements to my cards are so boring as I really use the “basics” over and over….but that is how I roll.
I think that we can all agree that the Stampin’ Trimmer is one great tool. I adore it. I would not be with out it. I admit, I have many….actually MANY trimmers as I think that there are trimmers that have many different uses but this one…I always go back to. It is a classic…it does everything you would need….scoring and cutting – what more could you ask for!
These squares are 1 1/8″ squares and here are 3 things that make it happen: A ruler, a mechanical pencil and an eraser. (again, basics) Take a gander at the below picture and then below you will see the “works” of the how did she do it?
Another key product that I used that made this project fun and easy was using the Multipurpose Adhesive Sheets. These ARE a must have for all of us. All you do is adhere it to the back of your paper….cut it out (as I did today with the trimmer) or you can use it with the big shot and framelits.
One of the reasons that I like this product is the ease of perfect placement and the ability to move the piece until I get it “just right” and then PRESS and PRESTO….it’s adhered!


How do you like these colors together? They are right up my alley. Clean, crisp and classic! Can you see how mixing a bunch of “cutting products” just seems to work! Please do not be afraid…just try it but please remember that it is the basic tools that make it work.
If you are new to stamping….welcome, you have a new addiction. The best advice I can give you is…get the basics – they WILL be your friend and when in doubt – pull them out….they are your friends…they will be your lifeline!

Before you HOP ON…..do you see the leaf punch? WOOT-WOOT….it is a newbie in the upcoming catalog and it is part of a bundle and YEP, you need it! I am giving you heads up….’cause it is a keeper! I know that you might think that it is crazy to have it in So Saffron but WHY NOT….So Saffron makes everything better! (I love that color)
I hope that you are smiling and I would love to hear how you like my project for you today! Yikes…so much to say but I am out of time….(how about this ribbon???) I admit that when I saw this Navy Crinkled Ribbon I was not sure about it but boy was I wrong…it makes the most AMAZING bows!
OK – that’s it from me….I do hope that I brought some inspiration to your day and I hope that I shared with you that sticking with the basics is the way to go. I am a simple card maker and this layout….YEP, is my cup of tea (even thoughI am a coffee drinker) 😀
Please take a minute to mark your calendar for our next hop on September 13, 2017 for “My Favorite Season”. Now hop along using the Blog Hop Line-up below. Thank you so much for hopping with the Stampin’ Pretty Pals today. Don’t forget to leave us a comment. We’d love to hear what you have to say about our creative “Cuts”.
Blog Hop Line-up:

by Susan Itell | Aug 8, 2017 | Tips and Tricks!!!, Uncategorized |

Most Tuesdays I like to share a tip with you! Sometimes its a new one that I have discovered…sometimes it ones that I have shared before but totally feel like it is worth sharing again and that is what today is about!
I make no bones about it….I am not a fan of Walmart as honestly… it stresses me out!
I have blogged about these little cubes for a great way to store things in your craft area and I get emails often about….WHERE DID YOU GET THEM? I love ideas of storage that makes our lives easier…and these little gems do just that!
I find at this time of the year….Walmart does have them at a great price (I guess I should thank them) and they come in fun colors for the back to school craze that happens each year. This is the only time that I seem to find fun colors…and a fun price!

Here is the scoop on them of the why’s I like them and find them super useful!
- For just .97 how can you go wrong (other than having to fight the crowds in the store) and right now the fun colors that I saw were navy, pink, teal, bright blue, a weird green, red and I am sure there are others……
- These cubes stack on top of each other so if space is an issue for you….these are great to stack depending on the height of what you put in…
- I use them mainly for storing my 6″ X 6″ Paper Stacks and also discontinued paper that I have that I want for the future (I cut it to 6″ X 6″)
- I use them when I am working on projects to keep things orderly ….like when I am working on a kit…I use a cube to put in the elements for a certain card…then I can stack others and have everything neat & tidy
Now here is another thing that is great to get at this time of year….the VINYL FOLDERS (below you will see it in Yellow) These can get pricy but at this time of year is when to get them and then do surgery on them!!! 😀
WHAT???? SURGERY????…Yep, type A Susan here…
I like to cut them up and use them as dividers for my paper. You know that I am a HUGE fan of the PTouch Label Maker…well to keep me organized I make a label with the name of whatever and then put if on the Vinyl divider that I made….
The reason that I do this is that the labels peel off if the item is ever discontinued and then I can re-use it! (you see…there is always methods to my madness). The dividers are super thin so they do not take much room but they are also super sturdy so you can use them over and over!
You will only get (2) dividers per (1) vinyl folder but there are scraps that you will find a use for. True it is an investment (but soooooo inexpensive) and then you will always have them to use over and over. (I do use the corner rounder of my envelope punch board to round the edges, I told you I was Type A)

The picture tells the story but here it is in more depth. The grey chipboard on the right is what comes in our DSP when we get it (usually the heavy one like this is with the speciality DSP)
It is great for packaging if you are mailing something and you do not want it to bend but today I am showing you how I cut that up for dividers. When I have a DSP that is retired….I move it to a cube and peel off the label from the vinyl divider and put it on this chipboard!
Because I always have swatch books of the DSP (and YES – I will be doing a Product Share for the new catalog) I can always reference the DSP that I have in the cubes. You can tuck the swatch books of the paper offerings in the back of the cube.
There you go…your TIP for your Tuesday! I find little things like these posts to be helpful so of course I want to share! I warn you….enter Walmart at your own risk….it’s a crazy place this time of year and the shelves are a total mess!

Here is my funny for going yesterday! I first needed to pop by Jeanie’s house….when I said – I need to run as I have to pop into Walmart for my blog post for tomorrow….Her face was PRICELESS….her glasses came off…her jaw dropped and then she said – WHY IN THE WORLD DO YOU NEED TO GO THERE!?!?
When I told her…this huge laugh exploded and then quickly she said…”great – pick me up some while you are there!” Gotta love a friend!
by Susan Itell | Aug 6, 2017 | Step it up Sunday! |

Good Morning and I have a confession…yep, a confession of an honest stamper! Yesterdays card….click here to see….was a card that I was contemplating not showing you as I thought that it was just “o.k.” but to my surprise…YOU LIKED IT!
Why am I telling you this???? Well…it is because there are times that you just do not know and you need to roll forward and that it what I did! Not only was I excited that you did like it…it made me really think – how can I change it up!?!? I did NOT use any additional products to make this card today….same elements – just worked differently!
Below are the (2) bundles that I worked with this weekend….it is fun to take “bits from here and bits from there” – I always encourage you to use your products to the max! When you “KNOW WHAT YOU HAVE”…then it is fun to pull from here and there!

Well here you go….side by side, you decide!

At a quick glance you might thing…not much difference but below I will bullet point the changes that I made and the (why did I do it 😀 )
- The total card is made out of Thick Whisper White Card Stock – (I had a little “honestly session with myself” and I am to the conclusion that I prefer my card bases out of the Thick Whisper White or the Thick Very Vanilla Card Stock) My reason….maybe it is “just me” but I love the feel of this card stock in your hand…it is so substantial and the reality of it is – I can add the POP of color, there just is something that I prefer over having the color card stock as my base!

- The FUN oval part is the marriage of 2 techniques that I adore to do when I can….Paper Piecing and Inlaying a die cut. Time and time again, I share that the basics are your friends….as when we have the basics at out fingertips we are able to make magic happen with little effort.

The magic was the Ovals Framelits and the Stitched Shapes Framelits. I cut the “friend” out of a Tranquil Tide and also a White piece of Card Stock and then “pieced” the Tranquil Tide Silhouette of the word into the White oval. Here is a great tip that I should have taken a picture for you…I put several pieces of Tear & Tape on the back of the White Stitched oval frame of “friend” so as I “pieced” the Tranquil Tide pieces in…the adhesive was there for me – easy-peasy!
The Calypso Coral Oval Ring was a total “after thought” but I think that it makes the POP happen. The way I figured it…I have the framelits and “Mr. Big” out….so why not?
- I also adhered some of the flowers flat today so there is more of an interest to your eye – I personally like this as it adds a very subtle interest but to me…the real show stopper and WOW factor of this card is the fact when you hold it in your hand and see and feel all of the inlay fun and then open it up and there is no evidence of “how did she do it” The reason is….the piece that I worked with is the exact same size as my card base so POOF – adhere and hide…you look like a pro!

Here is a funny for you as we have all heard the saying of “great minds think alike”….well in Jeanie Starks blog post yesterday, (she is a dear friend and downline) she showcased this below chart of the In Color Combinations that are FUN. Well….truth be told, I have this taped to the wall in my work area and that is exactly where my color combination inspiration came from for this weekend post! (I just could not find the chart on line so I snagged it from her post yesterday) The moral of the story is….look for FUN color combinations everywhere.

I do not know about you….but I find that I get myself in a rut using the same colors. Calypso Coral is not one of my “reach for colors”, I am not sure why but I think that there is some FUN about this color combination…so – GO OUT OF THAT BOX that we get ourselves in and have fun!
Another weekend post for the record books. Honestly there are weeks that I say….I am not sure if I can come up with something but I go to my area of fun and just roll with it! The reality is…there is no “right or wrong way” to do a card….it is merely an interpretation of the fun that you have in your craft area. I encourage you to try something different….see if it works or if it does not….the end result is…YOU TRIED!

Now go have a great day and I will see you on Tuesday! I have a tip for your Tuesday that needs to be done as this IS the time of the year for the deals!
by Susan Itell | Aug 5, 2017 | Simple Saturday |

Woot-woot….it is time for Simple Saturday! Wow….I was thinking back….and it has been I while since I designed for a weekend post because of the amazing talent of my team during the month of July! They did a fantastic job – setting the bar high so…..I hope that I can inspire you!
For those of you that are new to my blog, first – welcome and let me explain what I do on the weekends. Saturdays post is called “Simple Saturday” where I share with you a simple card….and then I welcome you back tomorrow for “Step it up Sunday”, where I try to tweak it a bit to share and show you how you can make some simple changes….stepping it up a bit!
Here is a “smile card” for you….what???? I ask you – DID YOU SMILE when you saw it? I bet you did because I think just about anyone would love to receive a sweet card like this!
Naturally the color combinations you could do with this are endless….today’s palette of Tranquil Tide, Calypso Coral and So Saffron are the trio of choice and the “greenery”….good old Pear Pizzazz!
I blogged the other day using the framelits from this bundle, Lovely Inside & Out and just as I said the other day, this is one unique set of framelits….you can simply cut out the word (like I did on Thursday) or you can do like I did today, use the coordinating framelit to cut the entire shape out (like I did here using the Layering Ovals Framelits)

Below you will see a trick that I did to make this super fast to do! Whip out that good old pencil and trace the oval as a guidelines as to where you would like to stamp! Now you can see that it is super fast to stamp!

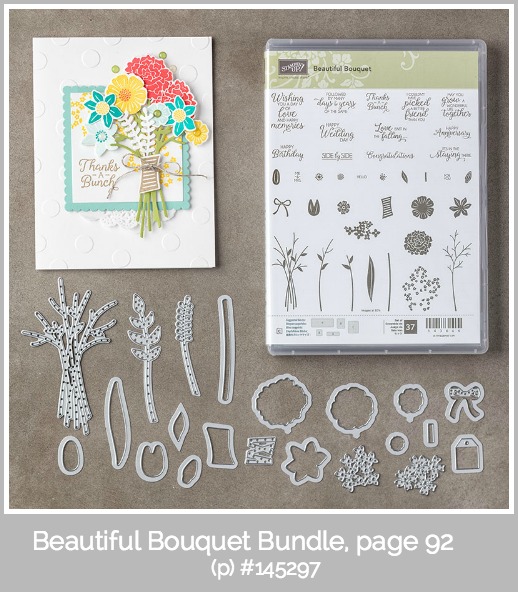
The floral fun is from the Beautiful Bouquet bundle below. I know that Stampin’ Up! has a bunch of floral offerings but this one has the “floral shop and sentiments” to the max…all in one! The unique element about this bundle are the actually amount of “die cut pieces” that truly give you that layered and “hand-picked” feel of a beautiful bouquet of flowers.

We all seem to like the look and feel of “layers” on a card, especially with the bases on a card….but once you add layers of the actual stamped element….there is an instant POP that happens and the smile gets even bigger!
Another reason why I am a fan of this type of a stamp set/bundle is simple…I love to be able to tuck here and there! When you have small images that “just work” as a filler, it makes creating more fun and interesting! Also, small images are great boo-boo fixers like I have done today!
The envelope love came from the Whole Lot of Lovely DSP offering…this paper offering is full with fun and busy to clean and classic! Today, the simplicity of the black and white with the pop of the colors that I used in the card just seemed to work!

There you go….a card that can go for just about anyone! It is clean, classic and the color ideas are endless. I say….pick 3 colors that you want to play with….add a green tone and just have FUN! Another thing that would be beautiful to do is…use (3) shades of yellows for the flowers to have a fun monochromatic look!

Have a great day….and I hope to see you back here tomorrow to see how I have “stepped it up” Please remember that I offer a very generous Rewards Program for shopping with me. I know that I love to earn FREE STAMP SETS and I know that you are no different.
Now go make someone smile today…..I hope to!
by Susan Itell | Aug 3, 2017 | Uncategorized |

Thursday’s are all about playing Tic-Tac-Toe….but also TODAY….THIS THURSDAY is a super special day for me because I am going to meet a blog follower, Georgette Huff. I am over the top excited as she contacted me months ago saying that she would be in the area visiting a friend and hopefully we could meet!
Can you say….MUSIC TO MY EARS!!! I feel so blessed to do this simple thing of “paper, stamps & ink” and to have the opportunity to “cyber meet” but then to “real life” meet…..EEK – I am pinching myself! 😀
OK…..here is the challenge board for this week and I went down the right side….(well, kinda) The plants thing kinda got me so when in doubt….ask friends!
That’s what I did and I loved the response that I received from fellow PAL and TTT Challenge Designer, Shannon Jaramillo…she said “Open to interpretation”…to me, that’s like saying…HAVE FUN!!!! 😛

I used the Whisper White Notecards to make this sweet card. When I think of Georgette I think of DSP as she is the Queen of using “prints” of DSP to make her card fronts pop! Truth be told, she is much more creative that I am showing you today as all I did was a quick cut to 3 1/2″ X 5″ of the DSP from the Birthday Memories DSP Collection.

When you look at the line up of products that I used at the end of the post…you will see that I am using several framelits from a variety of Bundles. YEP, I like to do that and if you get in the habit of cutting the shapes out of your bundles and having them on a paper for reference, it makes it super easy to flip through and find the perfect shape/accent for you to add to a project!
I know that many times we all can remember the shapes etc…but if not, this works great. I will wager to say that the framelits of May Flowers gets overlooked by many….this is one framelit that I love to use as a “go to” filler….(On this card, it is the Daffodil Delight little circle flower thingies! 🙂
The “hugs” was from the Lovely Inside & Out Bundle and I just snipped the edge of the circle that was attached when it was cut out. This is a very unique framelit offering and again, Stampin’ Up! did a fantastic job with being so unique with the design. You know I adore “words” to use on cards….and this set makes me smile!
I should have used the Multipurpose Adhesive Sheets to do the “stacking” of the “hugs” but silly Susan, I forgot…..so great glue did the trick for me today! Have you tried these Adhesive Sheets yet? They do a super job with die cut adhering and no sticky fingers!

So….seeing the card upclose you can see the “row” of “all things round (the circles)…stacked words (the hugs)…plants (my lovely “greenery”) to play this weeks challenge. Please make sure that you go to the Tic Tac Toe Site and see the BEAUTIES that the designers created this week.
I say….their creative juices were on overload as they are insane! It is just so much fun to see other peoples work and also when you play a challenge, to see the interpretation that others do.
I can remember one of the reasons that I was afraid to try a challenge was when I looked at the challenge I took it too literally and said….“I do not have that”….so in my head would think – I can’t do this one….DOES THIS RING A BELL WITH ANYONE????

There you go…and NOW IT IS YOUR TURN….how about going to the “room or space of fun” and have some well deserved “me time” and play with us this week?
Not only would I love to see your work in the gallery….but I am sure that …..NO, I KNOW – that you will feel great about yourself….because YOU DID IT! Please feel free to email me if you need help!
Have a GREAT day….I know that I am going to….grabbing a “hug” from Georgette and her friend Chris…..it doesn’t get any better than this! See you in the morning!