by Susan Itell | Jan 12, 2018 | 3-D Projects, Paper Pumpkin, Uncategorized, Valentines |

Hello and Happy Friday to you his week went ZOOM!!! I have a SUPER FUNNY for you today….please read on and then you will see why this is “The tale of an adorable FISH”
John and I are “on the road” to be “useful parents” this weekend as we make the trek to North Carolina to move our youngest peep into a new apartment….what are parents for….right??? – I have my label maker and my rubber gloves packed…..John has his hammer with an assortment of handy necessities and Milo is coming because I thought – WHY NOT…after all, he is perfect!
The GOOD NEWS is that along the journey there will be a CONTAINER STORE…..and then about an hour later….and IKEA….and then about 2 hours after that…..one of my favorite little speciality/foodie stores….and then its kinda boring for the next 3 1/2 hours but I’ll make the most of it as I am in a great book! You see…..MILO DOES serve a purpose…..he needs potty breaks so his Mom can shop!
Now to my funny…..do you remember that the November Paper Pumkpin was that SUPER ADORABLE Holiday Stocking!?!? Well it was just simply adorable and when I went to OnStage I was able to see a sneak peek of if and I knew that I want more than my normal 1 box that I receive every month.

When you are a subscriber to Paper Pumpkin you have the ability to pause, add to or simple cancel your subscription at anytime without any penalty….it truly is that simple! Well….I went in and change my number to 12 as I knew that people would go goo-goo over that adorable stocking….and YEP my sweet mailman had to drive back our lane and even said “Susan. I think they made a mistake….you have a bunch of those red boxes” ….
Well they were put to great use…..mainly by me as I just had a blast making them and using them as adorable “add ons” to Holiday Presents and also I made many sets for dear friends for their Holiday Dinner Table settings…they were just TOO DARN CUTE!
Here’s where it is funny…I TOTALLY FORGOT to go back into my Paper Pumpkin account and change the number back to 1 so YEP….it happened again…..my dear mailman did the same thing as the previous month. As I drove up to the house one day I saw a PILE of these boxes at the front door and then the LIGHTBULB went off….darn, I forgot to change the number!
Sooooooo the moral of the story is that I have a BOAT LOAD of the December Kit Stamps…..and I have been trying to find more ways to use it that as meant to be! That is the other thing that is amazing about this program….there are ALWAYS soooooooo many people out there that find the way to use these kits in an alternative way….
The person that shines for me each and every month is Rachel Tessman. She is just one amazing Stampin’ Up! Demonstrator and she does a fantastic job with her alternative ideas…..this is where the fish idea came from! Every month she makes a wonderful video showing the Paper Pumpkin and then also shares alternative ideas!
Below you will see the video and the adorable Fish!!!
It is a long video but if you want to get right to the FISH part…..start at the (32:50) minutes of the video….You will see that Rachel received this from another SUD, Ann O’Shereo….(I could not find a link for her) but isn’t it just WONDERFUL when other SUD”s open their hearts and share ideas…..I love that part and that is exactly right up my alley…..
Remember, I am simple and I followed these instructions to the tee and not only was it super fun & easy…but they become addictive to make! Who every would have thought that a simple square envelope…a trimmer….and a small little stamp would make this adorable FISH…I say WOW to those people that have that type of creative mind!
Because I received so many FULL kits….I have a bunch of the stamp sets that came in the kit….and if YOU think that YOU would enjoy trying to make these sweet fish or heck, just want the stamp set (see images below)….simply email me and put in the subject line I WANT THE FISH!!! The first 6 people (first come – first served) that email me will get the stamp set mailed to you. (I will not be able to mail it until Tuesday)
Please email me if you would like one of these free stamps…..
(hurry….I have 6!!!)
ALL OF THE FISH ARE GONE!!!


What did I put in the fish? Well…..Yummy Swedish Fish….why not? I could not find any prepackaged at my grocery store so I bought a bunch in the bulk food and put them in little bags and tied a bow! They are super sweet… snack M & M’s and several Peppermint Patties also fit perfectly!
You can see that I had fun using different current papers in making them – and if any of you have the retired stamp set called….Hey, Valentine – check out this great sentiment to add to these sweet fish…..I say TOO DARN CUTE!

Speaking of retired product….I have added a drop down box in my Blog Header with retired product from the Holiday 2017 Catalog. You will find it under SHOP….and then the Retired Product will be there. Please take a look and grab a deal, I sell all of my retired products at a 50% discount.
There you go….a never a dull moment – a tale from Susan…..an opportunity for you to get a free stamp and an opportunity for you to grab some great deals with retired products….I say that’s a trifecta!!!

I have had many requests for the Product Shares…..please see the tab on the Blog Header and then email me, I will email you back and get you in the next wave…..we all LOVE Product Shares!
Have a great weekend….I know that we will – spending time with Hannah is always a joy…..even when we are moving!

by Susan Itell | Jan 10, 2018 | Birthday, Congratulations, Sale-A-Bration |

Happy Hump Day! Did the subject line peek your curiosity? Well, YEP….that is right – no stamping today…just die cuts and special ones at that as these 3 thinlits are free with a qualifying order of $100+ during Sale-A-Bration!
There is a stamp set, Amazing You that also coordinates with it but today I am focusing on just these 3 words….it is called the Celebrate You Thinlits I think that it makes a fun yet kinda dramatic look and feel, making it super special. I know that if I were to receive it, I would beam and also oooo & ahhhh over it!
Below is a super short (under 2 minutes) video that the home office did about these 2 products…there are some amazing samples in there that will perk you up and then you will see where my inspiration came from, YEP….I cased a card!
Every Tuesday Stampin’ Up! shares weekly updates with Demos and then they also help us by sharing with us a weekly training piece to help us, inspire us and teach us focusing on a specific product. When I clicked on the email yesterday and saw the picture below I know that I needed to case it as it is truly a fantastic card!
First I adore a tone on tone and truth be told I like it best in White or Vanilla but I thought that might be hard to see in pictures so I went with my favorite Stampin’ Up! color…..lemon lime twist….(I can hear Chris R. right now making all sorts of faces as she does not care for this color…tee-hee-hee 😀 ) but me, I LOVE IT as it is big and bold and looks fantastic with black and white!

Now here is my take on this fun card! You can totally see the CASE that I was going for….the repetition of the word celebrate! I added some simple changes to share with you how you can see something that you love….tweak it a wee bit and make it work for you!
I do not know about you but…I have GOBS of Washi Tape….I buy it….but then I do not use it. I placed a thin piece of Washi Tape down the left side and POP….and think that it makes a huge difference as it pulls together the black sentiments plus the thin black thread that I placed behind the banner….do you agree?

You know me….I like to find ways to make this whole process we do fun and as simple as possible and truth be told…there are products out there that make it easier. Below you will see the Elmer’s Adhesive Spray. I have blogged about this before and even though I do not use it often, when I need to – it sure is great to have on hand.
You can purchase it from a craft store…I think I picked it up at Jo Ann Fabrics and there are a ton of different brands – I just went with good old Elmer’s as I figured – WHY NOT….that brand worked for use when we were kids at school…I just figured this was the “grown up version”
When I use spray adhesive I make sure that I spray it in a deep box so there is no chance of spray residue getting on my work area and I also like to use little piece of wax paper after each spray. I have found this to be super helpful in not having adhesive stick to the next thing you are going to spray (I hope that this makes sense) I then just throw the wax paper away and I can reuse the box the next time I need it.

This font of “amazing” is that indeed….just amazing! I do like the idea of having the 2 words in the same color family but also at the same time making them a bit different – this black and white dot is from the Petal Passion DSP collection. This offering of paper is over the top! I admit…I am going to be sad when it leaves at the end of this catalog but in the meantime….get used to seeing it as it is a keeper, each and every print!
I realize that there is just (2) colors, black and white to this collection but the contrast when you POP it with a color like I did today is just classic. You can also use your blends to color right on the paper to add a super dramatic look….you will see a post on that look in the future!

Check out in the picture below how I keep my Washi Tape. I use a simple ring clip – I only do this with current Washi Tape collections so I can easily spot the current ones. The others that are retired I keep in a super cute basket in my work area….
You can see from the below picture that I simply used (3) additional items that most of us have….and in using these in a minimal way made an impact on the card! My little dots around the banner and also on my envelope flap just added that simple yet detailed touch that would certainly make the recipient smile….remember, it’s the little things that people remember!

One last peek of this fun card. It really did not take a bunch of time to do. The longest part was cutting out the word 5 times and the spray adhesive made it a cinch to adhere!
I first thought that I needed to do a bunch of measuring to make sure that everything was just right in the spacing and then I thought to myself…KEEP IT SIMPLE….and that is what I did!
I started with the center celebrate words (that was mainly under the banner) and then just added above and below….it’s not perfect but IT WORKS! After making one of these…I thought – WOW…..I need to do this with other sentiment words that I have!

Enjoy your day….and we are having what feels like a heat wave on the East Coast…..now it is not that warm out BUT it is a heck of a lot better than the sheer bitterness we have been having….I am even thinking about taking a nice long walk!
Below you will see the items that I used to make this fun card and I know that there are many of you that have been “eyeing up” this framelit offering. I agree with Donna from the video….Sale-A-Bration IS the sweetest time of the year for us crazed Stampin’ Up! lovers!
by Susan Itell | Jan 8, 2018 | Bundles, Thank You |

Ok….hands down….I think that this is the BEST bundle in the new Occasions Catalog! For us Stampin’ Up! fans….it gives us the best of all worlds – great florals….amazing sentiments…. Fantastic artwork on the stamps…and framelits that will WOW us in many ways….I say a HOME RUN!
The minute I saw this catalog…I knew that this bundle would have a forever home on Randall Lane. It is just stellar in so many ways. When you have the best of all worlds it makes it super easy to create. That sums this up…it is just one beautiful bundle and I ask you, how can you go wrong when the “moon and the stars line up” like this does! 😀

No worries about fussy cutting this gem….in the picture below you will see that there is a framelit that cuts out this beautiful cluster of flowers. Here is another thing that you could easily do…snip off a portion of the flower and adhere it with a dimensional to add another layer of a flower for a dramatic POP!
The other thing that I think is a win-win about this bundle is the large, detail framelit that is just the “greenery” For my card today I did cut (2) different colors out, Pear Pizzazz and Old Olive. I know it is hard to see that I have both colors, but in person the variation of the green colors makes a statement.
The reason that I like this piece is that it is a great “filler” when you need to tuck a little something “here and there” to round out a design! Hopefully that makes sense…but I often finish a design and stand back and say….it needs just a little something more….and YEP – this die allows you to snip a little off if needed….a quick tuck and BAM!
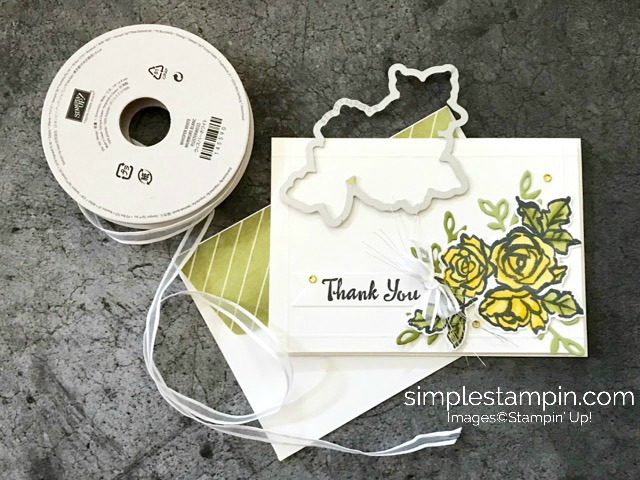
The size of this card is a good old Whisper White Notecard, so it is 3 1/2″ X 5″ . I was thrilled to be able to use this bundle with a smaller size of a card…..again, you are getting the best of both worlds! This would be a super card to make a bunch up and give it as a gift….we all know that handmade gifts from the heart are the ones that are super special!
Because this layout is so simple….I would go ahead and stamp up several of the sentiments on a 1/2″ white piece and then tuck them in with a bunch cards to give as a gift! I would put a piece of tear N Tape on the back of the sentiment strips so the recipient can simply pull off the release paper and adhere it to the card.
Trust me, this would be a gift that not only is so thoughtful and practical….but it would be one that she would remember……because YOU took the time to show you cared by making it!

We have another new product in this new catalog that totally deserves some “talk time”…and that is the 1/4″ White Organza Ribbon! WOW – this is beautiful and it makes the most “well behaved bows” – What the heck is a well behaved bow????
To me…..(because I am a bit bow challenged) it is when you can tie a simple bow just like you are tying your shoe and it works out to be perfect! YEP, this ribbon does just that…you can “fluff up” the loops and they will “behave and stay put” or you can press the loops flat and it looks perfect each and every time!
Because it is white…it works perfectly with just about any project, I am thrilled with this addition. Also remember, this ribbon you can run it across your ink pad and make your own “custom color” of ribbon. Jeanie does this all the time and the results are amazing….but then again, what doesn’t she do that doesn’t look amazing!

Can you also see that I tucked under the “behaved bow” some silver thread? This is a great added touch that take little time with a big return. Using a simple glue dot helps hold everything in place.
Did you forget about this DSP that I used for the back flap of the envelope? It is from the Delightful Daisy DSP collection. When I go to create I simply grab a swatch book and flip through to find a perfect, complementary color and feel of DSP to finish my project.
I am a HUGE believer of the swatch books as they are total time savers. My 1st wave of product shares are closed but if you want to get in the next one, please email me – you will love having a “bit” from all….without having to buy it all! I have the new Occasion Swatch Books available and trust me, once you have them….you will see what I mean about being a lifesaver.

We need to chat….a chat about the coloring and rhinestones. It is so ridiculously easy when you use the Blends…yep, that’s right…these alcohol based markers do all of the work for you without having lines. It is coloring 101 with great results each and every time.
I did not “blend” at all….all I did was put down the lighter of the color (daffodil delight and then old olive respectively) and then went over where there are the darker, pronounced areas are and used the darker shade – THAT IS IT!
For the rhinestones…you can make any color of a rhinestone by simply coloring them with a Blend….or you can also use a Sharpie Marker – it is fast, easy and no mess….leaving you with a perfect “bling” that creates that extra special something to a project!

There you go…a clean and oh so special notecard that is just beautiful! I am using this bundle this month for my monthly card kits ( I knew it the minute I saw it)….It is just a wonderful addition that is just timeless! Remember, if you purchase this bundle, you will qualify for a Sale-A-Bration item…..you see…that is why I say it is the “sweetest time of the year” – we get to pick FREEBIES!
If you are interested in my Card Kit, please email me…..I have a couple of spots open and the last day to sign up will be Thursday. I know you you will enjoy the offering and you will be a happy stamper when you can sit and create designs that I made! It is always my goal for you to feel confident about your stamping experience!
Enjoy the day and trust me, you will see me use this bundle a bunch as it is just a keeper! All of the 1st wave of my Product Shares are OUT THE DOOR today and now I am turning my time towards my Monthly Kits…… it feels great to have them completed and I know that you all will be thrilled to receive the newbies!
Until Hump Day…..go make someone smile!
by Susan Itell | Jan 6, 2018 | Birthday, Sale-A-Bration |

Good Morning and do I have a cutie for you today! I just smile when I see this stamp set….and then when I say the name of it – We Must Celebrate ..I just giggle!!! I envision this foursome to be holding up banner flags saying hooray….look at us! It is a new kid on the block and it is super sweet!!!
I was going to share this with you yesterday….but I have been in the trenches….the Product Share Trenches and WOW – I have dug a huge dent into the pile of paper and goodies….Many have shipped and the rest will go out on Monday. If you thought you were in my first wave of the Product Share and you did not receive a confirmation and or Pay Pal Invoice….please email me as they all went out on Catalog Launch Day!
Below is the stamp images…aren’t they just the sweetest!?!? Do you have a favorite? I think I am taken to the Bear and the Silly Squirrel. The sentiments are super sweet and you all know that I am a lover of a great sentiment. On the inside of this card I simply stamped the Happy Birthday sentiment…a perfect clean and simple card!

This card is so straightforward for you but I do want to point out some things I have learned from making it. This is a card that I went ahead and stamped up 12 of and then just put the extras in one of our clear envelopes to color at a later date. I invite you to do this when you are stamping an image like this as it is a fun thing to do when you are on the go!
The way that I look at it is….you have the stamp and ink out…why not just go ahead and stamp many of the same image so you are ready to color when you have the time! Coloring is so fun to do while you are watching a movie or simply waiting somewhere – I use these Zippered Mesh Bags for sooooo many things but one thing I would suggest if you get any…..BUY A TON OF THEM as trust me, they will disappear.
I alway have a pile of them as when the peeps come home – they seem to raid my stash as they truly are handy for many on the go things that we do or to simply keep us organized. If I am somewhere and I pull one of them out….I can almost guarantee I will have someone ask me where I got them. They are so darn affordable and I will say that I use all 3 sizes! Ok – enough on this but you know I love organizational tips for you an goodies to help life be easier!

I do love our Blends. Here is a tip that I have been doing lately. When I use the Stampin’ Blends I am finding that I am preferring using the regular (thinner) Whisper White Card Stock I admit, ever since Stampin’ Up! came out with the Thick Whisper White Card Stock I have kept a skeleton amount of the thinner but I am finding that I am reaching for it more and more when using the Blends.
Perhaps it is just a personal preference but I find that the Blends glide over the paper perfectly. The #1 reason that I adore the Blends is the simple fact of no lines showing!!!! To me, it is just simply the best to have a coloring product that just glides and gives a smooth and even coverage.

I know that many of you worry about knowing how to “blend” colors together…but hear me out – the 1st thing for you to master is just simply feeling comfortable with the coverage of the markers. I invite you to NOT WORRY about mastering the “blending” aspect of this product…rather embrace the fact that there are 12 color families – hence you have 24 different colors to play with!
The blending will come in time and it will only happen with one concept….that is PRACTICE!
I am just hoping that Stampin’ Up! keeps coming out with more and more colors. If I showed you how many Copic Markers I have you would say….a BIG – OH MY!!!! I just love the coloring result you get with an alcohol based marker but always remember to use the appropriate ink when stamping….use the Memento Black Ink as it is safe for the markers.

Did you notice the envelope love….I am still getting used to the new DSP offerings…but this one is one of the Sale-A-Bration FREEBIES….shown above. Trust me on this one….this picture does not do it justice as when I saw this picture I was not a fan of this paper but once I saw it in person….I thought of many projects that it would work for and heck – it is FREE….so who doesn’t love that!
Same drill as I always do….a 1/4″ strip of card stock and then a 2″ X 6″ piece of the DSP….adhere it and trim off the excess! This way I can get 12 envelope flaps out of (1) sheet of DSP! Works for me!
After I did my coloring fun and went to mat it onto the Sahara Sand….I thought it needed a bit more to POP…..so I simply used the stampin’ trimmer to cut a 1/4″ strip of paper and then matted that across the top and bottom of the colored image!
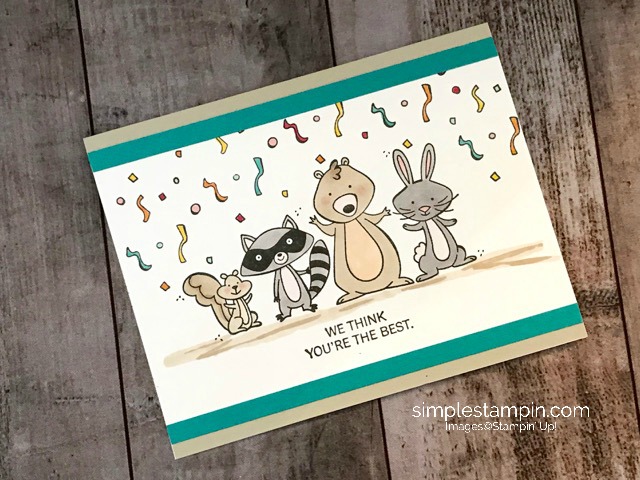
There you go…a super simple yet super fun card. I do enjoy working with a whimsical stamp set like this as I truly do not think it is for just the “young at heart” To me, it just conveys a FUN TIME and you could use a sentiment in the inside such as “We’re rooting for you” or “Sending well wishes”…just about anything would work!
Enjoy the day and stay warm…we are on day 3 of the horses being in the bard as it is just too darn bitter with the wind to go out! I have one miserable and super grumpy pig on my hands as Daisy simply hates the cold weather…..she is like a ground hog…..she would rather stay in her heated penthouse and just come out when it gets warmer.
Trust me, she grumbles at me when I push her out to go potty but she does what she needs to and then runs (well waddles) right back to the door to the heat! She really is not a fan of this weather!
I do hope that you can have some “crafting time” over the weekend. I am going to be doing some and then switching to the product shares….a little of each makes Susan a happy stamper! Isn’t it just wonderful to know the simple tricks that make us happy…..I want to play stamps, paper & ink…John wants to watch football….and Daisy wants to sleep – life is great! 🙂


