by Susan Itell | Aug 29, 2018 | Birthday |

HHD (Happy Hump Day) to you!
WOW, this has been one hot and long day and I have a story to share with you that will make you giggle inside!
Before we get to that….I have a FORMULA CARD for those times that your “creative juices” are just not flowing or also a great one to use when you are short of time!
For those of you that are new…WELCOME – when I loosely use the phrase “formula card” I am referring to the fact that you can take a super simple layout and use it OVER and OVER changing up the papers and stamps and BAM…you are good to go and no one would ever say….she made this again as truth be told, it will look different!

This is how I roll as trust me, I get it that there is nothing like going to layouts that you like and make them your own. I do this all of the time and I can say that at first I felt a bit guilty but that quickly passed as this whole stampin’ journey is to be FUN and when a time crunch gets in your way and you have intentions to get a card completed and out the door….I say, it is a perfect option!
Right out of the gate….here is this super simple formula!
- Cover card front in DSP
- Stamp images on a 3 1/2″ X 3 1/2″ piece of scraps
- Cut (2) colors of squares to 3 3/4″ X 3 3/4″
I told you it was easy…..but please read on!
Do you remember that last year my dear and sweet Aunt Jean celebrated her 90th Birthday? Well….another year has rolled around and she is still such an inspiration to me. She doesn’t like to have people say the “number of her age” which I do guess that bothers some….so I just wanted to make a super simple, colorful and fun card….just like her!

I am using the Birthday Stamp, Picture Perfect Birthday. This was carried over and is on page 76 in the Annual Catalog! Confessions of an honest stamper….I did not purchase and new Birthday Stamps from the Annual Catalog as I just LOVE this one! There are a couple of reasons that I like it so much….
- The price point is great – just $17.00
- It is a Photopolymer Stamp….make me giddy as they are soooooo darn easy to have great placement
- I can easily use the Stamparatus and whip out a bunch of the stamped bases
I think that you can see where I am going….it is a keeper! I have shared that I am becoming super selective with my stamps that I buy and heck – there are soooooo many things that we can buy…so why not focus on the ones that right out of the gate…you can envision what to create!

Because this card is so darn basic…I did decide to fru-fru it up a wee bit with the Silver Thread behind the square images. This is sooooo simple to do and I laugh at myself when I first tried to do it eons ago….and I admit, I have had a tangled mess before…..but not anymore!
All I do is wrap the thread around my hand or just 3 fingers depending on the size of the loops….just wrap it around 4,5, or 6 times (remember, no rules or being right or wrong) and then cut it….and slap it on the back of the squares that have adhesive on. AFTER you get the hot mess of thread slapped on….you can flip it over and fuss with it a bit to get the loops where you want them to be!
The other thing that I did to add a bit of pizzazz for my dear Aunt Jean was to make my own envelope out of the SUPER YUMMY Lovely Lipstick Card Stock. Isn’t that color just the BEST! This is just a little switch up from the regular white envelope. I do not do this all of the time but when I do, I smile as it really does add some simple POP!

In case some of you are wondering why in the heck did I use the Lemon Lime Twist to do the flames…easy – it is in the Broadway Bound DSP! You know me….I like to carry the theme all of the way! Also, Lemon Lime Twist is one of my all time favorite colors but I admit, whenever I use it I think of the one and only Chris R. from Iowa as she is NOT a fan of that color and we tease each other about it!
So….I say – WHY NOT???
Why not use a formula? There is NOTHING WRONG with taking just a matter of minutes to make a card! Remember, it ALWAYS goes back to the one thing I say over and over….get the BASICS….the TRUE BLUE tools that make this whole card-making process fun and rewarding! I know that we ALL HAVE the stamps and if you are like me….many stamps have never been inked up!
Let’s all get used to using the basic tools….if you do not already have a Stamparatus or another stamp alignment tool…than THAT is a focus item that Santa need to bring to you in August….It is a game changer and look at this card – the candles are perfectly lined up. There would be no way that I could do that with such speed.

Also remember….the house glass has turned for the Bonus Days to come to an end. You have just until Friday evening to take advantage of the $5.00 coupon to be used in September (woot-woot) – the new catalog as well for every increment of $50.00! Please just remember to keep the EMAIL that Stampin’ Up! will send to you after you place your order!
All of the products that I used for this simple card are at the end of the post as usual. The Bonus Days are also a great time to stock up on the items that you know that you use all of the time….envelopes, cardstock, adhesives, dimensionals….the way that Iook at it is..it I know that I am going to use them…..why NOT stock up now and take advantage of the $5.00 off. It all adds up!

Now to a funny…..many of you know that I have a pig…aka, Daisy. I love Daisy and most of my family do not see the same beauty and love that I do for my beautiful swine! She brings me joy and for those of you that do not realize this….pigs are SUPER SMART and they are SUPER CLEAN animals!

(Look at my girl following her sister….carrots do the trick!)
Daisy does not go off of our property often….well – the last time was probably 3 years ago. Hannah is home just until Friday and Daisy really needed to go to the Vets for a check up….shots & vaccines and to get her feet trimmed….I guess you could call if a back to school physical that we did with our kids when they were grasshoppers!

(look at the boys….Oscar and Colin were so nosey – we put the tack trunk towards the back so she wouldn’t fall as we were driving!)
Daisy does like Hannah and actually Hannah has really started to take a liking to her. When John and I were away I think they bonded! (Hannah wouldn’t admit this though) The problem is that there are no vets in our area that will work with pigs. The closest one is in Virginia, about 1 1/2 hours away. That is where I have always took her since she was a baby……so just like we do with our doctor choices….why should I switch?
Well, I needed hep as my little girl has gotten too big for my VW’s back seat and trust me…..PIGS ARE VERY VOCAL when you try to pick them up. It truly is the most piecing noise that they make.
She was PERFECT getting onto our trailer this morning….now mind you – our appt was at 7 a.m. this morning so we were up and ready to rumble early and it was a family affair! In the pictures below you can see the horses running over to the fence and being nosey…..like saying – what the heck is she doing in our car!!!!

(that purple blanket and ball are her favorites)
We got there…the vet came onto the trailer and said, I think we need to sedate her but unfortunately I am concerned about the heat. I would like to sedate her and bring her in the clinic and then keep her here until her vitals are ok and she comes out of the anesthesia. I thought….ok – that makes sense as after all, she is my girl!
They sedated her and then there was a THUMP.…she tipped over and then I thought I was watching a MASH TV show…they brought a gurney out and rolled her on it and off they went! He said – give me about 2-3 hours and she should be good…..well – it was LONGER than 3 hours but we did errands in the area….grabbed some food (mind you….we also had the trailer) I could only find parking on the street and we took up 3 spaces and I had to feed all 3 meters!

Daisy was GREAT and he said that she was a perfect piggy!!! The one thing Hannah and I thought was…..she was sedated going in….how in the heck are we going to get her out and in the trailer? Now THIS WAS A 3 RING CIRCUS as she was totally stressed and screamed/squealed so loud that you thought she was being murdered!
I wish that I could figure out how to upload a video in the body of this post….you would CRACK UP to hear the noise that she made and then Hannah saying, MOM….you are not helping matters right now!
What a drama queen! We got her back in…..flipped up the back of the trailer and off we went….they Mother/Daughter dynamic duo team…..Hannah “get’s me” and she also laughs at me….she truly loves my passion for our animals as she is exactly the same!
As we left….the vet said, please keep her in and preferably in air conditioning for the next 24 hours….I laughed as yep, Daisy’s Apartment has AC and heat! The vet knew that she lived in the house with us and now has her own “digs” in the barn…we call it Daisy’s Apartment…..darn, she is one lucky pig!
Now have a GREAT EVENING….and try to find 15 minutes of ME TIME and create this formula!!! You know what I say….make one up…even if you do not have all of the products that I have used…this way you will get the feel of it and I would write down the measurements for the future!
Stampin’ hugs…..see you Friday!

by Susan Itell | Aug 27, 2018 | 3-D Projects, Gift Set Ideas, Just Because..., Super Easy |

Happy Monday….Happy New Week…can you believe that this is the LAST WEEK of the month! Yikes, the calendar is putting age on us! When I hear the word “September”…I think of kids going to school….and then I think of….here it comes….hang tight… as the next 3 Months will be the “trifecta” time of the year !!! Let the holidays roll!
Friday just simply did not happen but have no fear…I am here to sow you how you can make the perfect compliment to the Note Cards and Envelopes that I blogged about using the Abstract Impressions AMAZING Stamp Set! I really do love this little gem and yes, I did cave in and bought it as a bundle but honestly….if you like super clean designs, just get the stamp as it is one that you will use over and over….

I am going to share with you the colors that I used for the Note Cards when I stamped them. I had lots of comments and emails about that so keep reading as I will share!
Here is a great tip that I recommend that you do…PLAY and just have FUN with all different color combinations. I think that you will be amazed with how even just stamping off and also double stamping a color will give you a great effect if you do not have a bunch of ink colors!
I can remember a great little tip that a wonderful elderly man gave me when I was gardening one day just after I was married…..decades ago! 🙂 I was very young and did not know a thing about gardening and colors etc…This tip stuck with me stuck with me as I was trying to be a perfectionist.
Sweet little Mr. Kunkleman came over and said….looks like your having a hard time deciding what to plant? I said, yep….I just do not have the same amount and the color won’t match and be balanced. He sweetly and kindly looked at me and said…it really doesn’t matter because God loves and splashes all colors…everywhere with all sorts of textures and heights…just plant them and you will see how the mix beautifully and will pop with color!
Where does this go with stampin’? EASY…do not stress!!!
I admit, I think of him and this advice often when I get stressed out with finding the perfect colors when I stamp. When you really stop and think about it…it doesn’t matter, what matters is that you are having fun creating! Here is another thing that I often will say to myself – does it really matter???….my cards and the images I stamp and color are my own little imaginary world…the important part to always remember, is to have fun!

Here are the colors that I used for the above sweet notecards!
Remember….no rules – just have fun!
- Top left – The grass/stems are Granny Apple Green and Garden Green. The flowers Highland Heather and Gorgeous Grape were both STAMPED OFF ONCE and then I stamped the color.
- Top right – The grass/stems are Mint Macaron and Tranquil Tide. The flowers Petal Pink (full strength) and Calypso Coral was STAMPED OFF ONCE and then I stamped the color.
- Bottom left – The grass/stems are Lemon Lime Twist and Pear Pizzazz.The flowers are Coastal Cabana and Bermuda Bay were both STAMPED OFF ONCE and then I stamped the color.
- Bottom right – The grass/stems are Granny Apple Green and Garden Green . The flowers Daffodil Delight STAMPED OFF ONCE and the stamped in the same color FULL STRENGTH.

Now I know what you are also going to want….the SCOOP on making the Box! I have blogged about this before and you can click here to see a more detailed post on the box….but below you will see quick bullet points that will give most of you the details that you really need.
If I were you….I would make a box today and then write the measurements and scoring scoop down. Trust me, you will make this over and over….another reason that a “formula concept” always works!

For the Box:
- Granny Apple Green Cardstock – 8″ X 11″
- Score on the 8″side (shorter) at 2″ & 6″ I do use and suggest the Simply Scored Tool….I always think that leave a deeper impression than the trimmer…again, it is a basic tool that we all need and will use!
- Turn Paper to the 11″ side (longer) and score at 4 1/2″ & 6 1/2″
- Fold In and use Bone Folder to give a great crease
- Cut in the scored lines
- Use Tear & Tape as shown and fold in sides
Decorating the box: (these below are correct – in one of the pictures I had them mixed up…!)
- The White piece on the front is 3″ X 3 3/4″ and then I did score some lines as I think this adds a bunch! You can see that I only stamped one grouping of flowers as on the notecards I did use 2 groupings for each notecard.
- The DSP on front is 2″ X 3 3/4″
- The DSP on back is 2 1/2″ X 3 3/4″ and remember to only put adhesive on 3 sides as this is just a pocket to put 12 stamps in! If you do not want to put any stamps on your project, simply leave the back plain. Sometimes I put DSP all around the box but really….it is not necessary – it looks great as it!
I want to chat about the envelopes! You know that on Wednesday I shared with you that I used the 6″ X 6″ DSP paper found in the Annual Catalog on page 191! I ADORE THESE PAPERS and I am just so happy that Stampin’ Up! decided to bring them back! I love them so much because they take the guess work out of having to find a perfect match with DSP to your project!
I know that many of you LOVE TO HOARD your DSP and trust me, I get that. I am offering these again on my PRODUCT SHARE that is going on right now – IT IS ADD ON #2 (yep, you still have time to place a share order) as these handy 6 X 6 sheets come in each and every color of our color collection and they are in fun polka dots and stylish stripes!
Scroll back up to the picture that has the notecard samples and you can see that I used the different stripes and polka dots on each of the samples! If you want to take advantage of these in the Product Share or any other shares for that matter…..please email me and put in the subject line HOLIDAY PRODUCT SHARE and I will reserve it for you!

For these envelope I simply cut the paper to 1 1/2″ X 6″ and then use a 1/4″ strip of cardstock. you can see above that there is a week pit of envelope showing! No worries, just trim the envelope a wee bit shorter!
This is kinda getting back to that thing that I say to you…..DO NOT STRESS….do not worry about perfection…..just do it and have fun! By cutting the paper this way, you can cover (4) envelope flaps per sheet of paper!!!! Another reason why I love these papers – I had many requests to offer these again in a share….so here you go – your chance to get each and every color and design!

I hope that this post has brought you inspiration and smiles and I also hope that it brings to you a gentle nudge to not be so hard on yourself. Trust me, this is something that I have to work on each and everyday as self care for myself is a SUPER HARD thing to do! I am definitely one that likes to give and give to others before doing something kind for myself!
This is one of those reasons why I love stamping so much….it gives me some “me time” and is truly a therapy for me…there is nothing like paper, ink, stamps…..
If you were to poll my peeps and ask them what is one of the all time “MOM things/quotes” that I have said to them OVER AND OVER as they were growing up and experiencing situations…growths….obstacles etc….it would probably be this…
“If there is no joy in the journey…than there is no joy at the journey’s end!”
I invite you to read this and then re-read it and then think about how true it is in many aspects of our lives! Let’s take stamping for example…I adore stamping…I adore creating….but if I came to a place that it was stressful, not fun, making me grumpy and resentful than I would do this – simply stop it…now this WILL NEVER happen with me as I adore expressing myself with handmade love.
I think that you get where I am going…we all have choices in life and let’s face it…it is so much easier and rewarding doing something that you get joy from than having to do something that stresses you….life is just to darn tootin’ short!
OK — enough of LIFE STUFF….I think you all know me well enough by now…I love what I do and I share with you through my blog snippets of who I am and what makes me roll! Speak of making me roll….this type of project makes me roll and it is something that I make often with all different stamps!
One last picture of this gem….I do not know about you but I adore these new Mr. Rogers Stamps that the Post Office has. I am a stamp hoarder (yep, I admit) and between these and the new Scooby Doo Stamps…..I am smiling! My sweet little Post Office often sells out of new stamps as they do not get a bunch in….so remember, check the USPS Website…they will have all stamps!

Well…there you go – inspiration… “how to’s” to make a perfect, useful and practical gift! Have a great day and remember that we are on the LAST WEEK to take advantage of the Bonus Days where you will get a $5.00 Coupon Code from Stampin’ Up! for every increment of $50.00 that you spend! You can use them in September and if I were you…..I would wait until the 5th – when the new holiday catalog goes live!

by Susan Itell | Aug 22, 2018 | Fun & Cute!, Gift Set Ideas, Uncategorized |

HHA (Happy Hump Day) to you all!
I have a cutie for you that is not only going to make you smile…it is going to get your creative juices flowing as the options are just endless! This is one of those kinda posts that I hope settles in with you as I think that these are just ADORABLE Notecards!
Let me share with you the “why’s and how’s” of how these cuties came about! Hopefully you know me well enough by now…there is always a method (or whys) to my crafting madness!

When I create and more importantly to me….when I share something with you on my blog…I do it for one reason…I LIKE IT….I guess this is one of those things that I like about being a Stampin’ Up! Demonstrator….I get to purchase just what I like and will use. The minute that I saw this bundle on my first flip through the catalog I knew that it would have a home on Randall Lane.
Being completely honest with you….when I saw that it was a bundle, I didn’t quite get how the framelits went with this very forgiving and quite whimsical stamp set. I just love this set…and the ideas are just simply ENDLESS….If you have not already done so…I would google and or go to Pinterest and see all of the amazing projects people have made using this gem of a stamp set.
I have shared with you in previous post that there are actually times that I do not buy a bundle…it is rare but there are times that when I know that I am simply not going to use a part of the bundle….I say why buy it? I thought pretty hard on this one but ultimately I did get it as a bundle as that triangular floral image is just stunning.
I did just what I said above to you – I googled it and saw amazing ideas that others made with it and YEP, it made me purchase the bundle. I will share with you in a future post the BEAUTIFUL card I made with this stunning framelit so the moral of this stampin’ story is…..BUY IT as a bundle!

Ok…onward as I have a ca-zillion things to do this afternoon and this is soooo ridiculously easy but it has such a practical and cute impact! This is how I roll….I needed a gift for a Bridal Shower and also for a dear friend that has been ill and asked me if I could just whip up something….HOW COULD I SAY NO????
That darn thing of TIME was once again on my shoulders and I went to my FUN AREA and….kept saying to myself…you can do it…you can do it…and POOF – I did it! Not only did I get my gift mission accomplished…I thought that they were so cute that I made up 20 more for myself as they are just too sweet!
There really is not much to tell you about making them….but you know me, I will share and I do hope that you come back on Friday as there will be a Part 2 to this post with my packaging and another….GREAT TIP!!! You know me, I love to share and I love to inspire!

Now I admit, I do not “get it” why there are some of you that do not embrace the love for the Note Cards & Envelopes? They are such an AMAZING bang for the buck (as the saying goes).…I ask you???….how in the world can you get 20 pre-cut and pre-scored bases in THICK cardstock with envelopes for just $6.50….let me answer this for you….you can and if I were you….I would CLICK HERE to get them in White and then CLICK HERE to get them in Very Vanilla!
These are just one of those Stampin’ Up! staples that you just have to have on hand. Now if it is the size that bugs you….o.k. – but really….this is a super size for a note (5″ X 3 1/2″) but if you insist to do it in an A-2 size…..go for it as we both know it will be beautiful!
There are those darn Basics that I blog about all of the time that made this a BREEZE to do. You will see that I am showing you (3) different color combinations but I thin that you can see that you can do whatever your heart desired. I made up (20) of eash color combination….yep – a total of 60 and it was a fun thing to do!

The Stamparatus made it a breeze as all I had to do was put the paper in….stamp….do all 60….the change to the next stamp…..put the paper in and stamp…..it goes super fast! A stamp positioning tool makes the process a delight to do. I feel SOOOOOOO strongly about a stamp positioner that honestly, if you do not have one….buy the Stamparatus.
Ir is a great tool. I have shared that I have had a MISTI for years as well as a Tim Holtz one….but truly, Stampin’ Up! nailed it with this beauty! It truly is unique with having a (2) door system…I am just very, very happy and also proud of the product!

At the end of the post you will see the list of inks that I used. I think that you will find it pretty easy to see which ones went where…etc but if not, please feel free to leave me a comment and I will clarify it for you!
Here is the SCOOP on how to make them. You will say, NOW EVEN I CAN DO THAT! Well, you know what I am going to say right back to you….OF COURSE YOU CAN DO IT! I am such a FIRM believer that we all can do whatever we want to achieve as long as we take the time to practice and also have the right tools to get the job done!
- Use the Notecards & Envelopes
- Cover the front panel of the notecard with a piece of cardstock (to coordinate with your color palette) to 3 1/2″ X 5″
- Cut a piece of Whisper White to 3 1/4″ X 4 3/4″
- Stamp the Whisper White piece to your liking
- After you have done all of the stamping….take this to your simple scored and score lines as you can see in the pictures…..THIS IS KEY TO ME…as trust me, it is that PERFECT ADDED TOUCH that we have been talking about lately!
- The envelope….same drill as usual BUT because the flap is narrower that our regular envelopes…..you can just make the DSP 5 1/2″ X 1 1/2″ under the 1/4″ strip of paper!
The reason that this is WOOT-WOOT…as you will be able to get (4) envelope flaps per (1) sheet of DSP…..I used the Garden Impressions Stack but then I also used the AMAZING Stacks from each of the color families! You know HOW I LOVE them and this is why I put them BACK ON my Product Share Offerings……as so many of you wanted them again (Add-On #2). It is a GREAT way to get all of these without having to buy them all!


Well…there you go! I hope that I have inspired you today and I also hope that you will come back on Friday to see how I packaged them! I just LOVE to package things up as let’s face it…that is what sets the tone…the 1st impression is how a gift is wrapped!
Enjoy the remainder of the day and I will see you on Friday!!!!

by Susan Itell | Aug 20, 2018 | formula, Just Because... |

Good Monday to each and everyone of you and I hope that you had a great weekend! We did and I was able to be quite crafty over the weekend, which made me feel super good, and John and I also went to see the new Mamma Mia movie. There is just something about seeing a musical that makes you skip a beat – it was a cute movie!
Now how about some inspiration? I admit, I was super happy with the end result of this card and I can see myself making many more cards using this same basic “formula” and simply change up the stamp set and DSP.
Before we get into the “nuts and bolts “ of this card I need to share and give credit where this AMAZING card idea came from today. I “jump started” today’s card from fellow demonstrator Sandy Carlson from Minnesota. I can’t even remember how we began our connection with one another but wow; Sandy is so darn sweet and also so darn talented.

Sandy sent me this card after we returned home from the Alaskan Cruise. Now you know me and my style….fun folds and lots going on usually stress me about but when I opened this card from Sandy, I beamed from ear to ear as I just loved the colors and also the “mechanics” of this card! I thought….WOW, I could even make this!
So as we say in the good old Stampin’ world…here is my version of CASE-ing ….and I hope that you find it fun and give it a try! As I always share with you….when I give you a “formula” with all of the measurements etc…I strongly encourage you to try it…even if you do not have the stamp and DSP that I am using….
WHY??? Easy, by trying it (physically) with following the measurements etc….it is the BEST way to give the formula a “test drive” and see how you like it, see if it is a style of card that you would make again.
I would also encourage you to write down (or print off) the measurements and also jot down the date of this post. WHY? Easy (again) as this way you will be able to pop back to my blog and refer to it in the future!
OK…you can see clearly that Sandy’s card is just fabulous…and the changes that I did were not huge and after you see my dimensions you will clearly be able to figure out how to make it just like Sandy did….all I did was add some “Susan touches” to mix it up a bit….so a HUGE thank you to Sandy for not only inspiring me with today’s card but also for always being that ray of sunshine!
Now to the “formula” and a bunch of pictures for you. I hope that you enjoy and I also hope that you will go and make one…and as the sentiment says…kindness changes everything!

- Piece of Thick Whisper White 4 ¼” X 5 ½” – this will be the back of the card. I chose to do this, as I love to hide the mechanics of a card as much as I possibly can.
- You will need a Blueberry Bushel Card Base….go ahead and make it an A-2 card size but then take it to the trimmer and cut off 1/8” from both sides making it a card that measures 4 1/8” X 5 3/*’…..later this will make sense to you…..hang tight!
- Cut a piece of Whisper White (I use the regular weight for the insides of my cards) to 4” X 5 ¼”
- The DSP for the card from is from the Garden Expressions 6 X 6 paper stack (love this paper) and trim it to 3 ¾” X 5”
- Cut a mat of Whisper White to go behind the DSP 3 7/8” X 5 1/8”, (you could skip this but I think matting the DSP really adds a special touch…)
- The dimensions of the banner part is in Blueberry Bushel at 1” X 6” and then I scored it twice starting at 4” and then one notch over (4 1/8”)….score and burnish the score lines. (the why I did this will be later…hang tight!!!)


- For the envelope…same drill as Simple Susan loves to do, 1 /4” of a solid card stock and then a 2” piece of DSP….this way you can do 3 envelopes from a sheet of 6” X 6”.
Now let’s chat about stamping this card! I used the Stamparatus as this is the single BEST WAY to make sure that you have not only a good clean and crisp stamped image but it makes it a breeze to make up multiples of cards at one time.
Another amazing thing that is super helpful about the Stamparatus is…you can go ahead and cut multiples of shapes (like I used the stitched Ovals to stamp on) and just crank them out without having to line up the stamped image.
In the below picture the light will shine for you…..and let me guess what you are thinking…..a great idea…right!?!? Yep it is, this is a template for you to use over and over. (I keep all of the ones that I make up in a stamp case)

I stamped the sentiment on the white stitched over and then matter it with an oval that it a bit bigger from the Ovals Collection Die Set. I want you to think about this….as once again, what am I using……THE BASICS!!!
The other thing that I stamped was a super sweet sentiment on the inside of the card from the Varied Vases Bundle. This is one of those Bundles that are a MUST HAVE for every stamper. It is just so unique and classic!

I think that it is pretty straight forward in how this card all came together but I want to shed some light on you as to why I made the changes. Again, the card was perfect from the start that Sandy did but I wanted to bump it up some and make it my own as after all, that is what CASEing is all about…..
Copy And Share Everything while giving the credit to the creator and then possibly making small changes to make it reflect your work and style. I know that these are more steps than I usually do but heck, I adore it and I thought it totally reflected my style of card making!

My main objective was hiding the folds on the banner and also having a solid front panel. The reason that I scored the banner lines in 2 measurements (just one notch over) was to allow for the thickness of all of the paper.
I used fun foam to pop up the DSP Element of the card. You know that I blog often about using fun foam. I like it for a solid mass like this as it gives the card such stability when you hold it in your hands.I know that this is just a personal preference of mine but it is one of those things that I do just about all of the time when I have a larger area to pop up…..I am not a fan of sagging and I also do not want to peel off a ca-zillion release papers from the dimensionals.
I just buy fun foam in white from Amazon and you will be shocked with how long it will last you. For this I cut the fun foam to 3 ½ X 4 ¾”. I keep a container for all of my scraps of fun foam as you can use even the teeniest of pieces! For smaller areas and odd shapes, I would use the Stampin’ Dimensions” as well as the Mini Stampin’ Dimensioals.
You adhere the finished “blueberry card part” to the piece of Thick Whisper White and presto….you have a beautiful card that you cannot see the seams of the ovals/strip of Blueberry and also you cannot see the adhered back part of the strip as you have the white back to hide the back fold of the banner strip.

Call me “type A” and yep, I admit it and agree but this is how I roll. I am just like you…I love to create and when I create I simply get “lost” in the process. I know you agree with me, it’s a fun journey to be on!
Little finishing touches of the white gel pen on both the card and the envelope made the whole thing come together! Remember, it’s the little touches that add up to be biggies!

There you go….a bit of inspiration to jump start your week! Thoughts..comments…..ideas & suggestions? Please feel free to leave a comment as we all love to read them and I truly think that this is how we learn and grow.
I feel blessed to have a strong community of old faithful blog followers and trust me; your comments really do make a difference. On Wednesday I have another cutie that will make you smile….I look forward to seeing you then!
On Friday I shared the Product Share offerings that I will be having with the new upcoming Holiday Catalog. I have NOT emailed confirmations out yet so if you emailed me….no worries – I will be sending confirmations out starting Wednesday.
With the way that the upcoming months will go…just ZOOMING BY….I would try to get in the first wave of the product shares….then you will be getting out of the gate in style and hopefully less likely to experience any delays with backorders…..SHAME on me….I should not even think of that…..we know….things like this can happen!
See you in just 2 short days….and do not forget – this is the time to stock up on the basics….for every $50,00 you spend, Stampin’ Up! will give you a $5.00 code (via email) that you can use next month to get off your September purchase…..WOOT-WOOT….as the NEW Catalog will be live!!!!
Thanks for spending some time with me today and remember, Kindness DOES changes everything! Yesterday I was on my way home from Yoga and on the back country roads there was a car stopped…..I thought that perhaps his car broke down and I was going to offer to see if he was ok….and YEP – he was ok…..he stopped to pick up a Turtle and put him on the side of the road so he didn’t get hit…..
I smiled….and thought…..YES, this simple act of kindness warms my heart! Now go and make someone else smile!
by Susan Itell | Aug 17, 2018 | Product Shares, Uncategorized |
 Happy Friday…happy Weekend! I do not know about you but this week has ZOOMED by!
In less than 3 weeks the new Holiday Catalog will be live and that means it is time for another Product Share.
When there is a new catalog the best way to get a taste and feel for it is to take part in a PRODUCT SHARE.
It is as simple as this….you look at the below offerings and decide what you want…email me to save your share and then I get to do the work in ordering, dividing and creating!
I know that this time of the year that life just becomes “crazy”! If you are anything like me we have great intentions to “be on top of it” and not let the calendar get to us….and then IT HAPPENS…(fingers crossed that this year might be different)
That darn calendar turns to September…and we walk around saying…where did the summer go…kids back to school...and then October…yikes – Halloween….and then… the upcoming “biggies” of Thanksgiving and Christmas….CALGON, take me away! It is all in great intentions as we love to create and make things for our family and friend, trust me, I GET IT!
I know many of you are nodding you heads as it happens, each and every year. This new catalog will go live on Wednesday, September 5th and I will have these shares in and out the door in a jif as I know I was in your shoes before…you want the “goods…and you want them now” (kinda like the girl in the Willy Wonka)
The BEST part about this Holiday Catalog is….that the most time consuming part for me with the shares is making up the DSP swatch books (share #1) and as a Demonstrator I have been able to order a wee bit of all of the paper, and trust me, I have been making these up!
Let’s get to it…..here are the Product Shares that I have for you!
All I ask from you is…EMAIL ME and put in the subject line…HOLIDAY PRODUCT SHARE so I can spot it and get the list going! Please let me know what shares you wish to preorder and ALSO your address. I know that there are sooooo many of you that have been ordering shares from me for years (thank you)…but it makes it super easy for me to just copy and paste all of your info…..(thanks!)
Share #1 – DSP Swatch Books – $17.50 – These are a MUST HAVE Stampin’ Aid to have at your work space!
These gems are a VERY VALUABLE piece of Real-Estate in your craft space. These along with below ADD ON OFFERING Share #1 will have you SET and all ORGANIZED. There is no need to DRAG OUT lots of paper to see what will work for you.
These are a true “labor of crazy love” to make but they are sooooo worth it. You will thank me each and every day you use them! They have all of the important information on them to see at a glance – trust me, once you get these….you will always get them each catalog.
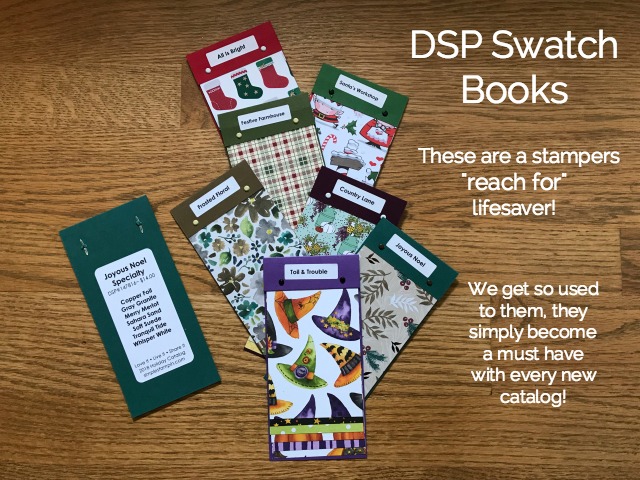
There will be 7 swatch-books – all from the collections of paper that I am offering in the next share.
Share #2 – DSP Paper Share – $25.00 (7 DSP paper collections below)…a total of (44) pieces of 6″ X 12″ paper/
- All Is Bright, Festive Farmhouse, Santa’s Workshop, Joyous Noel, Frosted Floral, Country Lane, Toil & Trouble
- (1) 6” X 12” piece of the Galvanized Metallic Paper
- (1) 6 “ X 12” piece of Black Foil Paper
Share #3 – Tis’ the Season to Shimmer – $9.00… The fall and Holiday Season lends itself to some glimmer and bling…7 different colors to add that special little touch! In total you will receive (14) pieces of glimmer.
There us no doubt that a bit of glimmer is a perfect “something-something” to jazz our projects and Stampin’ Up! has redesigned the glimmer paper and the “glittery goodness” does not come off!
- (2) 6 “ X 6” of EACH Glimmer Paper in Copper, Merry Merlot and Tranquil Tide, Gold, Rose, Silver & Sparkle
Share #4 – Ribbon Shares – $15.00 You will get 2 1/2 yards of EACH of the ribbons below
Stampin’ Up! offers super… classic offerings of their ribbon to coordinate beautifully with our Product Line. I wish that you could be here to see the assembly line we have with ribbon! It becomes a whomever is in the house affair!!!
I take everything off on the kitchen island and put pieces of Washi Tape on our Kitchen Counter….get a pair of Ribbon Scissors for John or my Dad… and say – HAVE FUN! They hang the ribbon on all of the Kitchen Cabinet Knobs for me to separate and package!
- 3/8” Real Red Mixed Satin Ribbon
- 5/8” Striped Burlap Trim
- ½” Poppy Parade Textured Weaved Ribbon
- 5/8” Merry Merlot & Copper Reversible Ribbon
- ¼” Tranquil Tide Velvet Ribbon
- 3/16” Braided Linen Trim
- 3/8” Black Glittered Organdy Ribbon
Share #5– Embellishments – $20.00
WOWZA – It is always hard for me to pick out the goodies to put in the Embellishment Shares. I have narrowed it down to the “keepers” in my eyes and trust me, I only put products in my shares that I love and stand behind as after all, if I am not a fan of it….chances are you are not going to be happy with it as well!
I think think that you will be supper happy with these picks… again, I tried to pick the must haves in my SIMPLE opinion!
- All is Bright Paper Clips – 5 each of Star and Tree (classic shapes for the classic Holiday we all love!!!)
- 6 Galvanized Buttons – (These super thin buttons will be a perfect accent to adhere a bow without the bulk!)
- Santa’s Workshop Enamel Shapes – 60 in total (we all love enamel do-dad’s…the colors are Garden Green, Poppy Parade & White)
- Frosted & Clear Epoxy Droplets – ½ sheet – 48 in total (these will be a GO-TO all year as they are that simple WOW)
- Galvanized Clips – 6 clips (LOVE the thinness of these, a sweet and perfect little accent)
- Chicken Wire Elements – 2 per share (This is NOT wire…actually it is a super fun accent that silver on 1 and the other is white…your choice in how you want to accent a project…a perfect little “something-something” to add to a card, I’m excited to use these!)
- Spider Trinkets – 3 trinkets per share (these are just too sweet as a perfect little accent even for those people that are not a fan of Halloween)
Now for the fun part…what Shares do you want?
If you are like me, how can you not just WANT IT ALL! That FOMO (Fear Of Missing Out) gets us all of the time but I am being 100% honest and say…what I am offering are all things that I use in my Clean and Simple way of Crafting. YEP, even those glimmer papers for the Holidays….there is just something about them in “little bits” that works for my style of card making.

I Want It All is $ 86.50
(I always tuck in a sweet treat for those whom get that I WANT IT ALL….and here it is….)
You will receive a 25 yard spool of the NEW Garden Green/White Bakers Twine, it is super and it is practical! It is a thick Bakers Twine and perfect for you to use all year long PLUS (3) 6 ” X 12″ pieces of the limited edition Holiday DSP, Dashing Along…
Shipping: This is always so hard to figure, but please know that I take great pride in the packing and making sure you are getting the best pricing…as I GET IT – shipping is expensive! Feel free to email me if you need further clarification.
- Share #1 only is $4.00
- Share #2 only and also if combined with any other share is $7.00 (because of the length of the paper 6” 12” – it has to go Priority Mail Legal Size which is a flat $7.00)
- Any combination of 2 or more shares NOT including share #2 is $5.50
- I want it all is $12.50 (you will have 2 packages coming to you, one in the Priority Mail Legal $7.00 and also a bubble mailer, $5.50)
For Example:
- If you want share #1 only it will be $4.00 for shipping
- If you want share #2 and share #4 the shipping is $7.00
- If you want shares 1,3 & 4…the shipping is $5.50

NOW TO THE “ADD ONS” FOR PRODUCT SHARES!!! (hang in there!!!)
I am offering (2) additional Product Shares that have been SUPER HOT and I have had many request for….Please let me know if you would like to add any of these on with your Product share….or perhaps you just want one of these add on’s and nothing from the above offerings….that is PERFECT with me!
ADD ON #1 – Card Stock Swatches on a Ring – $10.00
These are a MUST HAVE in my stampin’ opinion! I blogged and offered them earlier in the month, click here and MANY of you have already ordered them and they are a HIT! You will have ALL of the solid cardstock paper that Stampin’ Up! offers in one handy ring…all labeled for you

I am on BATCH #4 of these gems! People JUST LOVE THEM and trust me, I get it as it is a super practical and handy tool to have! Having all of the paper on a ring makes it a breeze to use different color combinations, The paper color and the color family are all printed on the pieces of cardstock in a super heavy and crisp font taking the guess work out of what color you need for a project!
These make a FANTASTIC gift to give to your favorite stamper…and for those Demonstrators out there…these are perfect for your customers, open houses, downline etc….and if you order 10+ the shipping is FREE on them. I have had many Demonstrators order them and have their team/customers simply reimburse the demo…..and that is totally fine with me….the feedback of how thrilled people are with them makes me smile from ear to ear!
ADD ON #2 – Paper Share – Color Collections – $35.00(6″ X 6″ sheets of the DSP Families) in polka dots and stripes!)
I am just “over the moon happy” that Stampin’ Up! has these!!!. These 6″ X 6″ sheets in each and every color that we have. This new offering from the Annual Catalog that launched in June was one of the KEY ADDITIONS to the Stampin’ Up! Catalog
I also love the basic designs of the stripes and dots….classic all the way – below you can see an image but remember, this offering will include a FULL 6″ X 6″ sheet of each color in each collection – 6 collection in total= a total of (100) 6″ X 6″ sheets!
- Brights, Regals, Subtles, Neutrals, In Color 2017 – 2019 and In Color 2018 – 2020

I am still playing catch up on emails, mailings of Cardstock Swatches on a Ring (add on #1) and by the end of the weekend I am hoping to be caught up! I had 17 orders go out yesterday and I was in disbelief that I needed to reorder on them again!
These have been so well received and I bet about every 2-3 orders I hear….why doesn’t Stampin’ Up! carry these……well…I am really not sure – they use to have that wonderful Color Coach but still…I think that there is NOTHING LIKE HAVING AN ACTUAL PIECE OF CARDSTOCK in your hand!
For those of you that are waiting…the wait will be caught up by Mondays mail! I am home for the weekend and getting caught up and actually looking forward to a PJ type of weekend just hanging around!
There you go….I know this was super long but then again, you know that I take great pride on my shares! I truly love to do them and I will say…it brings me joy to package and present them to you….Happy Mail from Maryland!
Email me and let me know what share I can put aside for you!!!!

Have a fantastic weekend and do not forget about the Bonus Days this Month….you will get a $5.00 coupon to use next month for every $50.00 you spend. his is a great time to stock up on the products that you use all year long….paper, adhesives, Inks etc….as you know that they will go to use throughout the year and then next month you can shop for the NEW GOODIES and have some $$$$ to put towards it!