by Susan Itell | Mar 24, 2018 | 3-D Projects, Easter |

Good Morning and I have a SUPER fun post for you today. I am warning you….I have a ton of pictures for you today. I think pictures are a huge help in seeing projects. I have been working on my photography so much over the past months to deliver to you clean and crisp images and wouldn’t you know…today of ALL days….I think my pictures are a mid-grade C+.
I was sad as I have worked very hard on this project as you know that I love to do FUN things for Holidays and this post….YEP – it is a super fun one that can be used ANYTIME of the year……hang tight, you will see what I mean. Today I am focusing on Easter with bunnies driving the Pick up Truck but think out of the box…..would this just be an adorable Graduation Gift to give to someone?
I can see it with a pun of… “your adventure awaits…….best of luck” and roll up money and stack it in the back of the pick up! I just LOVE this idea! I think I am going to do something like that for the “pet sitters” we need from time to time……wouldn’t this just be super adorable!

Before we get going….I need to share with you where I got this idea…..and before I get to that – I would like to address the one thing that I hear over and over again – “I am not creative…..or…..I just CASE things from pinterest because I can not think of anything…..or…..I would never know how to do that….” Do these sound familiar?????? (let’s be honest….)
Well – there are many and I mean many times that I feel the same way but guess what…??? – We are human and with that said…we are here to help each other and to learn.
I learned about these SUPER ADORABLE PICK-UP TRUCKS from another Stampin’ Up! Demonstrator Blog Post. Yep, that’s right…..I totally CASED this project and I am sharing and hoping that you will enjoy it…..make it….and share it. To me, that’s what it is all about! I made some changes and I will let you know about them but honestly….the PDF will be a huge help.
I saw this idea on Sarah Will’s Blog…..and the minute I saw this…I PERKED UP as I thought that it was just adorable! It was made by Twila Davis and she was so kind to have a PDF of instructions…..so you see…that whole thing of “PAY IT FORWARD”….it really does happens and that makes my heart skip a beat! (thank youTwila and Sarah….this is a great project)

I went to town being a Mechanic and I now have a whole fleet of Pick-Up Trucks on Randall Lane ready to roll out the door to make my loved ones smile! These guys actually hold a bunch…and they are just so much fun to make up!
When I saw this idea I thought about making Jeanie one for her Birthday (pst….IT’S TODAY) as she is always making the most unique projects (and she knows that I am so challenged with following directions) so….here you go – this is Jeanie’s Birthday Truck!

I had an idea of stuffing the truck with critters and sweets….as this kinda sums me up…..as Jeanie always gets cracked up with my life happenings with animals. I have a memory of Jeanie hopping in my Pick Up Truck with the Horse Trailer and we drove to find this place that was going to work on the trailer. We laughed and laughed as Jeanie was quite impressed with how I handled the “rig” and I can still see her smile and expression of…..this is fun truckin’ with you!
The below stamp set, We Must Celebrate was just PERFECT for this project! I have blogged with this stamp set and if you remember, I did “surgery” to the critters….yep….out came the scissors and the were separated right on Randall Lane. It was a successful surgery and now I can just stamp them one at a time or if I wish, I can group them back together! I know that some of you cringe with this….but there are times that I just DO IT!

I used my Stampin’ Blends to color my friends and secured them with a glue dot to the truck. Glue Dots are a HUGE help with the “crafting thing that we do” – I would always recommend have 2 boxes of them as the minute you run out…who wants to wait to get them!
The other key Adhesive for making this project is Tear & Tape. You need a STRONG adhesive when you make 3-D’s. This too is another thing that you need 2 rolls of – a back up is always a necessity with our adhesives! I use this for my envelopes all of the time (the 1/4″ strip) and another “get into the habit” of using product!
You can see in the pictures that the shy is the limit to having fun with colors….remember, no rules here other than to HAVE FUN! For those of you that sigh when Stampin’ Up! In Colors leave our line of paper, USE IT UP making trucks….as the saying goes….KEEP ON TRUCKIN’!

Remember to refer to the amazing PDF but in the picture below you will see some changes that I made and some tips. I am just so thankful that Twila was so kind to share these amazing instructions!
I find it helpful to make one and have all of the cut lines finished and scored etc….and I keep that as a template so when I want to go back and be a mechanic later…I can use the template to get the old brain fired up!

You saw in her directions that she used a border punch to give the cab of the truck some fun….but I figured that many of you might not have that so I did a “plan B” for you….this project uses the “BASICS” and I figure that if you are on my blog today, than you know that I love and work from the basics. I scored.
I found (personally preference) that I needed more room for the bunny and I did not find the need to make a seat for him. In the above picture you see that I scored the (2) areas for some texture and on the finished truck, it does add a nice flair. If you look closely you will see that the front piece is a wee bit shorter that the “outside arms” on the front. (look at the picture…you just want to score the (2) piece front & back where the arrows are)
The front gets 3 score lines and the back gets 4 score line….then you cut one of the score lines OFF. (I figured that it was easier for you to cut a straight line following the score line)

Once you get rollin’ and “get it” they go fast. TRUST ME…..please leave me a comment if you need further help….. I also found (just like I do with cards) that mass producing is the way I roll. I have many, many cabs already made….and then next time I sit and play…I will make the beds of the trucks etc.
I do want to say that I have a Scan & Cut….yep, Santa was good to me and I used it to cut out my critters but you know that the good old fashion way of fussy cutting works too! Paper Snips are the BEST! I am still learning the ins and outs of the Scan & Cut but fortunately many of my teams members have them so we chat about our victories as well as the frustrations of learning how to use it!

After I made over a dozen of these guys and AFTER I took the pictures….I realized that I forgot to put the lights on the trucks! SILLY SUSAN…..I will go back and add them with a simple glue dot! You can see in the line up of products that I used (3) different circle punches…..hmmmmm…..funny – we have been talkin’ about punches lately and SEE – this is a GREAT example of how having the basic punches in your stash becomes a lifesaver!
I rarely use enamel accents….why, I am not sure as I just forget about them….but they did make the wheels smile a bit! Just look at what you have and go to town! If I had the time I was thinking of doing a white truck and have small flowers stamped and colored all over it – how cute would that be!

WHEW…this is SUPER LONG and I am sorry…..but I just wanted you to get the whole idea! I DO hope that yo make these – they are simply the cutest. They are super sturdy (from the cardboard) and they will make you smile each and every time you see them sitting at your desk.
I have 3-d’s all on a shelf in my work area and they all have a special meaning to me….I still think the “sheep” steals the show for me. Mary Anne made that for me many years ago and I smile each and every time I see him! One of these trucks is going to New Jersey to her home as this was perfect timing as she just redeemed some of her Paw Print Rewards from me and chose this stamp set…..We Must Celebrate as her freebie!

Have a FABULOUS DAY and I hope that this not only made you smile….that it inspired you to make one….(or many!!!!) Please feel free to leave a comment and/or email me if you have any questions about making them.
A HUGE thank you to Sarah and Twila for the inspiration…..this is what I love about Stampin’ Up…sharing and paying it forward. We all CASE….and that is just perfect. I always like to think of it like a recipe.
How many times to you like something, ask for the recipe and make it? Do you feel bad about making it?….the answer is probably NO and I think of creating the same way…..CASEING is fine….we all learn from others, just thank them….perhaps add some of your own touches….and be happy!

by Susan Itell | Mar 23, 2018 | Fun & Cute!, Uncategorized |
Good Morning! Well….before I inspire you with some video links for you to watch and be inspired with…we have a WINNER! You are just going to LOVE this fun and easy project….you know me, I love to share with you ideas and inspiration….
On Wednesday I had another challenge as to how I would choose up to $125 with of products from the supplies that I used on Wednesdays post to fill my picks for the Ultimate Bundle. I gave you the clue that the targeted amount that I was going for was $124.50. If you missed the post on Wednesday…..please click here as it is a super sweet card that ALWAYS gets rave reviews!
The winner is Dana M…..way to go and please email me so I can mail you the Fast Fuse. Here was Dana’s picks:
- Stampin’ Trimmer
- Layering Circle Framelits Dies
- 1/2″ Circle Punch
- Pansy Punch
- Whisper White Medium Envelopes
- Multipurpose Liquid Glue
- Tear & Tape Adhesive
- Stampin Dimensionals
- Polka Dot Basics Textured Impressions Embossing Folder
- Simple Stripes Textured Impressions Embossing Folder
All of these items are link below at the end and when you add them up…..yep, $124.50! That is a perfect target amount to make the most of a $125 threshold. It truly is as easy as that…pick what YOU want and just pay $99 but remember, you can still pick ANY 2 stamp sets….and it all ships for FREE!
You can see from the list above that these are staples and tools that make the classics. I adore punches and Stampin’ Up! does a fantastic job with the quality of our punch offerings. They are a HUGE time saver and I encourage you to have a solid punch collection as it is a product that you will use over and over. When I started….I would add a punch on every order….and then in no time, you will have a great collection.
Punches are a product that I rarely get rid of if they become discontinued. If there is a specific punch that goes with a discontinued product than I might but in general if it is a shape I will keep it. I think we all love and covet our punches.
On Wednesday I shared that we were going to get Easter Inky today….and what I was going to do was show you the finished products that I made from doing the below videos…..BUT….I am KNEE DEEP in a project that is going to make you smile from ear to ear but I do not have the directions typed up yet…..
So…the moral of the story is – you are going to have to wait a wee bit but TRUST ME – it is worth the wait because you will just have the biggest smile…so fun…so cute yet very doable! In the meantime….ENJOY THESE VIDEOS as they are just amazing and these are the easiest project to do!

The videos are SUPER FUN techniques to use alcohol inks with plastic Easter Eggs….Tim Holtz is a fabulous teacher and trust me, you will be wowed with how easy they are to make. Sit Back, enjoy these short videos and then grab coupons to go to the store and get the supplies – you will have a ball!
TIP FOR THIS VIDEO – Remember to get the smaller plastic Easter Eggs…..I bought a bag at Hobby Lobby that had 24 for a whopping.60! The foil paper is also super inexpensive…..like $3.00 for 50 sheets. Last Friday Jeanie and I made these and they came together perfectly – the only thing that we giggled about was the fact that the end product looked like a super expensive chocolate from a candy store….and when our loved one open them up and see a Hersheys Chocolate….well….they will know that we love them!
TIP FOR THIS VIDEO: I had a hard time finding white eggs where I live but here is a heads up…Jeanie found them at 5 Below…..a store that I have yet to go in but that’s where they were! These make up an AMAZING EGG…they would be beautiful as a centerpiece on your table or you could fill them etc…..
If you have not played with Alcohol Inks….I say, grab a coupon and go to the store and get a few colors…..don’t go crazy and get a ton but grab colors that you like. They are a super fun product to work with and there are ENDLESS videos out there with different techniques!
I will see you soon…..(hopefully later today) and if not, I will be in your IN BOX in the morning! If you are out and about getting some of the supplies to make this super fun eggs…..go ahead and grab some Easter Candy as when you see my next post…..you will have wished that you got a PICK UP TRUCK LOAD of candy….that Easter Bunny…..he is a sweet guy!
by Susan Itell | Mar 21, 2018 | Fun & Cute!, Just Because... |

Happy HUMP Day…Happy 1st full day of Spring and Happy SNOW Day!
Hello and wherever you are….I hope that you are having a great day and that you are safe. The weather all across the map is just crazy and here on the East Coast…YEP – we are getting DUMPED with super heavy snow. Do you remember the days of the revolving back door when kids were little? I clearly do as the wash machine and hot chocolate were hopping then but for me now – I deal with a new type of revolving door.
Most dogs love to play in the snow and our troops….are in their glory today except for poor pathetic Rosie…she does not like it one bit and she is not a happy camper. She is the one that follows John wherever he goes and on Snow Days….she can only take about 30 minutes! Our snow is so deep that John did not go into the office and remember, he is an Accountant so that is tellin’ you that it is a mess as he is in the mountain of Tax Season!
I ask you….how can a dog be so ugly and also so cute?
(Just look at those snow balls stuck to her! One WET MOP!!!)

Today I have a card for you that I make every year. I have blogged about it before and it is a card that throughout the year that I get emails about with questions etc….It is one that ALWAYS is a huge hit and once people make it I see so many pictures of the fun they had with different colors and papers. It is one of those timeless and “happy cards” to brightens anyones day….and who doesn’t like “happy”!
Today will be another opportunity for you to guess what I would put in an Ultimate Bundle…we have been having fun with that and I hope that you put your thinking cap on and see what I would pick from the line up products at the end of the post. The threshold is $125 but I will tell you the number I hit was $124.50. The opportunity to get (2) FREE Stamp Sets of you choice with the Ultimate Bundle is quickly coming to a close on March 31st.
That is why the IS the best time to take advantage of it….and if you already have “just about everything” in the Stampin’ Up! line of products….no worries, stock up on staples that you use all of the time. Remember, ANY 2 stamps sets….and with that said….I would look at what you have been on the fence about, perhaps it was the price….so now you have nothing to working about as it is FREE…..(darn, that word is music to a shoppers ear) with no obligation to do one more thing!

Throughout the post I will share with you some hints that will make your guessing a bit easier for you and on Friday I will announce the winners…..I will give up to (3) fast fuse adhesives as I see that they are no longer available. The refills are still available! I admit, I am super sad about Stampin’ Up! retiring the fast fuse as it is the BEST and STRONGEST adhesive that we have but I do think that many had learning curve issues with how to work with it…..in the end, I am sure that Stampin’ Up! has something else up their sleeve to replace it. (there is a hint – FAST FUSE is not in my pick for Ultimate Bundle challenge today)
Ok….let’s get to this and I do hope that if you already have this stamp and punch….that you can find some “me time” and bring a little sunshine to someone with making this sweet card. The stamp set is Flower Shop…it has been around a long time and it is one that I will always keep along with the Pansy Punch that coordinates with it to make to cutting out a cinch….just line up and POP!
Here is another hint…this stamp set is NOT in my pick for the bundle challenge today. WHY?….easy – there are many, many other stamp sets that I have a much higher price point than $18.00 that I would chose as a FREEBIE…..after all, you could turn around and just pay $14.40 with your endless 20% discount! It’s like having a Bed, Bath & Beyond 20% off coupon every-time you order….but you do not need a coupon!

Let’s face it…nobody knows what stamps and products are going to be retired and once that list comes out….there always seems to be a huge scurry to make decisions as what to get…before the they are gone for good. As I have been blogging about lately….I have become very selective to what I have bought from the Occasions Catalog…as the reality is – we only can use so many stamps!
I have a HUGE AMOUNT of retired stamps set aside to sell and the ones that I chose to keep…are truly a small amount but this one will be kept as I love to make this card (and I never get tired of it)…I love the size of this flower….I love the various designs of the flower….and I LOVE that there is a punch. Stampin’ Up! has soooooooo many floral stamps…but being very non fru-fru….this one speaks to me.
I am a clean and simple gal and all of the elements of the “makings” of this card are the classics…..(which I am a HUGE believer in having the right tools/supplies……will end up with a fun creating process)….To me, you need to build up your “tools and staples” inventory as without these….stamps will just sit.
You can see below in the picture the framelits and punches that I used to make this sweet card. In your stash of MUST HAVE’s is the Layering dies ….today I used the Layering Circle Framelits and they ARE a staple. The flowers vase was cut from a circle and then I just snipped of the bottom. (hint…hint again). Layering paper on paper and shapes on shapes always will go far with creating!

As you can see that this is a square card…actually a 4 1/4″ square card. I adore this shape of a card and today you will see that I made my own custom envelopes with the Envelope Punch Board as that’s how I roll…the icing on the cake in my eyes and heart. I know that there are many that do not like to have to pay for extra postage (as all square cards are extra postage)…..so if you chose….you could put this in a White Envelope and it would be just a regular stamp…..

Here is another hint…..the envelope punch board is NOT in my pick for the bundle challenge. Of course I would always have that product….but what I am trying to show you is that there are MANY ways to fill that kit for $125 and only pay $99. I realize that there are many that simply would never want to play around with this tool…and that IS ok – we are all comfortable in many ways.
The other beauty of this card is…the sky is the limit for your color palette. I stuck to bright and bold colors today and I worked with the super fun Tutti Fruitti 6 X 6 DSP Stack. Don’t you just love the crispness of the colors and the variety of designs on the pansy’s? You can see that I POPPED out with the help of the 1/2″ circle punch the insides of the flowers and jazzed them up with some dots and dashes from a white gel pen and a quick go over with the wink of stella for some soft bling.

A product that I often forget about using are the embossing folders. You can see from that link that we have over 20 to choose from and they DO make such a difference. Just like picking the basics, the (2) that I am using today are keepers as they will never go out of style and then lend themselves to a broad span of cards that we make.
Sometimes I really feel like I am a “plain jane” but how do classics like stripes and polka dots ever let you down? I just know what works for me and figure out a way to use it over and over again.

There you go…..a SUPER SWEET card that would perk up anyones day! You know that I am a lover of sentiment sayings and this “friend” from the Lovely Words Framelits was fun to snip off and just let the word shine! I stacked it up to make it more of a statement and I used the Multipurpose Sheets (another great and overlooked aid we have) to adhere them together but if you just have the green glue….use that – a total staple to have!
We all know that there are many ways to do things. The key is to find the way that works and feels good to you. I love to share with you the ideas that I have with what most crafters would find useful! This IS how we learn…by sharing and giving feedback! Please feel free to leave some feedback about this card….I just adore it.

HEAD’S UP….to those smart stampers that placed a pre-order for the STAMPARATUS…..Keep an eye for a notification from Stampin’ Up! that yours is ready to finish the ordering process! You will receive an EMAIL from Stampin’ Up! I have no idea that you pre-ordered one or not…..but after you receive the email, you will have the opportunity to add to your cart.
If nothing else, I would add something small onto it so you could get a freebie from Sale-a-bration…….why not? You are going to love, love, LOVE this tool and for those of you that did not get in on the pre-order….no worries, you will be able to get it starting June 1st with the new catalog!
Have a great afternoon and have fun trying to guess what is in the ULTIMATE BUNDLE using the below items….again, the total was $124.50 that I picked! I will see you Friday with some Easter inspiration for you to do over the weekend….it is super fun – pull out the alcohol inks!
by Susan Itell | Mar 19, 2018 | Sympathy |

Good Monday and I hope that everyone had a wonderful weekend! On the East Coast yesterday is was absolutely gorgeous and I took full advantage of being outside and playing with the pups, horses and yep, dear sweet Daisy. Poor thing…..she has scratched away her hair on the sides of her but to me, she is still the most beautiful pig in the world!
I have a formula for you today and if you are not familiar with what a formula is….you will like this as it is a super simple way of creating with little effort using things that you have right in front of you! I love that theory, how about you? Unfortunately we need Sympathy Cards from time to time and I admit…I was super pleased with the end result of this as it is just clean…simple…yet super classic – the 3 elements that I love to have in my card-making style of design.
I do work hard on photography but there are certain cards that you simply cannot get the right “click” and feel – today is one of those as I heat embossed the sentiment in Fresh Fig. YEP, you read that correctly….I heat embossed it with Fresh Fig – are you asking yourself…how did I do that? Simple, after stamping the sentiment in Fresh Fig, I simply added clear embossing powder over it and then heat set it. When you hold the card in your hand, it is just stunning!
Let’s get to this formula as I do hope that you have already started a notebook that you can write down formulas, ideas that you want to try and tips and tricks you pick up along this fun paper journey we are both on. Seriously, I know we are on the same island here….how many times do you have something POP into your creative head to say…..where did I see that….or I can remember it was on a blog post……trust me, I GET IT as it happens to me all of the time! Get a notebook, you’ll be happy you did so!
The stamp that I am using for todays card is, Sorry for Everything from the Annual Catalog. It was on my list to have the minute I saw it for mainly 2 reasons…I am sure you know what I mean…the first time you flip through a catalog, certain ones JUMP OUT….and this one did that for me for its uniqueness and practicality.

- I ADORE the large script font of “Sorry” – I have my fingers and toes crossed that we will have more like this in the future and also hopefully large die-cut words as I admit, I do purchase from other companies script word dies as I adore the look and feel it gives.
- The sub-sentiments are fantastic and the font is a great classic one to go with the large “Sorry”

Do you remember the other week when I blogged about it being time to turn towards your Designer Series Paper you have and use it up!?!? YEP, get to it cause’ we will be having some new kids on the block before you know it and we both know what that means…..you will just want it! Again, I GET IT as Stampin’ Up! always has some yummy papers and the best way to get a taste of them is a product share….and yep, I will do one for the new catalog!
Today I am using the Naturally Eclectic DSP…the look and feel of this collection of paper will easily cover many themes that we could create. I chose the soft yet distinct watercolor looking floral flower that pairs up perfectly with (2) of the In Colors, Lemon Lime Twist and Fresh Fig. We have a ribbon, Fresh Fig Woven Ribbon that ties the BEST bows and also great flat knots!

When I started to type the formula up….I realized that there are other ways that I could have done this, perhaps not using as much paper but I will say….I like a super study card…and I knew for that reason alone, I wanted the card base to be out of out Thick Whisper White Cardstock. Call me silly…but I am just being honest as to me the “feel of a solid card” does it for me!
- Card Base is thick whisper white horizontal fold, 5 1/2″ X 4 1/4″
- Adhere a piece of Fresh Fig, 5 1/2″ X 4 1/4″ to the front to cover card base.
- Working with a 4″ X 5 1/4″ piece of whisper white (you can use the regular weight if you prefer) add a piece of DSP to the top 5 1/4″ X 1 3/4″
- Add a sliver of cardstock under the DSP…I just use the trimmer to cut a wee bit and then use the green glue to secure. (You could skip this if you want but I think that the look adds a bunch to the card….remember, paper adds a bunch of POP!)
- Use the Powder Tool over the area that you are going to emboss….(a great habit to always be in….it is not a “must do” when you are working with the clear embossing powder on the white but a great habit to get into.) stamp the “sorry sentiment” and then cover it with the clear embossing powder and heat set it with the Heat Tool.
- Stamp the sub-sentiment above and repeat. (You could have stamped and heat set both at the same time…but I prefer to do it in 2 steps.) For the inside, stamp whichever sentiments you desire….I thought the “for your lose” was appropriate.
- Add a piece of ribbon to the left side of the sentiment and the tie a bow with another piece and adhere it with a simple glue dot. For me, I like to do this in this fashion simply because I do not trust myself in making a great bow right on the card with one long piece of ribbon (hopefully that makes sense to you) just a quick and easy tip.
- Getting back to the solid feel of a card…I like to use a piece of white fun foam a bit smaller that the piece as the feel and firmness it gives is unmatched. True dimensions do the job and we all love our Stampin’ Vitamins but I find it faster to do it this way….it would have taken me a bunch of dimensionals as we do not like sags…. do we ladies!
- Give the envelope some love that it so deserves and you have one beautiful card!

There you go….a fantastic formula to use over and over. I encourage you to make up the “guts” of this card today with what you have….and then make notes of ideas that you could use it for. Right off the bat a Happy Birthday comes to mind to me or also where the sentiment goes on the front, you could add a bunch of flower die-cuts as a focal and then have the message stamped in the inside.
What I am trying to convey to you is…use a formula to your needs. These are timeless and no one would EVER know that you have used this formula over and over as you will always have different paper and different stamps you are working with! You know what I say…JUST HAVE FUN!
WHEW….that is a lot to try to put into words but I do hope that you find it helpful – please feel free to leave me your thoughts about not only this card but also to the “formula concept.” I do try my best to type the instruction clear so you can easily duplicate it. I realize that we are all in this journey together and I love to share with you tips and tricks to make the creating process a fun experience.

Well….tomorrow is the 1st day of Spring….with yesterday being BEAUTIFUL and today is to be the same…I am in denial with what that darn weatherman is saying……SNOW TOMORROW!!!! REALLY!?!? The poor Cherry Blossoms in DC are so confused….but I think that their peak is to be later next week. This is something that I have always wanted to see….the Cherry Blossoms at their peak….but I have heard that the crowds are insane (I do not do well with crowds)
Whatever you are up to today, make is a great one and I hope that my post has inspired you to use a formula to your benefit. They save time and they always end with a fantastic card…I know you can do it… – I will see you on Wednesday for more fun and inspiration! All of the products I used are found below…..remember, we are on the final weeks of Sale-a-bration….and that means FREEBIES!
by Susan Itell | Mar 17, 2018 | Fun & Cute!, Super Easy, Thank You |
 Happy Weekend…Happy St. Patricks Day and a special shout out and HAPPY BIRTHDAY to our one and only “Chris. R. from Iowa”…
I hope that you have a special day and that there are many happy and healthy returns to you! (you always keep us in stitches with your “life happenings“)
I have a card for you today that will put a “spring into your step” as the minute I saw it….I knew that I needed to CASE it! There are many reasons why it “spoke to me” as it is right up that simple alley that I love in being clean and simple with design.
We also have “winners” from the can you guess on Wednesday’s post – these have been fun! I know that many of us have “the basics” and that makes me super happy,….but I also know that many of us could easily find $125 worth of Stampin products that we use on a regular basis that would be thrilled to pay just $99 and it ships for free (free shipping is music to my ears)

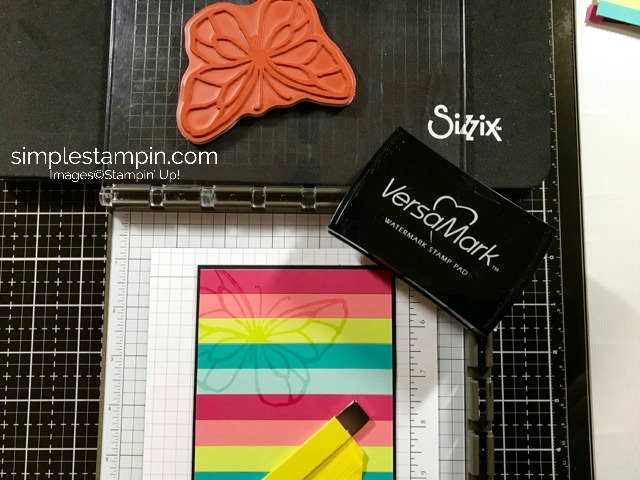
Now to this super simple yet super fun card! As a Stampin’ Up! Demonstrator we get a quarterly Magazine called, Stampin’ Success sent to us. When I see it in my mailbox I get super excited as I usually sit at the end of our lane to do the quick flip through and look at the pictures of amazing samples….YEP, I did it again on Wednesday when it arrived.
You know that I adore Versa Mark…as this IS the key to heat embossing as this is the “stick” for our embossing powder but I also use it and often blog about it as a tone on tone effect it will give you when you use it like an ink! It is a magical must have…
I think that many of you think that it might not dry….trust me, it does and heck – if you are also using an embossing technique (like I am today) you will already have your heat gun out….just add some heat to speed up the drying process. I usually just let it set and it dries perfectly.
You know me….it needs to be simple, clean & easy and this is all of that and more. I started with a 4″ X 5″ piece of white cardstock and added a piece of Multipurpose Adhesive Sheet to it. This product IS one that many of you forget to have handy but it IS one that needs to be with you as it is a TIMESAVER to the max. I actually have many scraps with this adhesive on already in the basic colors (white, vanilla, black, sahara sand) already with the adhesive on it….so when I need a piece, I am ready to go!

I took the 5 colors that I chose (melon mambo, flirty flamingo, lemon-lime twist, bermuda bay & pool party) and cut them into 1/2″ strips and placed them on the white piece of paper that had the Multipurpose Adhesive Sheet on it. This adhesive if forgiving until you give it a firm press or a good “run over” with the bone folder….(and YEP, I will share with you MY FAVORITE bone folder) at the end of the post!
HOW SIMPLE IS THIS??? I just cleaned up the edges and then matted it on a piece of black cardstock that is a “smidge” larger. I just adore the look and feel of the color and just think of the ENDLESS color schemes you could go with….now to the other “easy element” that made this card special.

Now here is the stamp of the show. It is called Beautiful Day and it is from the Occasions Catalog. This is a stamp that would be super fun to color but today….a quick stamp….how simple is this!

I used the STAMPARATUS to do my stampin’ of the butterfly but by all means, you do not need a placement tool – I just wanted to do a good and firm stamp (I actually stamped it twice) to get a darker versamark image. How beautiful and simple is this? I was beaming from ear to ear with the end result.
Carrying out the theme and design I pulled out a sentiment from the One Big Meaning Stamp Set, this is in the Annual Catalog and as you can clearly see below….it is a fabulous stamp set full of great “thank you’s” with fun fonts! I heat embossed it in White on the black cardstock so the black matting would POP! This IS a stamp set that truly gives you a bang fro your buck as it is priced perfectly!

It wouldn’t be one of my cards if I did not have a fun envelope for you….and YEP….same drill as what I did for the card except I made the width of the strips a bit smaller so I could fit all of them on. I know that it doesn’t take much to make me happy…but this card DOES make me happy and I will use the design and layout for many cards that I create in the future….(A formula) as I like to call it!
Now to WEDNESDAY’S WINNERS…..please go back to the blog post from Wednesday to see….then it will make perfect sense! The items that I would have chose from the ones that I listed were…… and we have 2 winners……
WOOT-WOOT to Kathy Beemer & Pam Traffis…
These are the items that came to $124.25 – Yep….all keepers and you would only pay $99 and it is free shipping! (heck, that is an additional $12.40 off)… Envelope Punch Board, Stampin’ Trimmer, Extra Blades for trimmer, Simply Scored, Paper Snips, Tear & Tape, Glue Dots, Dimensionals, Mini Dimensionals & Foam Adhesive Strips.
The key hint that I gave was…“what tools/aids” would I use…..I was super proud that no one put the bone folder (that means you read) and below I will share my favorite. If you look at the picks that I chose…you will see that I did them for a purpose….to be “set” for creating with the basics! Way to go….Kathy…..please email me…I know Pam’s address!
Let’s Chat about Bone Folders as these little gems are a must have for what we do. I always say that I am honest with you in the things I love and use to make the process work for me and true, the stampin’ up! bone folder gets the job done (and it is great for a beginner) but once you get your paws on a teflon bone folder….you will see what a GAME CHANGER it is.
I also have this one, the Ergonomic Square Bone Folder and I am thinking that I like this better as it fits on my hand perfectly and I can give it a good grip…I know…I know – many of you are saying….why in the world would someone spend that money on these???…well – I am just being honest as these are tools that I use ALL OF THE TIME and they make what I do more enjoyable and easier for me!

Why do I like the teflon material with these bone folders??? They are both SUPER SOLID and it will not leave any of that shiny residue (especially on darker cardstocks) when you score. I love a very solid and firm score with my projects as it is this element that really makes your projects look more polished.
There you go….some inspiration for your weekend. I cannot wait to continue to play with this layout design. Please go to your stash and great the stripe part today so you can get the feel and then look at it and think of all of the ways you can use it! I think even after you create the base….it would be super cute to cut a circle out and make a fun and festive shaker card!

That is why I love this thing that we do….there are always sooooo many ways to create and I do love sharing my passion and love with you. Now to the answers that I asked about me…from Wednesday…..
- If you could be anywhere in the world for New Year’s Ever this year, where would you most want to be? THIS ONE IS SUPER EASY….HOME! There is no place that I would rather be than HOME call me simple…call me boring but I just love the simplicity of home. Many of you got this one!
- What is your favorite saying or quotation? I loved your guesses and YEP, you do know me but the key word that is in my saying is “JOY” I think that is such a powerful word….and just think 3 simple letter…..that has one HUGE MEANING! Here you go…..and trust me – this goes through my simple little head a bunch as it is soooooo true…..
“If there is no joy in the journey…than there is no joy at the journeys end”
There you go….to me, a great way to live by. Have a fabulous and safe weekend. For you Basketball Fans out there……YIKES – big shake up last night…#1 seated Virginia lost to UMBC….I am sure there are lots of brackets messed up! I will see you on Monday…all of the supplies that I used will be found below and I do hope that you let some fun and festive stripes in your life and card making!


