by Susan Itell | Jan 30, 2017 | 3-D Projects, Uncategorized |

I do not know about you…but I LOVED “Show and Tell” days at school! It was a total excitement for me and I planned what I was going to “Show or Tell” to the max! I thought that it would be fun to SHOW and TELL this AMAZING goodie that was in my mailbox! Talk about hitting the jackpot!
Before we get to the fun today, I must say – you all are the best and I do dearly love reading each and everyone of your comments. I admit….I try to stay off the computer during the day as I get “sucked in that cyber hole” so I do try to respond to your wonderful comments but as Sonny said, I usually do it at the end of the day! (I guess it shows that I am trying to be disciplined because I know that it is hard for me to get off once I get on!)
Let’s get to this Monday fun! This was in my Mailbox on Friday. It was from me dear friend and downline, Jeanie Stark. I have known Jeanie for ages and we have gone thru Creative Memories, American Girl Dolls with our girls…to endless laughs and inspirations…to being together in Atlanta for On Stage!
Jeanie is super talented and just darn tootin’ fun. We truly have had many adventures together from taking my truck and trailer to get painted….to picking strawberries…to creating endless works of memories for our families…..she is truly a talented stamper, and amazing pre-school teacher and a wonderful person!
I love her motto….with her work schedule when she gets off…..“FROM 12 to 3, IT’S ALL ABOUT ME”.…this was “her time” before her children came home from school but now her peeps are out of the home nest and she is doing a BANG UP job with her blog, Just Stampin’. I highly encourage you to subscribe to her blog as it is Jeanie at it’s best – and it is FUN!

Isn’t this the best ensemble to see! Not only did I feel super special, but I just did not want to open it because of its sheer beauty. Being the “teacher” that she is, she is doing another (this is her 2nd go around with the Alphabet) of the A,B,C’s…and she NAILED IT!
CLICK HERE to see her post of how she created this AMAZING project!

I am never, ever brave enough to try to use the sequins…but I think that we can agree….she NAILED IT! It is funny….clustering together different types of products just always seem to work….for me, it is just sticking my head out and try!

Another product that I am a bit shy to use but again, she rocked it – the gold glimmer paper…I adore how she off set the layers as it gives such a POP!
When you look at this and really, really look at it – there are simple elements that are all put together to make an instant dimension! I was just sooooo touched by this, it is such a beauty but also sooooooo do-able!

I just had to take the tissue out of the box so you could get the sheer FUN of this bundle! The way that these stars POP up is amazing and the gold paper makes such a statement. Wouldn’t this be an AMAZING project/gift to make…..when you see Jeanie’s instructions~ you will see how do-able this is!

I love to share other peoples work….and I hope that this post made you smile and also brought some insight to you in how to make an amazing gift! We all have so much to give and share and I cannot tell you how proud I am of Jeanie’s blog ….we all have gifts – just always share them and let them shine!
How about giving Jeanie some comments of love and also – please check out her blog….it is amazing and you will laugh, be inspired and want to come back for more!
See you tomorrow for Tips for your Tuesday – trust me, you will smile! 😀
by Susan Itell | Jan 12, 2017 | 3-D Projects, Uncategorized, Valentines |

Good Morning! Do you ever stop and think of all of the crazy things that can happen in one day? Well, yesterday was one of those kinda days and I was so excited to go to bed and have a new day begin!
I cannot even begin to tell you all of the things that happened….but here are some lights that all happened before 10 a.m.
- The donkey got loose and was running all around and Arnold was having a fit because that dumb donkey is his seeing eye buddy…..
- the Fed X Truck FLEW down our lane and I was flapping my hands for him to slow down….and then he said to me…..“Do you know your donkey is loose”? I felt like saying REALLY…. 😳
- Next….about 30 minutes later the UPS Truck came and one of the Jack Russells hopped in his truck after he shut the back door of the truck and then yep……about 10 minutes after he left….down comes the truck and out the door came Jack! What could I do but LAUGH!!!!
(At the end of the post…I will share with you the TRUMP CARD of the day and you will then see….why I was excited to go to bed last night!)
Let’s get to this super cute box that can be made in a JIF! It is cute and I just love the little heart card I added as a note 🙂

I came in the house and decided to try to be productive and made this adorable and oh so easy White Gift Box! I love the ease of it and I cut (4) 2 3/4″ squares from the great Valentines Paper, Sending Love DSP Pack. I will say that there are other prints in this pack that go beyond Valentines.

I took a piece of scrap Real Red and folded it over to make a heart card. Using the framelit (as shown) – I left a little bit of the framlit above the red so it could asked as a hinge. Have you ever tried this? It is fun and then I used a smaller heart in white for the inside!

Can you see the sentiment? It is from the Teeny Tiny Wishes Stamp Set….(LOVE THAT SET) – it is truly an old one but a GREAT one. I stamped it in Versamark and heat embossed it with white! A simple white bow was the perfect finishing touch!


How about that Blog Hop yesterday? I hope that you all were inspired. I am always in awe of all of the great talent that is out there – I just love this FUN thing that we do! It makes my heart happy when John says….“My wife shares kindness and makes people smile” We all should be so proud of ourselves by sharing our handmade works of art!
Now for the TRUMP CARD….I was away for the afternoon and came home to a broken water heater….one word – YUCK!!!!!
See you tomorrow…..never a dull moment on Randall Lane! 🙂

by Susan Itell | Dec 11, 2016 | 3-D Projects, Christmas, Uncategorized |

To end this FUN week that we have had with “Practical Posts” – how can we not end with a good Old Fashion AMAZING Chocolate Chip Cookies! I honestly do not thing that I know of one person that does not like Chocolate Chip Cookies!
You know that I LOVE presentation…and today is no different! Mason Jars are a classic…and Chocolate Chip Cookies are a classic, so I ask you ~ how can you go wrong? These are a great gift to give all year long as again, how can you go wrong with a classic!
Here you go with a super quick recipe!
Mason Jar Chocolate Chip Cookie Mix
For every one-quart jar,(use the wide mouth) ~ you will need:
1 3/4 c. flour
3/4 t. baking soda
1 /2 t. salt
1/2 c. white sugar
3/4 c. (packed) dark brown sugar
1 1/2 c. chocolate chips
Combine flour, baking soda and salt in a small bowl – pour into your mason jar (I found a funnel to be VERY useful )– especially when making a bunch of these!
Using your “tool” – I like a long ice tea spoon, tamp the flour mixture down till it is firmly packed and level. The BEST tip I can give you is to start with the flour and also tapping the Mason Jar firmly on your counter as that also makes it good and tight.
Add the Dark Brown Sugar and White Sugar….with the chocolate chips and if you have room ( I always have room) – I add some walnuts or pecans…..YUM and THEN seal the jar.
Here are the directions that I put on the tag.
Empty contents of jar into a large bowl.
In separate bowl combine 3/4 cup of butter (use the real stuff), 1 egg and 1 yolk, and 1 teaspoon vanilla. Beat until creamy. Add to dry mixture. Drop by tablespoonful onto an ungreased cookie sheet, and bake in a preheated 375 degree oven for 8 to 10 minutes. Cool on a rack and grab some milk and go to heaven!
Here is a baking tip that I have always found to be a fool proof way to have your cookies come out perfectly. I keep (2) cookie sheets for JUST making cookies and I ALWAYS use a Silpat Mat on my baking sheet. Here are the type of sheets I use – you can get them anywhere but for ease sake – I am linking them to Amazon (I get mine at Sam’s Club)
As I have been saying that I am stocking up the PEEPS kitchens this year and yep, they are each getting the tools for making perfect cookies plus one of these jars! I bet I have had my Silpat Mats for over 15 years – they are the best and a game changer!

The sky is the limit on how you decorate the jar! (a great way to use up leftovers!) and I added a strip of tear -n- tape to the back of the ribbon and then it was a breeze to adhere.
Let’s chat real quick about the fun tag. I used the Santas Sleigh Thinlits for the tree and this IS being carried over BUT NOT THE BUNDLE PRICE….so if you do not have this set….I ask you , “why not?” as it is an all time Christmas classic. Next year, you will be able to buy them but NOT at the bundled price! I cut (2) of them from Garden Green as type A Susan liked to cover the back so you did not see the the red tag that I adhered to the tree.

The sentiment is from the Candy Cane Christmas and this IS walking the plank so if you want it, scoop it up! I heat embossed it with white, I just LOVE that pop!
I think that you can see that this is a “keeper” that you can use all year long and with many different recipes. It would be perfect for any occasion to give and trust me, when someone sees a Mason Jar filled with love and then realizes that YOU took YOUR time to make this…you will be their NEW BEST FRIEND!
I often look for these when they are on sale and then when I make them….I make a bunch because you can go down a list real quick with who would love them – also a PERFECT hostess gift!
Well…I hope that this made you happy and that you will also make someone else happy with a great gift like this! This is a great project to do with children and as I said before, they are fun to make in the “masses” – they is nothing like seeing a bunch of these on your counters ready to go!
Jammie shopping on on trend…..”just saying” 🙂

by Susan Itell | Dec 10, 2016 | 3-D Projects, Gift Set Ideas |

Woot-Woot – it is the weekend! Do you have your tree??? Are you decorated yet??? This is such a funny…crazy time of the year and I am always amazed with how we “deal” with it. In the end…it all gets done.
I will say that I think I am like a good wine….”I am better with age” – I am sure that there are many of you that will agree and chuckle about that but that is really how I feel. I used to be soooooo stressed about making everything “just right” – now I like to take it all in and enjoy…simply enjoy!
I have been working super hard this week trying to show and inspire you with posts that YOU can do as gifts made from your own hands will always be remembered and be cherished!
I am doing something that I rarely do, I am using a stamp set that is no longer current (Larger than Life) but the main point of this post is to show/share with you how you can make an amazing and practical gift that surely will be appreciated. I know that you all have many stamps that you can use to make a great gift set on notecards like this!

The star of the show today is the Notecard & Envelopes….these are TOTAL KEEPERS as how in the world can you go wrong with 20 cards and envelopes for just $6.00!
The other great “presenter” for the day is the box that I made! I know that many of you are afraid of making a box…but this is soooooo darn tootin’ easy and with that said……as NIKE says….JUST DO IT! (trust me, you will be super proud of yourself)

As always, please feel free to email me if you have any questions on making this! I hope that you will give it a try and even if you do not have this stamp set, no worries….use whatever you have…..as I know YOU HAVE MANY 🙂
I am going to make some gifts using this concept but I am using the Cottage Greetings…that is a GREAT stamp set to use as the sentiments are perfect for the insides of the cards! If you use that set, I would add a very simple flower die of stamp of flowers to the front~ that would be super cute. Are you all wondering where this DSP for the envelope flaps is from? It is a FREEBIE in the upcoming Sale-a-bration…I think it is super cute and classic!
Did you notice that I made a “boo-boo”? I am honest and I have to say that I did not realize it until I when to adhere them together! (Oh well….I am human and we all make mistakes (speed bumps) and this is for Hannah so she will be “just fine” with it – actually you would probably have not noticed if I did not point it out to you)
If you look at the above and below picture, you will see that I did not cut the paper the correct size that I stamped on – I honestly did not notice until after I have stamped all 20 cards…but it worked….

Here are the dimensions for you…it is soooooo ridiculously easy and then I will give the measurements for the box! The other great thing I love about this simple project is that you can just use (2) pieces of DSP – you will be able to make all of your envelopes plus add a piece to the front of the box!
For the Notecards:
- You will need a pack of the Whisper White Notecards & Envelopes….just $6.00!
- Cut (20) pieces of white card stock to 4 3/4″ X 3 1/4″ – stamp your heart away with whatever tickles your fancy!
- If you wish, using the score board – score on all 4 sides (I like the look)
- Cut (20) pieces of 6″ x 2″ DSP for the back flap of your envelopes and (20) 6″ X 1/4″ for the accent strip to the envelope.

For the Box: ( all 20 fit PERFECTLY in this box)
- 1 sheet of Cardstock cut to 8″ X 11″
- With the 8″ side on the score board, score at 2″ and 6″
- Turn the paper and score at 4 1/2″ and 6 1/2″
- Fold score lines and use your bone folder for a great crease.
- Using your scissors, cut up as shown below to the score line. Cut an angle in the flaps – this makes a perfect finished project.
- You can see that I used tear-n tape…as I thought that you would be able to see it better….you can use this or fast fuse, you need a strong adhesive like these 2 for projects like this!
- The DSP for the front of the box is a piece that is 3 7/8″ X 4 3/8″ and then the ribbon – IT ON CLEARANCE (just $2.80) – so how can you go wrong with being generous in using it to “finish” the project!
I hope that this helps…I admit, it is hard to try to put into words how to do something, I hope that the pictures are of help! Please try this – it is sooooo easy and fun to make!


Whew….this was hard to put into words but I hope that “you got it”!
Again, please feel free to reach out to me if you need help. After I made this I made a list of people that would love it – I actually just ordered more of the notecards as I figured that I could go ahead and stamp the “whatever I want” to the paper and go ahead and do the envelopes….and then when the notecards come in…..adhere the stamped piece on and DONE!!!!
Please let me know how you like this…I adore reading your comments and I know that we all learn from each others feedback! Have a SUPER SATURDAY and please share my Blog of Stampin’ love to your family and friends. If you hit the subscribe button, we will be able to have a daily dose on inspiration …together!
by Susan Itell | Dec 9, 2016 | 3-D Projects, Christmas |
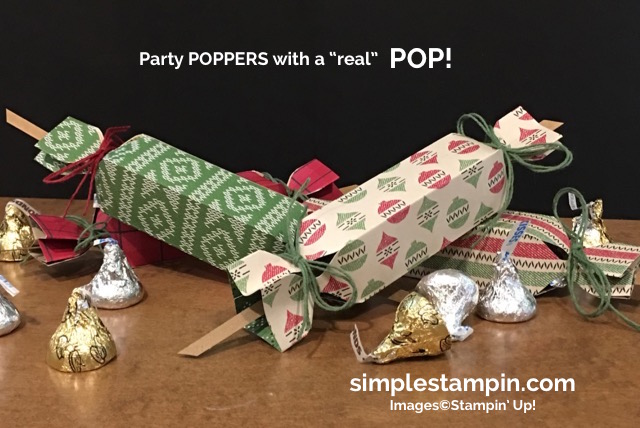
Good Morning…I sure do hope that you have been enjoying the week of practical posts! I have had FUN showcasing them for you and have no fear – I still have (2) more to show you!
I admit ~ THIS ONE IS MAKING ME DO THE HAPPY DANCE!
Please read on because even though you know how to make these fun poppers, I found a company to actually buy the “real popper thing” to slide in so it will surely be a POP at my holiday table! I will share with you where I bought them.
I never want to assume that you know how to make something as hopefully I have some “new people that have hopped on the Simple Stampin’ daily train” so here is the low down. Making these poppers are like eating potato chips ~ they are addictive and you finish without one calorie!

If you CLICK HERE it will take you to another post that I did that will share with you step by step on how to make these fun goodies and then if you want to watch I video that I did eons ago...CLICK HERE – I think that the video is sooooooooo basic but it will walk you through step by step on making these gems and heck – we are one step closer to being together in person! 🙂
Here comes a story….go grab that coffee!!!
I just LOVE to get the conversation going when we get together with the God Parents and the PEEPS….it is always a fun evening as my dear Dad and brother join us as well. There will be 14 of us this year and because everyone is “all grown up” – we have out grown the days when we had high chairs…or “kids” tables etc….
Because I cannot fit all 14 of us around my dining room table this is what I do. I put on pieces of paper either #1 or #2 – (I have (8) #1’s and (6) #2’s) and before we get our food we pick a number and that will be where you go….I found this to be a FUN TIP as it mixes up people and if you know what I mean….someone always want to sit with a certain person etc…..
We are a family that LOVE to sit and YACK away because we do not get a bunch of time together with everyone living all over. On the night that the godparents are there – it is even more special as there are more stories, laughter until there are tears, stories etc….so this year I thought that it would be FUN to have conversation POPPERS!
After we eat we all seem to gravitate to our family room to be by the fire place etc…This is when I will let everyone pick a POPPER and then read the message inside and hear their feedback! I went to my pinterest page where I have some motivational quotes/thoughts and went from there to make my questions!
You might thing that they are a bit “deep” but make them whatever you want – if your ages are all over the place, make some like – What was the best movie you saw this year….or – What is your favorite color and why? I just know that the peeps and company will love what I picked because they know that I love quotes and motivational books.
This is a GREAT way to get some GREAT conversations going. You will sit back and be amazed at the comments and then you will get that twinkle in your eye and say, I am blessed. I just love having the peeps in the house!

Now to where I purchased these Cracker Snaps….you can CLICK HERE and it will take you right to the store. I ordered them on Sunday and they were at my house on Wednesday so you could go ahead and make up the poppers and once the snaps come….just finish the job!
I was SOOOOOO excited about these. Just think of how FUN it would be to for a birthday…you could even put money in it – that would be a GREAT gift ~ if someone lived far away, wouldn’t they love to get a popper in the mail with a message from you?


They you go…poppers again and I bit of a story! Just use your computer and printer to type up some goodies and have fun. Please let us know if you do this and how the outcome is.
I had a fun day yesterday, mission accomplished – one store and DONE…and then to heaven…the grocery store! John used to think I was silly about actually liking to go to the grocery store but now he “gets it” – when you go to Wegmans….you are in grocery shopping heaven!
Pace yourself….stress do not look good on any of us! Here is that paw print….shop away and the vault is open and ready for you to come on in!
by Susan Itell | Dec 8, 2016 | 3-D Projects, Christmas |

Good Morning! As promised…here is another version of a check holder and true the base dimensions are the same but the thing that I want you to see is that you can add “stamping” to show your skills off and also it is a great way to add a diecut as well!
I will run through the dimensions for you because I think that it is cute…actually super cute. I know that I used this color scheme before and I just had to continue to roll with it. I need to back up a bit….do you remember when we were showcasing the Card Swaps, Princess Judy was the one that encouraged me to use the green plaid as the POP! You see….I am always learning….from YOU GUYS!
The TRUMP to this post is the super fun Envelope…..(thanks to Chris R.’s inspiration in her comment) This board makes it super easy and you can make it with a piece of paper that is a 8 1/4″ square!

I know that the shape of the “flap” is a wonky shape but it is this way because the card is so long and narrow. I simple cut off the point to make it a bit different and I think that I accomplished that! The green strips are 1/2″ and the Dijon ones are 1/4″ – I kept the same theme of the 1″ squares!
Well….here you go – the dimensions! Today you can see that I used my little buddies to make the fun card! Actually the sentiment is perfect as the recipient want some lamps and pillows for their home….so I thought a check is perfect to let them pick what works…..so they need to “DECK THE HALLS” of their home!

- The basic check holder is the same as yesterday…..click here to view that!
- The Thick White is 6 3/4″ X 2″ and then I stamped our friends with the Black Archival Ink and used the aqua painter!
- I added a thin strip of Dijon to top of the stamped image…..mainly for balance and color, it is 6 3/4″ X 1/2″
- The sentiment is on a scrap 1/2″ wide and then matted with Delightful Dijon a smidge bigger….
- For the top flap FUN…..the white is 6 3/4″ X 1 1/8″ and then the DSP are 1″ squares. (this is a great way to use the paper stack as they would not have been long enough to make it the whole way across )
- A simple piece of Linen Thread did the trick to add that special, homemade touch!
The below pictures will makes sense to you after reading the bullet points! Please play with the Aqua Painter…it really is your friend. Stampin’ Up! is coming out with Watercolor Pencils in January and these are also going to be a great way to add color and yep, you can soften it with the Aqua Painters as well!


Well…there you go! Thoughts? I would love to hear from you and I hope that you can see that you can use DSP like I did yesterday to make a holder or use our cardstock and dress it up a bit! I just adore those little rodents and they will always be warm as they will never leave Randall Lane.
They are on sale and remember, the vault is still full – with every $75.00 purchase with me this month – you will be allowed to ENTER THE VAULT...it is a bit overwhelming but I am sure you can imagine how many stamp sets I have in there!

I have another keeper for you tomorrow…it is something that I do each and every Holiday and there is a special twist to it this years…when I discovered this company….I could hardly wait to get them! Please POP back tomorrow to see how I will see show you another fun practical project that you still have plenty of time to make!
I am not one that likes to go to stores but today is the day that I am making the trek to one store that I love, Williams & Sonoma. We have an outlet store somewhat near by and this is a place that I adore….I am blessed that all 3 of the peeps love to cook and I love to pick up goodies to continue to build up their kitchen.
After that….guess where I’m going???? You will laugh….to the grocery store!!!! There is a huge Wegmans near where I am traveling and this is like a candy store for me – I will probably be in there for hours as every holiday I like to go up and down each isle and find the things that I can never find where I love – call me crazy but I love to cook and I love the grocery store!
Enjoy your day and don’t forget to do something for YOU…..I am looking forward to my silly “me time”


