by Susan Itell | Dec 9, 2016 | 3-D Projects, Christmas |
Good Morning…I sure do hope that you have been enjoying the week of practical posts! I have had FUN showcasing them for you and have no fear – I still have (2) more to show you!
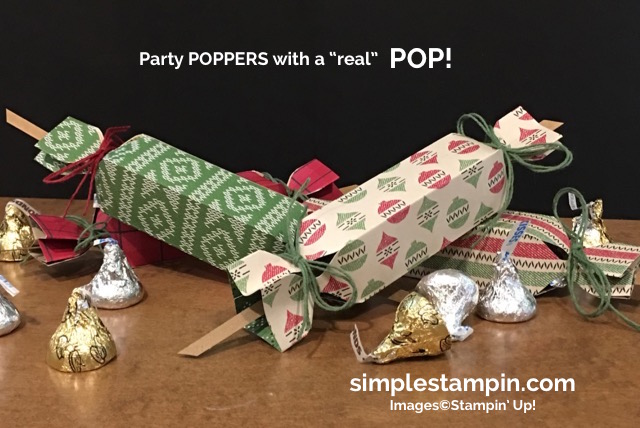
I admit ~ THIS ONE IS MAKING ME DO THE HAPPY DANCE!
Please read on because even though you know how to make these fun poppers, I found a company to actually buy the “real popper thing” to slide in so it will surely be a POP at my holiday table! I will share with you where I bought them.
I never want to assume that you know how to make something as hopefully I have some “new people that have hopped on the Simple Stampin’ daily train” so here is the low down. Making these poppers are like eating potato chips ~ they are addictive and you finish without one calorie!

If you CLICK HERE it will take you to another post that I did that will share with you step by step on how to make these fun goodies and then if you want to watch I video that I did eons ago...CLICK HERE – I think that the video is sooooooooo basic but it will walk you through step by step on making these gems and heck – we are one step closer to being together in person! 🙂
Here comes a story….go grab that coffee!!!
I just LOVE to get the conversation going when we get together with the God Parents and the PEEPS….it is always a fun evening as my dear Dad and brother join us as well. There will be 14 of us this year and because everyone is “all grown up” – we have out grown the days when we had high chairs…or “kids” tables etc….
Because I cannot fit all 14 of us around my dining room table this is what I do. I put on pieces of paper either #1 or #2 – (I have (8) #1’s and (6) #2’s) and before we get our food we pick a number and that will be where you go….I found this to be a FUN TIP as it mixes up people and if you know what I mean….someone always want to sit with a certain person etc…..
We are a family that LOVE to sit and YACK away because we do not get a bunch of time together with everyone living all over. On the night that the godparents are there – it is even more special as there are more stories, laughter until there are tears, stories etc….so this year I thought that it would be FUN to have conversation POPPERS!
After we eat we all seem to gravitate to our family room to be by the fire place etc…This is when I will let everyone pick a POPPER and then read the message inside and hear their feedback! I went to my pinterest page where I have some motivational quotes/thoughts and went from there to make my questions!
You might thing that they are a bit “deep” but make them whatever you want – if your ages are all over the place, make some like – What was the best movie you saw this year….or – What is your favorite color and why? I just know that the peeps and company will love what I picked because they know that I love quotes and motivational books.
This is a GREAT way to get some GREAT conversations going. You will sit back and be amazed at the comments and then you will get that twinkle in your eye and say, I am blessed. I just love having the peeps in the house!

Now to where I purchased these Cracker Snaps….you can CLICK HERE and it will take you right to the store. I ordered them on Sunday and they were at my house on Wednesday so you could go ahead and make up the poppers and once the snaps come….just finish the job!
I was SOOOOOO excited about these. Just think of how FUN it would be to for a birthday…you could even put money in it – that would be a GREAT gift ~ if someone lived far away, wouldn’t they love to get a popper in the mail with a message from you?


They you go…poppers again and I bit of a story! Just use your computer and printer to type up some goodies and have fun. Please let us know if you do this and how the outcome is.
I had a fun day yesterday, mission accomplished – one store and DONE…and then to heaven…the grocery store! John used to think I was silly about actually liking to go to the grocery store but now he “gets it” – when you go to Wegmans….you are in grocery shopping heaven!
Pace yourself….stress do not look good on any of us! Here is that paw print….shop away and the vault is open and ready for you to come on in!


by Susan Itell | Dec 8, 2016 | 3-D Projects, Christmas |

Good Morning! As promised…here is another version of a check holder and true the base dimensions are the same but the thing that I want you to see is that you can add “stamping” to show your skills off and also it is a great way to add a diecut as well!
I will run through the dimensions for you because I think that it is cute…actually super cute. I know that I used this color scheme before and I just had to continue to roll with it. I need to back up a bit….do you remember when we were showcasing the Card Swaps, Princess Judy was the one that encouraged me to use the green plaid as the POP! You see….I am always learning….from YOU GUYS!
The TRUMP to this post is the super fun Envelope…..(thanks to Chris R.’s inspiration in her comment) This board makes it super easy and you can make it with a piece of paper that is a 8 1/4″ square!

I know that the shape of the “flap” is a wonky shape but it is this way because the card is so long and narrow. I simple cut off the point to make it a bit different and I think that I accomplished that! The green strips are 1/2″ and the Dijon ones are 1/4″ – I kept the same theme of the 1″ squares!
Well….here you go – the dimensions! Today you can see that I used my little buddies to make the fun card! Actually the sentiment is perfect as the recipient want some lamps and pillows for their home….so I thought a check is perfect to let them pick what works…..so they need to “DECK THE HALLS” of their home!

- The basic check holder is the same as yesterday…..click here to view that!
- The Thick White is 6 3/4″ X 2″ and then I stamped our friends with the Black Archival Ink and used the aqua painter!
- I added a thin strip of Dijon to top of the stamped image…..mainly for balance and color, it is 6 3/4″ X 1/2″
- The sentiment is on a scrap 1/2″ wide and then matted with Delightful Dijon a smidge bigger….
- For the top flap FUN…..the white is 6 3/4″ X 1 1/8″ and then the DSP are 1″ squares. (this is a great way to use the paper stack as they would not have been long enough to make it the whole way across )
- A simple piece of Linen Thread did the trick to add that special, homemade touch!
The below pictures will makes sense to you after reading the bullet points! Please play with the Aqua Painter…it really is your friend. Stampin’ Up! is coming out with Watercolor Pencils in January and these are also going to be a great way to add color and yep, you can soften it with the Aqua Painters as well!


Well…there you go! Thoughts? I would love to hear from you and I hope that you can see that you can use DSP like I did yesterday to make a holder or use our cardstock and dress it up a bit! I just adore those little rodents and they will always be warm as they will never leave Randall Lane.
They are on sale and remember, the vault is still full – with every $75.00 purchase with me this month – you will be allowed to ENTER THE VAULT...it is a bit overwhelming but I am sure you can imagine how many stamp sets I have in there!

I have another keeper for you tomorrow…it is something that I do each and every Holiday and there is a special twist to it this years…when I discovered this company….I could hardly wait to get them! Please POP back tomorrow to see how I will see show you another fun practical project that you still have plenty of time to make!
I am not one that likes to go to stores but today is the day that I am making the trek to one store that I love, Williams & Sonoma. We have an outlet store somewhat near by and this is a place that I adore….I am blessed that all 3 of the peeps love to cook and I love to pick up goodies to continue to build up their kitchen.
After that….guess where I’m going???? You will laugh….to the grocery store!!!! There is a huge Wegmans near where I am traveling and this is like a candy store for me – I will probably be in there for hours as every holiday I like to go up and down each isle and find the things that I can never find where I love – call me crazy but I love to cook and I love the grocery store!
Enjoy your day and don’t forget to do something for YOU…..I am looking forward to my silly “me time”
by Susan Itell | Dec 7, 2016 | 3-D Projects, Christmas, Uncategorized |

Happy HUMP Day (Wednesday) and I am happy to continue the week of “practical posts” for you….for those last minute ideas! I know that these are ones that you have seen…ones that are super easy but I say – they are classics so why not show them again!
I was thinking when I was preparing for this post….there are always NEW people that hop on the fun train of paper-crafting! I ask you to remember when you started…how you felt when you learned something and this week of posts I hope are useful and helpful to you!
I love your feedback and I smile with each and every comment that you leave as I feel like “our community” of sheer fun is just soooo darn unique and I thank you for stopping in….sharing….ordering….please know that sharing handmade kindness matters – BIG TIME!
I have a TON of pictures for you…so I hope that they help and please do not hesitate to email me if you need further help. This post is about how to give a fun & festive way to give a check or cash….as we all know, tis’ the season!
Today Is all about that and also all about doing “surgery” on this single stamp….I blogged about it over the weekend and yep, I am guilty as charged – I have (2) of them ~ one for the single stamp that it is intended and then the other, SURGERY – as I cut it into 11 stamps!


Below you will see a parade of pictures but I know what you want…the dimensions – “I GET IT” and trust me. when I caught the stampin’ bug…..I was always sooo appreciative of dimensions!
Here you go! So simple, so easy to duplicate and yep…tomorrow I will show you another way to make a check/cash fun!
- The base is a 7″ X 7″ square
- Score at 1 1/4″ X 4 1 /4″
- Punch a circle (whatever you have) in the middle before you adhere – see the picture below to find the middle
- Use tear-n-tape for the edges
- The belly band ~ 6 3/4″ X 1 1/4″ and then if you add an accent color like I did – that is 6 3/4″ X 1″. (make sure that you do not make the belly band too tight ~ you need that “wiggle room”
I say…just have FUN with decorating with what you have! I know that YOU have a TON of stash….I say, USE WHAT YOU HAVE. My feeling is at this time of the year, we always get sooooooo stressed – just do what you can….and then be proud!


You can see that I have used this stamp to my advantage….I loved it soooooo much that it was easy to buy (2) of them and now that they are on sale…I say a BIG WOOT~ WOOT ~ how can you go wrong!?!?!?!

Embossing was fun…and I say ~ rewarding..as there is something magical about seeing the transformation of seeing a simple “powder” turn to sheer beauty! THIS IS the TECHNIQUE that always WOWS all!

Have a fabulous day and I hope to see you tomorrow have another version for a check/cash for you! I ask you….HOW ARE YOU DOING WITH THE HOLIDAY SHOPPING?
The calendar is rolling but I truly thing that we can only do what we can do….enjoy the journey…and do not stress yourself ~ I am super proud that as I have “grown in age” – I do not let the little stuff bother me!
by Susan Itell | Dec 6, 2016 | Christmas |

Happy Tuesday to all…I admit, I am doing the HAPPY DANCE over today’s post but I am a bit sad that the pictures just simply do not do this great idea the justice it sooooooo deserves! Soooooo, I say – trust me on this one as it is SUPER cute…sooooo cute that I am going to make many more up!
I am glad that you all liked yesterday’s post and as I said…this entire week is dedicated to sharing with you fun, practical ideas that even if you do not have the specific product that I am using, no worries as there are always ways to make changes and guess what – it will work!
Here is that super fun Fabulous Foil DSP paper…and today I am using the silver side paired up with Navy – I say WOW….one classic card/gift! All you need to do is pop in the envelope a gift card and you will be the SHINING STAR of the Holidays 🙂

If you do not have the Gift Card Framelit you could easily use the envelope punch board but here is the way that I feel about it….we all know that gift cards are used all year long for a variety of occasions…and trust me, this is a breeze to make – if you are using a regular piece of card stock, all you need is a 1/2 of a sheet. ( but I need to say….you will not regret having this in your stash)…just saying! 🙂
I realize that the Gift Card Framelit is an investment….but then I look at it this way, don’t most things that are a bit more worth it in the long run. I find than when I get something of quality and in this case ~ also practical….each and every time I use it, I am thankful that I made the purchase!


Here are the measurements and tips for you… please CASE away and feel free to email me if you have any questions! – Just like I said yesterday, I would make one of these up and jot down the measurements for the future. Also, remember that you can scroll through my gallery at the top of the Blog Header and that will take you to the posts!
- The Card base is thick Whisper White, 5 1/2″ X 4 1/4″ (a regular A-2 Card)
- The Navy is 5 1/4″ X 4″
- The Acetate is the same size as above, 5 1/4″ X 4″ and then I used the fast fuse in the middle where the envelope would cover it to adhere it together! (this is what is great about this post….you can easily HIDE the adhesive!)
- The Envelope was cut with the Gift Card Envelope & Trims with the Fancy Frost DSP paper (love it!!! ~ the thickness is fabulous and the feel is over the top, plus it is on sale…this is what I am using for a personal Christmas card!)
- I matted it with the Silver Foil Paper, just a smidge larger than the envelope – 4 1/8″ X 2 7/8″ ( to me, a great touch)
- The sentiment was cut out using the Christmas Greetings Thinlits (another classic) and I used the green glue to adhere it!
Tips for you….:
- The adhesives I used were fast fuse and green glue!
- When you mat the envelope to the silver foil – use the fast fuse (just not a wet adhesive) and then add the twine/embellishments to the back….this way the “tails” will be hanging until you tuck in the gift card and then all you have to do it put it in….and tie the bow!
- I did use fun foam to pop it up ( and yep…it does fit in the envelope just fine) – you could easily use stampin’ dimensional….I just like the solid feel of the envelope!

Here is the SMILE picture…..do you agree???? One fun card that acts as a 2 for 1 – tuck the gift card, write a message…and you will be a hit.
Make sure that if you are mailing this to someone far away that in the Holiday Message that you write to “open the envelope” – wouldn’t that be the pits to have them think you just sent them a beautiful card!!! 😆


What is up me sleeve tomorrow….well let me share with you ~ we will switch from gift cards to “check holders” – as I know that there are many of you that enjoy writing checks!
This is a job that I do for my wonderful Dad, he prefers to give a check rather than a gift card and trust me, I have some classics for you!
I hope that you are enjoying this “practical week of posts” – I know that I could be sharing with you a bunch of SNEAK PEEKS from the new catalog…but I say….we are IN THE SEASON and I know that these posts will help you shine for last minute ideas! We will have lots of time for the new catalog and trust me, I will have some “keepers” for you in the very near future!
Please do not forget to check out the deals and end of year clearance….you never know – more items might be added, I check often!
by Susan Itell | Dec 5, 2016 | Christmas |

Good Morning and as I shared yesterday – this week is a week that I will showcase with you ideas that are super easy for you to make and even if you do not have the certain stamp sets etc…that I am using, I am sure that there are plenty of stamps that you have in your stash to CASE away!
Before we go any further I have a confession. I used to NOT be a fan of gift cards because I guess….I just felt that they are the easy way out. Now let me back up….first – the season is NOT able gifts…and “one uping” the person that you exchange with – but the reality is…we do share gifts and many times they are gift cards!
I am a big one that for children…give and share something that they want -they are at that “magical” age in their life that making joy means a ton.
There is also a time that it is just “down right easier” to give a gift card, let someone get what they want….One thing that I ask my family/god children etc…that I give a gift card to – I say…“please share with me what you picked for yourself!” To me….it is a win-win for both of us and it is a great way to reconnect and chat!


I love making things pretty and unique…there is no reason that a simple gift card cannot look great…..have fun!
Here are the dimensions on how to make this! Super easy and one that you can use ALL YEAR LONG….we all have gifts that we give throughout the year and this is a great one, especially for a guy!
If I were you….I would jot these dimensions down and add it to one that you make~ this way you will always have it handy!
- The base is 5 1/2 X 4 1/4″
- The Print DSP is 4 1/4″ X 4 1/2″
- The Black Strip is 4 1/4″ X 1 1/4″
- The Garden Green is 4 1/4″ X 3/4″
- The white piece on the back (the part that you can write a message on) is 4″ X 4″ but you could have easily made it larger, I really do not know why I did not make it larger! This is where you can write a message!
Here are some tips:
- I did heat emboss the sentiment with Clear Embossing Powder – make sure to use that Stampin’ Buddy!
- Use Tear – n – tape on the 3 sides to make a pocket for you to slide the tag/gift card in
- For the tag – I just took a piece of 5″ X 2 5/8″ paper and then added a fun DSP 4 7/8″ X 2 1/2″ (you can really make it what you want – just make sure that it is wide enough for the gift card.
- I added the “pull” so the recipient would know…there is more inside the pocket!
- I adhered the pines and linen bow with glue dots – can you say EASY!!!!!


There you go…..sorry that the post seems soooooo rushed but time was against me! We have a FABULOUS time yesterday at the Ravens game! It might have been my first….but it will not be my last – I was in my glory and I adored the fun and spirit that was surrounded by us.
They WON BIG TIME and we had great seats – this was us before the stadium filled up – a great day with my guys! COming home to FOREVER but that was ok – we yacked and yacked…..a great day!

I hope to see you back here tomorrow as I have another gift card idea for you. This is one that I like to use as it is a bit “stepped up” from todays….but I have a hunch that it will make you smile.
I am a believer that when you have a keeper…than KEEP IT!!!!! This is what this WHOLE WEEK OF POSTS IS ABOUT….sharing with you ideas that are practical and fun!
by Susan Itell | Dec 4, 2016 | Christmas, Step it up Sunday!, Uncategorized |

Good Morning! If you happened to wonder where was my morning early post….we lost internet yesterday! Sorry for the delay but you are going to love this one! 🙁 The GREAT news is that I am back and we need to have a chat about this super cute shaker card!
I adored the comments from yesterday and yes…PEEP James did love the card (sometimes I wonder if he just says that because of me being “Mom” but he liked it and John…well ~ he increased his order to 18 cards! I think they think I eat Bonbons all day!)
Here you go….side by side, you decide! I know that you like these 2 days posts and every week I say to myself, I don’t know if I can do it….and then somewhere…somehow – I pull it off!

I have LOTS of pictures for you today as I feel pictures really help but as always, please feel free to email me if you need additional help. Shaker cards are really fun to make and they are like anything else, a couple of tips and tricks and the process is much smoother!
Before we get going, here are the comments from the guys. They BOTH liked Saturday’s Card…naturally I said, does that mean that you didn’t like Sunday’s card….they both laughed at me and said that they didn’t need the fru-fru inside but they said that my readers would prefer the shaker card…..YES – I love them both but it is FUN to shake-shake-shake!!!

Making a Shaker Card if fun. Making a Shaker card is rewarding as there is something special about the movement inside. Making a Shaker Card creates and instant WOW to whomever is lucky enough to receive it. I hope that YOU try to make one.
We all have the necessities of making one…you can use circles, squares, rectangles….but today I am using the Hearth & Home Framelit as I think that it is a perfect choice for a shaker card, especially for the Holidays!
You can see by the pictures that I stamped the tree and cut it out like a normally would do but then I also cut a piece of Crumb Cake to go behind the window. Below you will see that I simply adhered the tree and then snipped off the edges for the backdrop of the shaker element!

TIP ALERT: – Use the thin Foam Strips when making a Shaker Card…they are a DREAM MACHINE and make life soooooo much easier and it is a HUGE time saver! Just make sure that you have the ends together to lot allow and “goodies” to decide they want to leave the card!
Here is another tip: – I like to take the embossing buddy bag and run it over the paper and image BEFORE I put the sequins in…this helps with static when you place the acetate over and also it takes away some of the “tackiness” of the sides of the adhesive strips so the elements do not stick (You can see in the picture below that I must not have done a good job on the right side as there are many elements sticking….no worries, once you have your card together just keep shaking and shaking and they will get loose!)

I forget to take a picture of this but I think that you will “get it” – You will adhere a piece of acetate to the front windowpane part of the diecut. I used tear – n tape and where it was too wide, I simply folded it over. You really want a good and strong hold to keep the acetate in place. Also, take the embossing buddy and do the same thing – this helps for the static!
Another TIP: – before you release the adhesive strips, glue down a couple of sequins etc….randomly around the visual part. This way when your card is sitting up as a card would be on a shelf etc…you will see some elements and then hopefully (unless you are a guy) it will encourage you to give this card some love and smile as you shake it back and forth! 🙂
I went into my stash of fun and randomly used elements that I love…I just love little seed beads and also clear items. No rules, just have fun but do not put too much in because it will be hard to get the good “shake” – less is best!

Here is my smile picture, when I get to this part…I feel like I have accomplished something. I admit, guilty as charged that I have be known in my family to carry around a card and to keep saying, do you like this one – this is one that I would do with it!
I think that the tree behind the window just warms your heart for the holidays! I a getting excited (I rarely do this early) but yesterday we worked our tails off (but trust me, there still is a big tail behind me) and I will say that we accomplished 85% of the decorating! Tomorrow I will share with you a funny that will make you laugh!

Here is your 411 – picture to pin for the future! Just hover over it and take it to your favorite spot! I am sad that this stamp is “walking the bye-bye plank” but it will be one that will not leave Randall Lane…there are simply some stamps that you cannot part with!

Click here to see the items that are on the year end closeouts and remember, with every $75+ or more purchase with me this month, YOU can go into the VAULT and pick any stamp set your heart desires. I have 5 years of stamps in there and it has been a WORK IN PROGRESS trying to get them all in one place.
Those that have been to the vault as happy to finally get that one stamp set that they wanted but didn’t get. I do have marked in the vault (updated it yesterday) the items from this current catalog that I am saying goodbye to….but I can not mail them to you until after the catalog ends, Jan. 3rd as per our rules!
Have a fabulous day….”get lots done” and look for me at the Ravens game!!! Yep, James bought tickets for us to go together…..so the 3 of us are going to Baltimore today, this will be my first love NFL Game! It should be a fun day!
p.s. – this coming week of posts….they will be super fun and informative as I will be sharing with you some practical and fun ways to finish up those gifts ideas!


