by Susan Itell | Sep 23, 2018 | Blends, Embossing Folders, Thank You |

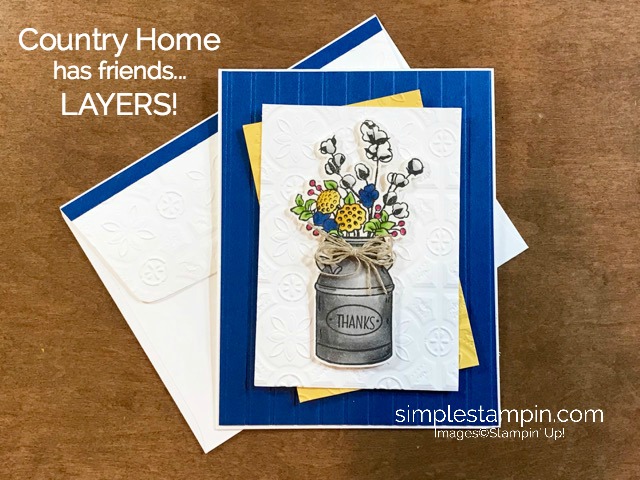
Good Morning and as promised I have another card for you featuring the Country Lane Photopolymer Stamp set….if you missed my other post with this, please click here for that inspiration. Today I have for you an example of just how adding layers of textures to make a fun, simple and classic card…. is easy to do with little effort!

I think when we go to our work space areas to create we get in the habit of using the same tools over and over and please do not get me wrong…that is truly OK and I am SOOOOOOO guilty of that but there are also many other tools that we have that can be used with our “old faithfuls” to make elements of our design….just that extra special something that will take your project up a level!
The textures that I am talking about are Embossing Folders!
My Embossing Folders are all snug in a container one a shelf in my work area. Because they are up on a shelf, I honestly just forget about them…therefore, they get skipped over many times. Embossing Folders (page 222 – 223) in the Annual Catalog and also several new offerings in the Holiday Catalog are the yummy Buttercream Icing on the cake!

WHY? – EASY…..with a simple pass through the Big Shot and just a piece of paper….out will come an amazing texture of goodness that will make a project go UP a notch instantly! For todays card, I am actually showing you (2) different embossing folders. The Simple Stripes and the Tin Tiled Textured Embossing Folder (this is a newbie in the Holiday Catalog). I know that many times we just use one Embossing Folder…but I ask you, have you ever tried 2 on a project?

I have some quick tips and tricks for you when using Embossing Folders and then I promise, we will get more into the card! You all know that it is always my goal to be able to share tips that I have found useful as heck – we are all in this crafting thing together and with that said – I say…HECK YES….the more tips always helps!
- When you use embossing folders…remember there are 2 sides (just like in life…there are 2 sides to every story) and sometimes you might like one better than the other……just like I did today…on the blueberry stripe one….I flipped over so the embossing strips are facing downwards.
- When you use a 3D Dynamic Embossing Folder like I used today for the Tin Textured (in white and daffodil delight)…you only need to use 1 plate in your “sandwich configuration” when you pass it through the embossing folder.
- I like to “mist the paper” with water when using many of the embossing folders….I suggest that you just have a mister bottle handy in your work area and play around with it. I always say that you need to play with products to get to know how they will work for you before you dive into a project….this way – you will always know the results before you get frustrated!!!
- Here is a tip and one that I know take time but trust me…it is well worth the effort. I would take cardstock (perhaps a color that you do not use a bunch) and make a sample of all of your embossing folders…hole punch it, label them and put it on a ring. I have done that and it is a great visual of what the folder will actually look like. To me, it is the same as I feel about seeing the Cardstock Swatches that I make…to have them in your hand is sooooo different than seeing pictures of what the embossing folders look like in the catalog!
- Stampin’ Up! has started to put lines on the bottom of some of the folders to give you a visual line to make sure that your paper is straight….this is a huge help for the images that if they come out crooked….YIKES.…we get grumpy!!!
- Run your embossing folders through the Big Shot with the crease of the folder in……not the open end….and lastly, the Stampin’ Up! logo should be facing up as it goes through the Big Shot.
Whew….thanks for hanging in there but I do hope that you found these tips helpful and if you have more tips and tricks that you have found to be helpful….please share in the comments as this IS HOW WE LEARN! I am a HUGE believer of sharing tips to make a process easier and I feel so blessed to have such an amazing community of Blog readers that always graciously share their tips and tricks!
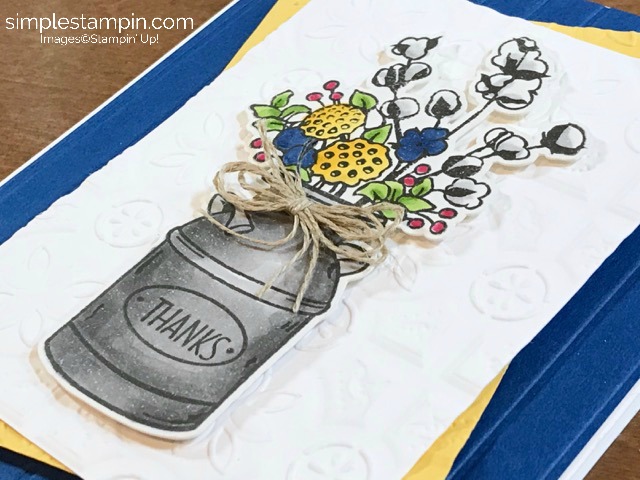
I just think that there is something super fun about this stamp set. I adore the fact that it is a Photopolymer Stamp as I find it so easy to look through….line up and stamp away! I did use the Stamparatus for this as I stamped many images at one time….I like a stamp positioner for doing this but I also like the fact that I can stamp it several times to get a good, deep and rich black image!

You will see that I cut it out…and I know…I know….it is a BUMMER that Stampin’ Up! did not make matching framelits for this keeper of a stamp set. You can easily fussy cut it out but I used my Scan -n – Cut to do the job for me today! Here is a tip when you fussy cut….thrown perfection OUT THE DOOR and just do it – trust me….no one will ever look at it and say – that is a terrible job!
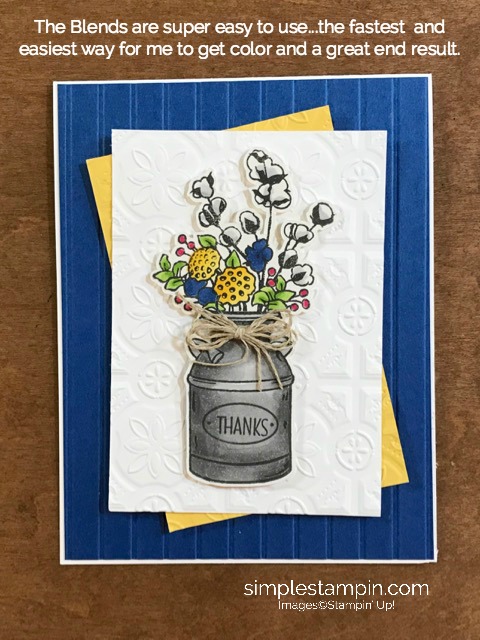
I used the Blends to color the image in and trust me again, they are the easiest and fastest way to color an image in. Being that they are alcohol markers…there are NO STREAKS in the end result! Please do NOT let the word BLEND get you flustered…they truly are the best. I also like to use the regular weight of Whisper White Card Stock when I use the blends….I just think that they absorb in the paper perfectly!
Today I tried something different and it worked PERFECTLY!!! Jeanie has always told me how much she loves and enjoys water-coloring on the Shimmery White Cardstock so today I thought I would give it a try and…..IT WORKS PERFECTLY! Always remember that you need to be sure that you that you use an ink that works with Alcohol Markers….the Memento does!
The Blends just glided on…just as it does what I used the regular weight Whisper White Cardstock….this is another product that you should have a pack of in your stash….it is a very subtle shimmer!!!

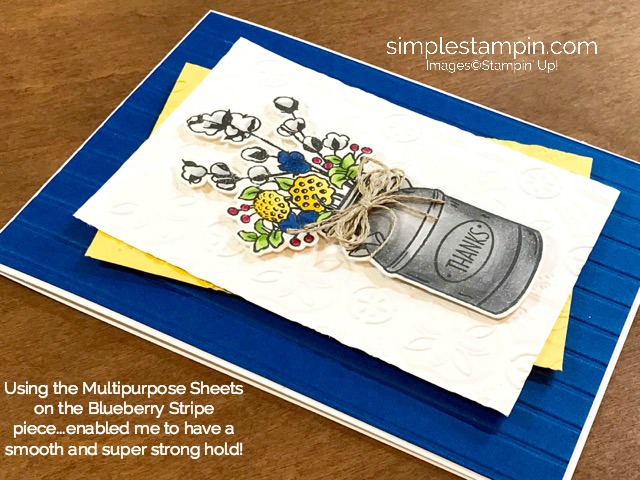
Below you can see that I commented in the picture that I used the Multipurpose Adhesive Sheets to layer the Striped piece down. YEP, I did as it lays perfectly flat leaving a very solid and professional feel to the card. Again, little tips for you! I adore this adhesive and a pack goes a LONG WAY…..to me, it is like that “little black dress” – you need to have a pack of this adhesive on your stash!

Below you will see the image of another tip….it truly is funny how the end result looks so different on different cardstocks! I know that I will easily use these for another project in the future….just wanted to share with you how I roll when I design!

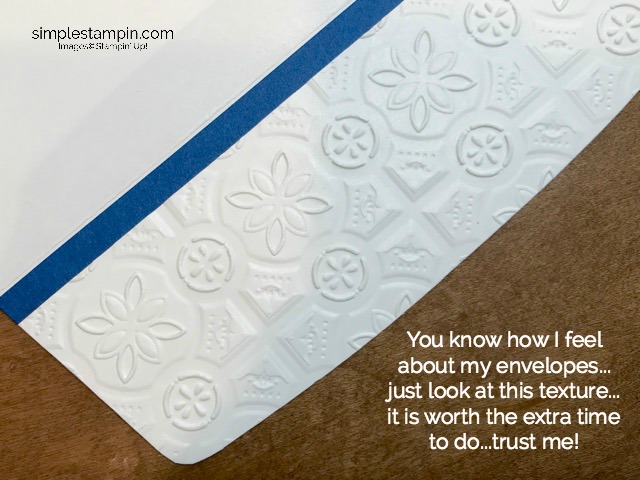
A close up and sorry, not the best quality of a photo below but I think you get the message. Just look at this love!!! Envelope love is the best way to end a project that you made with your own hands!!! Once you start doing your envelopes…..you will never send a card out with some sort of envelope love! It is also a great way to use up scraps!

Well….there you go…..another bit of inspiration from me! I hope that you enjoy the remainder of the weekend and I hope that you can turn the football games on today and craft away! That is what I am planning to do…..I am trying to get a JUMP START on Halloween Treats that I love to send to family and friends!
I will be traveling a bunch over the next month so I am trying to get my DUCKS IN A ROW (as the saying goes) and I will be sure to share with you some fun and easy ideas of what I will be making…..I am not a huge Halloween person but I sure do love to send fun, festive, and yummy treats of love made with my hands!
I sure do love this fun things that we do…..handmade love is just the BEST!

by Susan Itell | Jun 11, 2016 | Embossing Folders, Uncategorized |

Does this ever happen to you? Have you ever been enabled by a card that you just HAVE TO “cave in” and purchase the stamp set? Well my friends…I hope that you are saying YES as hopefully I have done this to you at times!
Today’s card was from my dear Texas friend, Alyece. She sent me this card in February and I must say that I have looked at it…and smiled 🙂 and then looked at it again (I do keep the cards you send to me)….and then I smiled again 🙂 – and then it happened…I CAVED and I ordered this as I knew that if I have been looking at it for this long…than it needed to come to Randall Lane!
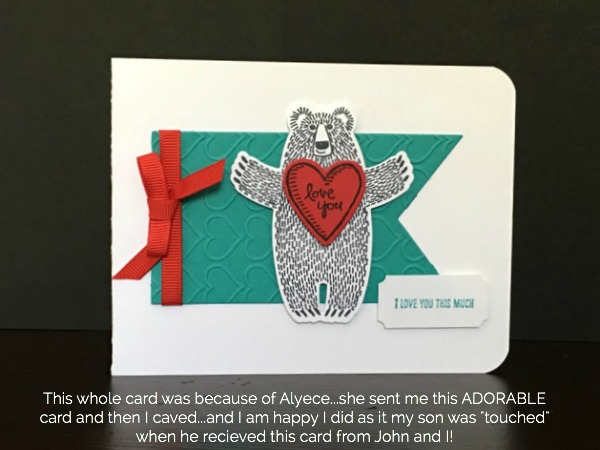
If it were not for Alyece…I probably wouldn’t have purchased this but I am so glad that I did. This card was made for my peep James. He is a wonderful person that has a wonderful heart and he is such a kind person. Last Friday night when John and I came home from our trip he was to pick us up from the airport. I was to call him when we landed as he would be waiting at the cell phone area.
Well…we landed, I called. Then as soon as we hung up from each other I had another call – it was from a driving service that we were to walk out of the airport and he was waiting to take us home. I was sooooo confused but James arranged this so he could be at our house…relieved the “house/dog/horse/donkey/pig/garden/flower sitter” (talk about jack of all trades) and make us a special dinner so when we walked in the door, everything was perfect.
Ever since James has been a little grasshopper I have always said, “If there were more James’ in the world, our world would be a better place” – I truly mean that – he is the keeper of all keepers. We had a great dinner together (even thought John and I were pooped but we found the energy to cherish the moment)

Wasn’t that special that he took the time and thought to do this…..and oops, I forgot – he also had on the table my favorite flowers, yellow tulips! Once we arrived home…we had calls from peeps Will and Hannah as they we all in this as well and they were so happy and proud that there “Mama and Papa Bear” did this fun and big trip! (We are blessed!!!)
I immediately ordered this stamp set and framelits…as I knew that Alyece’s card was so special to me, that this would be a perfect way to give a BIG bear hug to my peeps! Here is the image of the stamp set….I am going to have fun with the apron!!!

I have blogged about this before…embossing folders are a GREAT addition to your card…it is amazing how something so simple can produce such texture and sheer fun! I have yet to blog about the NEW ONES…but hang tight ,you bet I will!

Another product that I could not be without….BAKERS TWINE….it is the best and in my opinion, I think that you should have it in every color as not only is it super affordable but it is sooooo darn tootin’ easy to work with! There are so many things that you can do with it and for a “bow challenged” person like myself, it is the answer for me! (it’s kind of hard to get a bad bow with Bakers Twine 😆

The heart on the bear is adorable and as you can see I totally CASED it from Alyece but I also wanted to do something in the inside that was fun and whimsical… This sentiment is from the MUST HAVE Sentiment Stamp Set that was carried over (woot-woot) called Suite Sayings….now I am “just saying” you really need this one – it is a great addition for so many cards that we make!
Confession time: I stamped this on the inside without my stamp-a-ma-gig and it was crooked….and I was sad – well actually I was a bit mad at myself as I thought, why would I have done all of this to try to save a bit of time only to have it be crooked!?!?!? Well, there is always a plan B for us “type A’s” out there – love, LOVE these nesting framelits!


Well…thoughts? Did my Bear make you smile? Now how about this envelope with Baby Bear…he is sooooo sweet! After I learned my lesson with messing up on the inside of my card, I did pull out old faithful, Mr. Stamp-a-ma-gig and gave the front of this envelope some love….”nobody hugs like a mother” 🙂
I feel like I have been working at Jo Ann Fabrics in cutting ribbon this week……I have been BUSY getting the products shares all together and I am SUPER happy to say that they will be OUT THE DOOR on Monday Morning! (Get ready for happiness in your mail boxes) I will offer another share later this month in case you missed this one!
Have a GREAT day….I am going to as I am going to a Shoebox Swap today (I have no idea what to do…I just listened to what Jeanie told me to do and bring) and I am sure I am going to come back with some great cards – I have a CA-ZILLION things I should be doing here at home but…..WEEDS…they can wait….LAUNDRY…that can wait….sometimes a girl has to do what a girl needs to do! After all it is just from 8 – 1~ 🙂
I will see you tomorrow as I am CASEING again…..this time from Lisa Poe – do you remember her fun card from the card swap? I will do my version and share with you all of the measurements!!!! Go make a memory today and make someone smile!
by Susan Itell | Jun 25, 2015 | Christmas, Embossing Folders, Super Easy |

Did you see the date today….yep – it is June 25th and we know what that means…6 months from now it will be Christmas. I say YIKES…REALLY….WHAT HAPPENED…wowzers, time sure does fly! I thought it would be "fitting" to honor this milestone and I am sure that I am hearing lots of sighs…
This is my kind of card…simple and to the point! This would be a super easy card to "mass produce", something that many of us like to do with our Holiday Cards. I know that many of you like to make several cards and then make multiples of them – this is one card that I would not forget about!
The DSP is from the Merry Moments DSP and from one piece of of DSP, you can make 12 cards as the width of the DSP is 2" - and then matted a "smidge larger" in Old Olive. (Now don't forget use the inside of this paper to pop out punches etc…as you will be covering it up)

I also used the new Heavy Weight Whisper White Cardstock….LOVE IT – once you use it, you will not go back. The other thing is that the "White's match"(so you can easily use our regular whisper white layered on top) I know that this sounds crazy but trust me…you can put 5 sheets of paper that are white from different sources and they all look a bit different.
I was THRILLED that Stampin' Up! carried over this fabulous stamp set, Festival of Trees and it also comes as a bundle which will save you an instant 15%. I caution you when you order, if you want the bundle…make sure that you get the right numbers. (I cannot tell you how many times I see a punch and then forget to look for the bundle number)

The sentiment is from Sassy Salutations, and this is one of the very first stamp set I purchased when I was a customer. I have used it a ton and I still think the fun font today is as fabulous as I did back then, years ago! I call that a "keeper"!
I admit…I used the Stamp-a-ma-jig as how in the world would I have a crooked sentiment on such a clean and simple card!

Here is a great tip to save your DSP…for the envelope fun I used a scrap of real red and than ran it through the Big Shot with the SUPER FUN large Polka Dot Embossing folder….remember, this is on the weekly deals.
I like to do this as it saves you money but it still provides you a WOW and a fun card. I use "green glue" to adhere the card stock to back flap and let it "set up" and then trim off the excess.

Let's get some comments going…
- If you make Holiday Cards….when do you start to make them?
- Do you make all of your cards the same or make several different styles?
- Do you like to "mass produce" making your cards?
Many thanks for your sweet comments about James coming home…he arrived safe and sound and Leo has not stopped hopping all over the place…he was used to living in the city so our 30 acres is heaven to him.
Please feel free to email me if you have any questions and I hope to see you tomorrow….hopefully Jeanie will be coming over today or tomorrow so I can get to you her fun works of art!
by Susan Itell | May 22, 2015 | Embossing Folders, SNEAK PEEK!!! |

Can you believe that the weekend is here already and this weekend is the "kick off" for the Summer to officially begin! Time flies!!!
Here is another sneak peak of a NEWBIE stamp set that will be in the new upcoming catalog, you can click here to see the earlier post this week using it!
My goal is to showcase with you many different ways that you can use a stamp set so you can really get the best bang for your buck!

This card is a one layer card and I will share with you bullet points to make this. Remember to think out if the box – this was a fun card to put together and I just allowed the sentiment to shine!
- Stamp the sentiment and the flowers on a piece of whisper white. (I used the memento black – just love that ink pad as it always gives such a crisp stamp!)
- Using the circle framelits and Big Shot, cut out the stamped image.

- Use the Aqua Painters and use the cucumber crush and daffodil delight…add some fun color. When you do a minimal amount of coloring like I did here today, you can easily get by without using watercolor paper!
- Run a piece of white that is 1/4" smaller than the base through the big shot with the fun polka dots embossing folder.
- Cut a hole out of the embossed piece using the circle framelits.

- Make a green "ring" with the circle framelits (remember, you just use (2) of the framelits….easy!)
- Using the 3/4" punch , make lots of punches using the NEW In Color Envelope Paper and adhere these fun dots on the embossed image…(this paper is a dream, it is super light weight and sooooo easy for lining envelopes – the price is great as well = a win = win!!!)

- Envelope Liner Framelits to the rescue to give that classic finished touch that we all love!

To me, this is a FUN card! What do you think? The color, Cucumber Crush just screams being happy and who wouldn't love receiving this?
This was like a puzzle to put together and it was FUN to do, every element just fit into the cut circle of the white embossed piece….presto! – No dimensionals today but the POP of fun color of the circles makes the WOW happen!
In the next week I will be doing a fun post listing the "must haves" of staples that we need to have handy to make put crafting process smooth sailing and then when the new catalog comes out…I will add to the list! We have some new "speed products" coming out that I think make doing what we do much easier!
Thank for popping in….be safe if you are traveling….I'm doing the happy dance as peep James is coming home for the weekend! Please remember that if you are ordering from my site, please use the hostess code of K3VX2TKD – this is good until the end of the month, one person will win the hostess earnings.
I hope that you will be able to pop in over the weekend for my (2) day post that you all seem to enjoy!
by Susan Itell | Mar 30, 2015 | Congratulations, Embossing Folders, Tips and Tricks!!! |

Well my friends…it's going to happen again this week, the end of another month. Darn I swear that the older I get the faster that darn calendar spins around. You know what March 31st is as well, the end of Sale-a-bration.
I am not going to go over all of the "why's and favorites" that I have…as you have heard me and other SUD's many, many times but I will say – that this is the best time to stock up on staples and also take advantage of the Clearance Rack.Between staples and clearance goodies, I am sure you will hit that magic threshold for a freebie!
(I truly thought I had bought all of the Cherry Cobbler 1" Sheer Ribbon left in the world but I see it is still available!) This is BEAUTIFUL ribbon and do you remember when I did the Advent Boxes? One roll will do all 25 boxes…(trust me – I did many) and for that fact the 25 days Photopolymer Stamp Set will do the trick for a fun project next year.

Let's get going on today's fun and bright card and more importantly….the challenge for the week! Remember, this is a personal challenge that I throw out to you…why??? I want you to pull out your supplies and have fun and also help you learn to step out of a comfort zone, I know you can do it!
Today's personal challenge is to use (2) solid pieces of card stock and a DSP as the "bulk" of our card….this is for all of you I CAN'T USE MY DSP as it is so beautiful….I know you are out there….(trust me – SU will come out with even more incredible paper and then you will want that!!!!) yes, I will be doing the color swatches with the next catalog.
This is a fun and festive card that could be used for a graduation, a promotion, a simple "Way to go" (that is what I am using it for). It is from the stamp set called Bravo! and I truly love this one in the photopolymer so it makes is a breeze for exact placement. This is a BIG stamp set and has so many great sentiments for so many occasions.

I wanted to make the sentiment pop out like a bookmark and against the paper, I think it did the trick! Here are a couple of tips and tricks that I want to share with you – hopefully you will find them useful for projects!

- When you use 2 colors like I have done today, adhere them together with sticky strip BEFORE you run it through the Big Shot with an embossing folder, this way your points will always be perfectly aligned and also your adhesive is already on!
- Don't be afraid to mix up and bring lots of different colors and textures to your projects. The best thing is that Stampin' Up's products all match, from our paper – to our ribbons – to our ink pens…you are always guaranteed to have a "closet full of matching items"
- Have fun with trim, ribbon and please try getting use to using Bakers Twine…we have it is sooo many colors and it is super affordable…play around and do something festive and fun like I did today, it will be remembered by the recipient!

Having fun with color is a reflection of who you are. For example, this print "speaks to me" and I find it easy to use where as the Something Borrowed DSP is absolutely beautiful, but I would have a hard time having an idea POP into my head…I guess what I am saying it try different things!

Another great tip…NEVER EVER SKIMP ON STAMPIN' DIMENSIONALS – these are not only super affordable, they truly are the best on the market and they do the job! Having a "lift" on your card adds an instant WOW factor….so the moral of the story….never run out of these!
The biggest Stampin Crisis is…running out of Whisper White Paper, Stampin' Dimensionals and adhesive…the worst – so making sure your pantry is stocked is soooo important!

Getting back to the stocking up point….remember we are going to be saying bye-bye to the in colors: Strawberry Slush, Baked Brown Sugar, Coastal Cabana, Pistachio Pudding and Crisp Cantaloupe. Saying goodbye is hard and you know once it gets closer to the new catalog, these are going to be swooped up!
I hope that this cheery card put a smile on your face and I do hope that you will be able to carve out some time today and try this personal challenge, you can email me your card and I will randomly pick a winner and let you know tomorrow ….
Let's have a great week…Hannah had a great birthday (even though I was sad that we were not together) but she will be coming home this weekend so what better way to celebrate than with Easter!
by Susan Itell | Feb 15, 2015 | Embossing Folders, Super Easy, Thank You, Things you just have to buy! |

Yesterday I blogged about the super cute and easy card that I think is just adorable! My inspiration came from the Stampin' Success Magazine that Demonstrators receive. Please click here to see that post and today we are going to go through the "Stepped Up" version!
The reason I am doing this is to share with you how you can take some other products that we have and simply "step it up" I must say, I like both of them. Please remember, do what works for you. It takes a bunch of "trials and errors" to develop a style that works for YOU.
I am sure that you do the exact same thing that I do…that is have fun looking at Pinterest, watching You Tube Videos etc…and there are cards and projects that make you get sooooo darn excited, only for you to go to the effort to attempt to make them to find out that "they just weren't worth it" as it wasn't your style!
When I first started card making I tried all different styles and the happiest I am is with Clean and Simple….that makes me roll and I love to help you reach your goals!

Let's get going – I will share with you the changes I did…they are very simple!
- I looked at the Something Borrowed DSP that I used yesterday and the pattern reminded me of the Modern Mosaic Embossing Folder so out it came! The piece is in Sahara Sand and it is 4 3/4" X 3 1/4". I used the corner Rounder before I ran it through the Big Shot.
- The white piece is 3 1/4" X 2 3/4" and then matted with Pistachio Pudding just a "smidge larger" – 3 3/8" X 2 7/8". I also corer rounded them.

- The stamping was just like yesterday and before I POPPED this up I added the simple yet effective piece of Thick Bakers Twine…just a quick and easy touch!
- Now for the part that always makes smile – the envelopes….you know I sure do love my envelopes! Today I took a scrap Sahara Sand and embossed it, just trying to get the focal row of the image. I then took a 1/2" strip of the DSP and placed it on above and below….and after adhering it – a quick snip! LOVE IT! (well, I probably should have made the DSO a bit narrower to make it balanced….but there is always a next time!)

Well…thoughts!?!? I truly like both of my versions…it's all about time! Remember, break your projects down and do it in steps so you are not overwhelmed! This would be a great card to make BUNCHES of in all different colors and different DSP's (if you choice todays post)
Please feel free to leave me a comment and let me know how you like today's post! I am an email away if you need help or guidance!

Our dinner was FABULOUS last night….it is wonderful to have James home as he is my helper in the kitchen….he took after me in lovin' to cook – I told you he was a catch!
Lot's of fun posts ahead this week….I hope that you will pop back!
Stampin' hugs! Until tomorrow!
p.s. – James helped me set up an Instagram Account…click here to follow…