by Susan Itell | Jan 18, 2018 | Super Easy, Valentines |

Good Morning….did you hear me grumbling yesterday? Well….I admit, I was as it has been a long time since I have had my “Susan Computer Issues” but yesterday and this morning…. it happened with the “photos” on my computer….it still is not right but I was creative and figured out a way to import them and today…yep, I have a date with a computer gu-ru!!!
I have a super simple card for you today that will hopefully put some ideas in your creative head to use this super simple technique with other basic shapes you have! You can also do this easily with a specific die shape….all you need is a die cut and Mr. Big!
Today I am using the below framelits, the Sweet & Sassy Framelits. I am often asked…“What are some tips in getting started in cardmaking”…I just LOVE this question as the answer is super simple….get the BASICS! I think “nesting shapes” of framelits are basics…and something that “timeless and the classics”! WHY??? The are a great building block for a clean and classic card!

In the below picture you will see what makes it unique….I cut the heart shape out of the front panel of my A-2 Card and then did a super simple stamp of a “love you” and POPPED it up! Now I ask you….HOW SIMPLE IS THAT?
I realize that there are some people that enjoy Valentines and then there are some….that just find it an ok time to make projects…but I think that a simple heart with a sentiment can do the trick…..for Valentines….or also and many other times throughout the year for someone super special! Are you wondering where that sentiment came from?
Please pop back tomorrow as I will be doing a whole post on a FUN product that I wager to say…..is a “sleeper” to many of you! It is the Oh Happy Photopolymer Stamp Set that is in the Oh Happy Kit…..found on page 15 in the Big Annual Catalog.

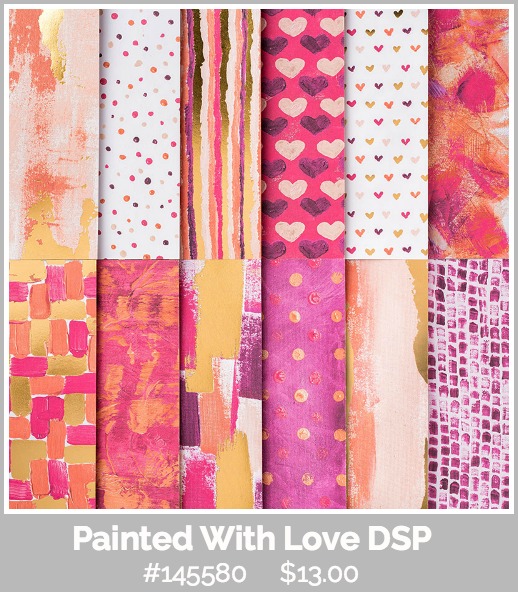
The focal paper is super yummy and the other prints in this collection are WOW – just STUNNING……Take a look below and I think that you will agree!
Remember, tomorrow is the LAST DAY for you to take advantage of my Occasions Product Share.…and just think – with a share you would easily be able to make some Valentines yourself with just a taste of this paper….a win-win as you will not be breaking the bank with having to buy a whole pack of paper!
You see….there are ways of getting the new kids on the block….giving them a test drive before you make the plunge to purchase it….to me, it is the best of both worlds!
This is a great view for you to see the opening….I thought that it was fun and something just a bit different than a regular card. I also think that the beautiful paper sets the tone for a clean and simple card that still makes a recipient feel WOW….I am super special! (cause guess what….YOU ARE)
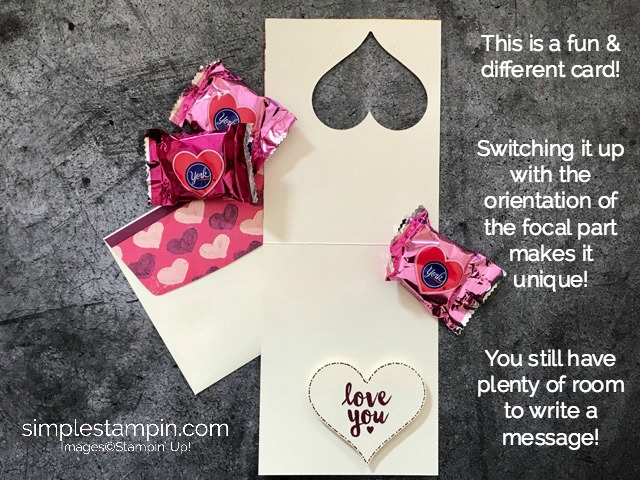
I used Rich Razzleberry to stamp the sentiment and then did my “Susan dashes” to just jazz it up a wee bit….you know how I feel….LESS IS BEST and SIMPLE is my middle name as let’s face it….there are simply times where we just want to make something….with little time….and simply have that “I did it” experience, that is what makes us all beam with pride and joy!
Doesn’t it just look FUN to see the opening on the front? I did double and you could also triple up the dimension to make it really stand out but the card will still go through as a regular card with no additional postage!

I hope that this sweet card made your heart skip a beat! I cannot wait to share with you tomorrow the Oh Happy Day Kit and what I created. I know that there are many that enjoy my Monthly Kits but let me tell you…..this was a HUGE TREAT for me to make as I adored not having to work with cutting….planning…..designing…I GET IT – KITS ARE GREAT!
Speaking of kits…I am in FULL STEAM AHEAD with the January Kit and if you did not receive a confirmation from me….Houston, we have a problem….but no worries….just email me and we’ll get it squared away!
Have a GREAT day!

by Susan Itell | Dec 30, 2017 | New Product, Super Easy, Thank You |

Good Morning and Happy Last Saturday of the year! WOW…that sounds super scary but yep…it is true!
I hope you all have been having a wonderful Holiday Season sharing love and laughter with family & friends!
Before we get going…I want to thank you for the well wishes for my dear Dad…he “sprung” from the hospital yesterday and is soooooo happy to be in his own home and is doing GREAT!
It’s funny how your body reacts to things….my “internal clock” woke me up to say…..“It’s time to get crafty!!!” and I admit, it felt great knowing that I was going to be able to have a “jammies day” as I am not going anywhere!!! Driving back and forth takes a toll on you…and truth be told – I wanted to get this STAMPARATUS inked up!
WARNING….this is a LONG post
(but I do hope that you will read it as my hopes are you to learn more facts about the STAMPARATUS!)
I have a super sweet…super easy….super duplicatable card for you today! As I shared, I woke up before the chickens and wanted to have some good old fashion “me time” and make some thank you’s but really, REALLY wanted to play with the new kid on the block so I can give you some feedback.
(click on the image to see it in use)

Here you go….let’s open the book of “Confessions of an Honest Stamper”….remember- this is the book of ME that I share with you as I always want to be upfront and honest with feedback of products that I use….and that is both Stampin’ Up! products and also others that are not Stampin’ Up!…here you go…

I firmly believe that a Stamp Positioner is a necessity for a card maker. There are all types of stamp positoners…let’s start with the Stamp-a-ma-jig….I can hear MANY OF YOUR SIGHS…..but YEP, I do love it but I agree that there is a learning curve but it is like learning to ride a bike…once you “get it…you get it”….and I DO think that there is always a need/purpose for this handy and inexpensive positioner.
Moving to the “nuts & bolts”…..many of you have heard of and possibly have a MISTI…it made its debut in 2014 ( I think?) and brought a whole new element to stamping in being able to mass produce….to have stamps stamp not only a super clean and crisp image, but also to be in perfect placement.
I do have a MISTI and also a Mini one and YEP, I have learned to use it…and I have used it hard. There was a learning curve but I ask you….Don’t you think there is a learning curve in just about everything we learn to do?
I admit, at first I did not like it because I did not take the time to embrace learning the “how to”…and I thought – well now that I bought this….I will be an expert card maker…(doesn’t work that way)
Earlier this year, Tim Holtz came out with a Stamp Postioner….and YEP, I bought it and I too have used this hard. I have known that Stampin’ Up! was developing a Stamp positioning tool but I also knew that I needed to try, play, get familiar with….other products so I could give a fair and honest feedback on what Stampin’ Up! was going to come out with.
We all know that it is hard to develop something that already is an amazing concept and I truly think that this is one of the reasons that it has taken Stampin’ Up! soooooo long to develop the STAMPARATUS….but they have and it is AMAZING!
I do want you to know that just because Stampin’ Up! comes out with a product…doesn’t mean that I need to use it or blog about it…I use and promote what I like….and what works for my stamping needs!
I learned to use the MISTI and then earlier this year when the Tim Holtz one came out….I learned to LOVE the Tim Holtz one….and I think that I found this one to be easier of a curve than the MISTI but again, I am just giving you feedback from my personal experience.
I also at first glance thought that the STAMPARATUS was basically the same as the Tim Holtz one but with 2 plates….I WAS WRONG!

Once the final prototype of the STAMPARATUS was developed I admit, I was getting a bit “perkier” about the design and how the whole “double hinged reversible plates” was going to work. Well – let me tell you….I have been up since 4:30 a.m. and I am like a kid in a candy store. This product is a keeper of all keepers!
Not only is the design of it brilliant…but the sheer ease of use is a big winner in my eyes. I am all about being able to “get the job done” with ease and precision.
For this card I used both a clear mount stamp (red rubber) and also a photopolymer stamp as I wanted to have the “feel” of both types of stamps on the plates. I even took it a step further to mount a third stamp so I could get the feel of how it felt to take the plate off and rotate it to the other side…and YEP, it worked perfect.

To me, this is a wonderful concept…when using Photopolymer keep the black foam in the STAMPARATUS and when using red rubber…take it out! This is just amazing that you can use all sides of the plates for different stamps!
I am just in amazement that the STAMPARATUS does the job so effectively yet with ease.
I know that there are many blogs and videos out there from Demos that have already received their STAMPARATUS but I invite you to watch these short videos from Linda Heller as she perfectly showcased this product! Linda calls it her Stamparatus 101 Series.
I know that there are (6 videos) but trust me….they are each super short and Linda does a fantastic job in describing all of the in’s and out’s. Linda demonstrated this tool during the Stampin’ Up! OnStage Event so she has had it for months and is sharing her knowledge and tips!
I know without a doubt that you will find these videos a HUGE help to you shine the light on this amazing product.
- 4 Step Stamping with the STAMPARATUS – click here
- Die Cut Stamping with the STAMPARATUS – click here
- Perfectly Stamped Sentiments with the STAMPARATUS – click here
- Alignment Tips and Tricks with the STAMPARATUS – click here
- Hinge Stamping with the STAMPARATUS – click here
- Inking, Cleaning and Storage with the STAMPARATUS – click here
Well…I was right!!! Isn’t Linda just the best in explaining all if the aspects of the STAMPARATUS. For those of you that are not familiar with Linda….she also has an amazing online school called Stamping School where she does videos every week! Take a moment and check it out!
Whew….I am sorry that this is such a LONG POST but I felt the need to really let you know my thoughts about this new product. This will be a game-changer for Stampin’ Up! and they have really thought this through and have really made it the best.
Today IS the last day for you to “make a reservation” for your STAMPARATUS until the New Catalog comes out in June of 2018. Here is what I would do…
I would HIT THAT PAW PRINT BELOW and reserve yours. Please remember, this will NOT be offered again until the new annual catalog comes out in June. I ask you….why in the heck would you want to wait that long when you know that this will not only make your stamping cleaner and more precise…but it will be a time saver as well.
(scroll down a wee bit and to the right – then click the STAMPARATUS image to get going)

Here me out here…have you ever made a reservation at a restaurant or a hotel and then had to cancel it? Well…my guess your answer is YEP….well….this is how it will work with the STAMPARATUS as well.
Beginning March 19, Stampin’ Up! will ship the Stamparatus in the order the reservations were received (first in, first out) and continue through the next few months and beyond as product arrives in the warehouse.
When your “reservation window” is available (remember..first in, first out) you will have the opportunity to cancel the order (which I am sure you will NOT do) and also be able to add other products onto your order….so you can see….there is plenty of time for you to continue to learn about this product and then IF for some reason you change your mind….no worries, just cancel your reservation!
As I continue to play and learn all about this product, I will continue to share my thoughts, learning curves, tips & tricks with you. As always, it is my goal to give you honest feedback.
Please make sure that when you secure your reservation that you leave current info (shipping, cc# etc…) You will NOT be charged until you confirm and close your reservation when notified. This is a new ordering system for Stampin’ Up! and they are trying to minimize backorders.

WHEW AGAIN….this was a bunch to put into words but I do hope that you have found this helpful. You can see, you have nothing to lose in making a reservation. Remember, TODAY IS THE LAST DAY until JUNE 2018.
As always, please feel free to email me if you have any questions…I know that this is a bunch to take in and I know that many of you have been on the fence because of having other stamp positioners. I admit, I am thrilled with the design mainly because I can use the “set up” for an entire card if I am using multiple stamps like I did for this card. Being able to use up to 4 stamps with one tool….WOOT-WOOT – I’m doing a happy dance!
I am sure that I might get some questions as to where the other stamps came from? Well…I am sure that you and are are the same in the way that we do not buy all of our groceries at the same store or wear just one brand of clothes….well I am also the same with my stamping.
When I see something that I think is useful for my needs, it’s simple….I just get it and use it. The other stamps that I used were here and here….you know me, I adore sentiments (and especially simple and useful ones) and I adore my envelopes!
Also….my Occasions Catalog Product Share is now open. If you want to get in the first wave of the share please email me your share requests and I take care of you! I have also added a Share Drop-down box on my blog header to make it easy to find!
I will NOT be sending Pay Pal Invoices out until January 3rd as per Stampin’ Up! policies so when you see your invoice, please take care of it to finalize your share. Product Shares ARE the best way to take advantage of the goodies!
Have a fabulous day…it feels great to be at home and also to know that I am not going anywhere! There is nothing better than a jammie day!
by Susan Itell | Nov 6, 2017 | Fun & Cute!, Just Because..., Super Easy, Uncategorized |

Happy Monday! I hope that you had a great weekend. This is a FAST week fro me as I am leaving tomorrow to start the trek to Salt Lake City for the Stampin’ Up! Event! WHEW…..I fell like I just unpacked my suitcase and here I go again!
I bet you are wondering….what the heck is this title about? Hang tight…..it will make sense.
Two months ago I started to send my team some “GUTS” – yep, that’s right…..GUTS…Now you might be asking what is guts? To me, it is elements that they can take and create. The main goal is to just HAVE FUN….perhaps STRETCH YOURSELF….and to THINK OUT OF THE BOX.
This is something totally optional as trust me, I get it…..sometimes you just down’t feel like participating but my hopes are to create a fun activity and let me tell you….it is super fun to see what they come up with!
For those that choose to play…..I send them a goodie…..remember, there are no winners and no losers…it is just a fun team activity! I am a bit behind the 8 ball as I have not posted the fun cards they made with these guts to our facebook group….but I am always amazed at how each of us can start with the same elements and come out with something totally different.
Before we go much further I have a confession…It was not until I was completely done this card that I realize that I did not use an element that I provided…..and that was the color soft suede. What I would have done was to have matted the DSP in the soft suede to add that element! (Silly Susan!!!)

Here are the “GUTS” that I gave to everyone. No rules….just have fun creating…..you can add anything else…but you need to use the below elements….(AGAIN….I was the SUPER LOSER as I forgot, totally forgot an element)
- a white doily (I chose this because I NEVER use them and wanted to S T R E T C H myself and see the inspiration from others)
- a piece of the DSP from the Coffee Break Collection
- a piece of Soft Sky and Soft Suede
I am sure that you can imagine the vast array of interpretations there are…as many use the “flip side” of the DSP….today I was playing it safe with this subtle print but the star of the show was using this below stamp set……Hug in a Mug.

At a first pass through the catalog I breezed right past this but then I received a card from my upline, Lisa Pretto and she used it….I thought….WOWZERS….
Once I saw that it was a photopolymer….easy decision – it needed to be on Randall Lane. I admit, I am getting rather picky about the stamps I purchase as I adore the photopolymer ones…..just think how adorable this would be for tags and even cards all Winter long.

I invite you to look at the small elements that are in this stamp set…they are SUPER -DE-DUPER “fillers” as I like to call it for space that you need a “little something”…just sayin’
This is a super straight forward card…..and it was fun to whip up! I did use the Stampin’ Blends to color in the images. I am having fun playing with them. After I adhered everything together, I took the Wink Of Stella pen over to add some shine…..a fun and fast touch!

I know that it is hard to see the Wink of Stella but please do not forget about this gem. It adds just the right amount of sparkle/specialness to your project!
Let’s quickly chat about the blends…..last Wednesday in Nov 1st…..I blogged about the Blends……CLICK HERE to see that post. These new pens have been the BUZZ,,,,,,and for good reasons….they are super easy to work with!

My goal is to have you NOT GET ALL WORKED UP about knowing how to blend. What I want….is for you to feel comfortable and enjoy the process and THEN…..we can work towards the blending……there is no need to stress….it will come – in time.
With that said, I decided to offer something that will help make the experience a bit more basic….a bit more relaxing….and also a little easier on your pocketbook buy stretching it out over 3 months.
***FOR THOSE OF YOU THAT HAVE ALREADY EMAILED ME TO JOIN….look for an email from me this afternoon with the colors for you to order and your first assignment! We are going to have fun together….learning and exploring!***
Here’s the scoop…please join the fun as this is how we will learn…..EMAIL ME and put in the subject line BLENDS CLUB and I will add you to the list. Please commit before this Friday the 10th so we all can get going on the assignments at the same time…..remember, this is a fun learning way for all of us to get a feel of these new markers….

HOW??? WHAT???…..Click here and put in the subject line BLENDS CLUB and I will send you a hostess code and the colors of markers for you to purchase for that given month. We will do this for the next 3 months….November, December and January. You need to email me saying that you want in “the club” by November 10th.
Each month you will order (4) color sets and a single marker that coordinates with the entire collection….so at the end – YOU will own the BIG KAHUNA….breaking it down for you….you will spend $40.50 each month to be in the “club”
Each month I will send you goodies/support training that will help you navigate the “in’s and out’s” of this product. We will have fun, even for me – it will be a learning experience. The one thing that I can guarantee that you will do is PRACTICE…..as that is the KEY TO SUCCESS in learning anything that is new to you!
Now lets all go and have a FABULOUS day….and I will see you on Wednesday…..I have a post that will make you say…..WOW – now that it super practical and versatile…..I know you’ll LOVE IT!
by Susan Itell | Oct 2, 2017 | Super Easy |

Good morning and here’s to a new week to all of us! Today I have a card for you that is truly as easy as the title says… it is as easy as 1, 2 and 3! With the calendar being October… October is a month that is known as Breast Cancer Awareness Month.

We have an absolutely fabulous stamp set called Ribbon of Courage and it is not only filled with many images that uses the very familiar ribbon that we all have come to know as an awareness for many types of cancer but it is also filled with some fabulous sentiments.
I encouraged you to take a look at this stamp set for many reasons…(It can be found on page 96 in the annual catalog.) I actually used this stamp set for one of my monthly card kits and I was just thrilled with the end result.

- This stamp set is that one of our companies million-dollar achievers created….Patty Bennett. That in itself is something to WOOT-WOOT about!
- This “Ribbon” is a common awareness for many cancers, click here to see a list of cancers and their colors (there are many sites that you can go to an see) but I am sharing this with you for your own awareness that this fabulous and simple ribbon that is near and dear to many…. is for many different types of cancers.
- The sentiments in this stamp set are amazing. I encourage you to look at this stamp set even deeper with the message that the sentiments say. Click here and you will see a card that I have blogged about before. To me, is is clean and classic….the message that the sentiment gives….FABULOUS!
I have had many people that are near and dear to my heart that have had this terrible disease.If you want to make up a card that would not only be a total “FEEL GOOD” to you….but also a “FEEL GOOD” to many that this would touch.
I personally have made a bunch of these cards for our local community as well as I have made many of them for survivors to use as a note of courage to send their family and friends.

This card comes together in a Jif… Hence the title easy as 123.You can see that I have made this into a square card but today I am showing you the envelope (a regular A-2 size) with it as it will mail with a regular stamp.
You can easily stamp many inside sentiments or just keep it blank as it is just a true blue classic!
Here is the scoop and I hope and encourage you to CASE this simple beauty… It comes together in no time and if your heart and time allows, I would pick up some card-stock to coordinate with a ribbon color and make some up… then take them to your local support office.
Kindness is always in style and not only will your heart be happy
- Card Base is 4 1/4″
- The White is a 4″ square and then after the image stamped….it was scored at (2) in on all sides. I used a piece of fun foam to pop it up as I like the feel of a solid “lift” but you could easily use dimensionals
- Take a 1/4″ piece of card stock to the bak of the envelope, adhere and then add a piece of DSP 2″ wide and adhere…trim off excess.


That is it…as easy as 1,2,3 (CUT,STAMP,ADHERE)
To me, this simple beauty has a HUGE WOW with a wee bit of effort! For those of you that purchased my kit the month that I showcased this….please chime in and share your love for this stamp set.
I know that there are stamps that come down the pike that we love for many reasons….but to me, it is super special to have a stamp set that touches so many….that’s why this gem has a permanent home on Randall Lane.
Please do not forget about all of the AMAZING HAPPENINGS going on with Stampin’ Up~ this month…..click here to see yesterdays post…..SOOOOO DARN much to take in….but as my peeps say to me, “It’s all good”
Now go grab this day and mark your mark on it!
Product List
by Susan Itell | May 17, 2017 | Fun & Cute!, Super Easy |

Well…it is going to happen today on the East Coast…we are to hit 90+ degrees today and guess who does not have air-conditioning? Yep, ME! Now… I totally have high regards to those of you that do not care for air-conditioning because I marvel you for not complaining (like I do) – I think I have it honestly as I am my Dad’s carbon copy when it comes to this topic.
We “should” be in business by the end of the day….but the wonderful men that are working at the house loosely said the word “should” but I am hoping that my cookies might “sweeten the deal” to get it done! I woke up super early to make fresh cookies for them so the kitchen wouldn’t be too hot.

After my blog post yesterday ~ I thought that I would show you 1st hand how easy it is to USE UP that DSP that you have….even from a 6″ X 6″ square! This is a classic clean and simple card….just like I like it!
There is simply nothing to say from me about this card because it is soooo super easy but still sooooo cute! I did use a product that we use to have and I bet some of you have it …it is called glossy accents. It is a double whammy…..it is an adhesive (really super strong) and it also can be used as a gloss as I have done for you today! (I was fading waiting for it to dry) when I took the picture….but if I had waited 30 minutes more you would have seen that gorgeous shine…..

The other product that I used were some “dew drops” – I love the look and feel of these little gems….I am not sure why but they always bring a smile to my face! I use the glossy accents to adhere them as I already had it out!

We all know that there is nothing more classic and symbolic (for a fun time) than a good old fashion Ice Cream Cone. Stampin’ Up! did a great job with this bundle and YEP…it is being carried over but not as a bundle…it will be a la carte therefore you will not get the 10% discount so HERE IS THE REAL SCOOP….if you like to save money, than SCOOP this up!
You all know I adore sentiments and I am thrilled that these framelits are being carried over because I truly love the simplicity of a “single word” and the impact it can do with a clean card like I have for you today! What makes it super fun is that I adhered (4) of them together….it gives you a great look and feel and it really is not a “biggie” to do – I simple sprayed it and POOF – sticks together like a charm.

I hope that this showed you that a piece of DSP (4 1/4″ X 5 1/2″) that is super clean and fun + a good old fashion Ice Cream Cone + a “sweet” word = ONE GREAT CARD…and you bet that whomever receives it….will be smiling. This card would be great to add a gift card to!
Fingers crossed that the air is on by the end of the day….or Milo and I might sneak over to my Dad’s to sleep. I know, I know….I am a baby about this but I simply cannot sleep when it is hot….and Milo agrees that he needs to be with me! (I like the way he thinks)

Playing is fun, shopping is fun. You can already see that there are many items that are already sold out….so please do not be disappointed – remember jammie shopping is totally ON TREND! See you tomorrow…..have a fabulous HUMP DAY!
by Susan Itell | Jan 26, 2017 | Just Because..., Sale-A-Bration, Super Easy |

Meet peepers! She is a part of the Hey Chick’s Sale-a-bration Stamp set and let me tell you…..peepers is happy that she is not in the egg carton! (I told her that she never has to worry about being a fried egg sandwich)
O.k. – I am just getting this out there right off the bat – I LOVE THIS CARD! It “cracks” me up (sorry peepers) and I think that this is a great card to say a “WAY TO GO“…..”THINKING OF YOU“….or just a good old fashion “HELLO“! 😀
We have been having lots of fun with the Hey Chicks Stamp Set and I still need to feature the other hen…but trust me, I’ll do it! This SAB item has been soooooooo popular!

Speaking of being SUPER popular and it is on backorder…today is the last day that you will be able to order the Watercolor Pencils before Stampin’ Up! flicks the switch to say that they are not order-able (kind of like they had to do with the stitched framelits) as these pencils have been SUPER POPULAR and if I were you…..I would HIT THAT PAW PRINT and get them now.

This is from the home office in regard to the pencils :
- In order to give you time to contact your customers so they may close any affected orders, this product will remain available until Thursday, January 26 at 12:00 PM (MT); it will then be placed in not-orderable status.
So the moral of this pencil story is….order them this morning this way you will be assured that you will get them (even if they say that they are on back-order) – once they go to not-orderable…..there is no tellin’ when they will be available. 😕

Speaking of the pencils, remember…if your order is $75 + I will send you a set of the blender pens. These work great with this watercolor pencils and they are like “magic” – swipe the end back and forth and it is clean and good to go! Please use the hostess code of S4WKPUZG
Let’s get to peepers…..this is a note card size (3 1/2″ X 5″) and they are a great bang for your buck! Just $6.00 for 20 cards and envelopes….I say – BRING IT ON!
I simply cover the entire front with the sweet DSP from the Sending Love DSP Stack and I had plenty to adhere to the outside of the envelope.

Let’s chat about this stamp set – Perfect Mix…I bet that many of you thought – WHAT THE HECK when you saw it…well I said – COME HOME TO RANDALL LANE…..I LOVE to cook and I love the fact that you can have fun with the “pun” sentiments. This type of stamp set is very on trend right now, there are several other companies out there with a similar product – I think that it is super fun and fresh!

I know that you like sizes and I get it….when I see a card that I want to CASE – wow…sizes make me smile! The size of the thick whisper white is 3 3/4″ X 2 3/4″ and then I matted it with just a “peep” of black to help the POP!!!! (again, sorry peepers…you won’t end up at the grocery store and get cracked)
After using the Black Archival Ink all I did was simply use the watercolor pencils with the blender pens – it is as simple as that but here you go again, simple WORKED….simple is CUTE and face it – SIMPLE IS JUST SIMPLE!

She is one happy little chick and I am excited to send her out! I think that I am going to make up a bunch of these to keep on hand – they are just too tootin’ cute! I am excited to read your comments about the “new chick”

That it my chicks! Let’s have a great Thursday….I admit it was wonderful to see the sun shine yesterday….the blankets came off the horses and yep – they rolled and rolled in the mud and I am sure that it felt great to them! I was starting to feel like “blue cheese” with all of the rain we have been having – (at least it is not S N O W ) 😛
Again, if you are interested int he watercolor pencils, I would get them this morning as there is not tellin’ when they will be back in stock. Remember, with a $50.00 order you will be able to pick a FREEBIE SAB ITEM (perhaps these HOT CHICKS) and with a $75+ order – you get both the FREEBIE and the Blender Pens!
See you tomorrow!
p.s. – In memory of Mary Tyler Moore….what a great quote!


