by Susan Itell | Jun 26, 2018 | Organizational Tips, Product Shares |

Good Tuesday to each and everyone of you! Summer is officially here…and today I have another ORGANIZATIONAL Blog Post for you so grab a cup of your favorite and let this settle in!
You might also wanna grab your catalog and a piece of paper and pen – we have lots to go over!
Before we get into the nitty-gritty of me attempting to explain my system of how I tackle my DSP….I have 3 point that I am going to be covering so if you are one of those….scan through people – here are the 3 main topics of this post!
- How I organize my DSP (both 12 X 12 sheets & 6 X 6 sheets)
- FINAL CALL for a Product Share from the NEW CATALOG
- UPCOMING SALE on DSP from the NEW CATALOG

You just have to chuckle when you read and look at this image. It is soooooo darn true for me at least…
We all seem to DO IT…we “get and get” before we declutter and/or have a system! It is a viscous circle we seem to get ourselves into!
I am the very 1st to admit that how one chooses to organize is a personal preference and lets face it, there are no right or wrong ways! The thing that I think we can all agree on is that….having an organizing system that WORKS FOR YOU…makes the journey a happier one!
I am one that adores a challenge of using a space to the best advantage. For me, it is a game/challenge to me and trust me, there are many times that I revisit a way that I organize and perhaps change it….for when it comes to organizing my Designer Series Papers….I have done it this way for DECADES!
I love this method as it takes up a wee bit of space, I have everything I need at my fingertips. It is clearly a “do it once and you are done kinda task” Let’s dive in. I will try my best to hyperlink items for you when I can. I want to point out…being organized takes a focused period of time on your part but trust me, when you are done…you are one happy person!

I use these containers to store all of my DSP in. YEP, just ONE CONTAINER will hold all of my paper….I do have another one and once the Holiday Catalog and then after January when the Occasions/Sale-a-Bration offerings come out..I can hold all 3 catalogs worth in just 2 of these containers.
To me, the key is having the file folders for each DSP offering. I know what you are thinking….Susan – this is great but it costs! I think you know what I am going to say…..
YEP, it does – but it is a one time investment and when you have the feel and enjoyment of organization with your paper…you will thank me!
Like I have said, I have used this system for YEARS and I totally would not change a thing! Now you all know I probably have a BUNCH OF PAPER…and YEP, I do – but to have the amount in just one of these containers is the best feeling in the world. Ready…!!!
- This is the lifesaver Storage System that I use! Remember, you can most likely get everything you have in 1 but I do have 2 for when more paper comes out! Ions ago there was a company called Cropper Hopper and that is where I originally purchased them from. To save you a bunch of time running from store to store to see if they have them….I would just order them online!
I am linking these to Scrapbook.com as they are the cheapest right now and shipping is free for orders over $60.00.

- Next, you need the folders to go into your holder. I know you all are thinking – this is getting $$$$ but I am trying to my best ability to share what works for me. Trust me, if you DO NOT GET A GRIP ON YOUR PAPER…..you will do one of 2 things……continue to buy more or become resentful to the whole crafting process and feel defeated! You can do this!
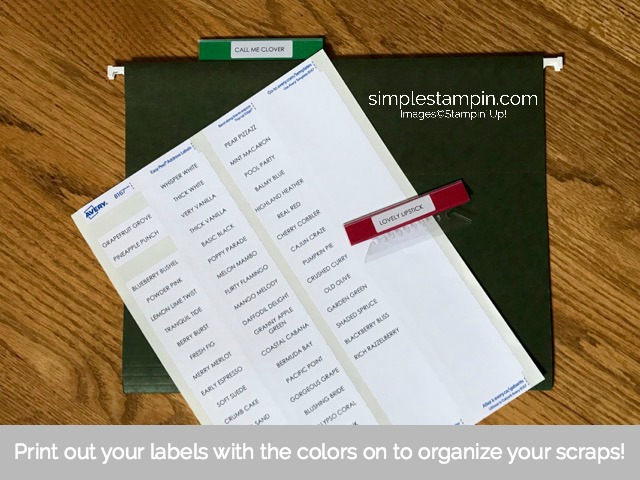
I have a folder for EACH of the DSP’s. When you purchase these folders…remember that there are 3 in a set so plan accordingly to what you think your needs will be. They are made from a super think vinyl and the labels that you create with your label maker will peel right off…..that is why I use the P Touch Label Maker for these over using the Avery Labels.


You will see below how I reuse these labels once the product has been retired. Darn, this is SOOOOOOO HARD to put into words – I hope that this is all making sense to you!
- Lastly you will also need these dividers to go INTO each of your folders to separate the Scraps from the full sheets of paper! Again, these come in a set of 3 so order accordingly. I place another label on the front of this saying the DSP Name and then the word SCRAPS after it…..(for example: Animal Expedition Scraps) I will re-use this label again after the paper is retired!
In a nut shell….if you choose to organize your paper like this (trust me, you’ll thank me) you will need 3 components – (1) the storage organizer, (2) the files for the DSP’s and (3) then the dividers to go into the files as stated above with all of the hyperlinks for you!
For my 6 X 6 DSP…I use simple cubes that can be found at Walmart (around Back to School time which will be soon – they have these in FUN COLORS and they are super cheap then) or any Office Store has them usually in Black. They are meant for storage for CD cases but they are a great organizer tool to have!

- I take my 6 X 6 papers and then make a label just as I did for the above and store my paper in the container. You can use the heavier cardboard that comes with the 12 x 12 DSP Packs and cut them to fit in between each paper collection.
With the NEW DSP Collections (page 191 in the new catalog) this is a great way to keep them separated. I have sold SOOOOOO MANY of the Product Shares #3 and trust me, if you do not keep them separated you will drive yourself NUTS trying to figure what color family they came from! You will be able to keep all of the 6 X 6 paper from this catalog as well as future catalogs in one cube….you see – a lifesaver!
The LAST Tip on DSP Paper Storage….
- When a new catalog comes out…I take all of the DSP that is being retired out of the storage sleeves and cut it into 6″ X 6″ pieces and take the label that I made with the P Touch Label Maker (that was on the storage sleeve) and place it on the divider that I cut from the packaging from DSP and put it on there.
- I put the other “label for the SCRAPS” and place it on these great bags so when I have scraps…they can easily fit into this 7″ X 7″ bag.
The reason that I use and adore these bags are that they are a super quality of a storage solution. I cut them down to the 7″ X 7″ size for this need…but I usually use them for large stamp sets that I might buy from another stamp company….(that is for another organizational post) as you know…there IS method to my organizational madness….ALWAYS!

These bags are super strong and you can use them forever. The reason that I like using the label from the P Touch Label Maker is that you can easily pull it off the front of this storage envelope without residue of the label behind and use it over and over…..as you know – THERE IS ALWAYS new paper coming out!
Here is a BIG TIP and one that I am trying to implement…as you go through your paper and cut it into 6 x 6 pieces….look at it and if you know that you are NEVER EVER GOING TO USE IT….do this – GET RID OF IT! Yep, either give it to a friend that can use it….donate it to an organization…or YEP – file it in the “circular can” !!!

I can hear some of you gasping but let’s face it, WE CANNOT KEEP EVERYTHING!
I have started to tuck in paper/products that are retired that are in perfect condition when I ship something to someone with Priority Mail….as it is a FLAT RATE…..no worries about the extra weight to the customer. It WILL make you feel good as at least you have the wonderful thoughts of someone else using it!
WHEW….that was LONG but it was also hard to put into words, darn I wish that we lived all in one town!!! I hope that this helps you paint the picture of how a system can work. As always, please share what works for you…we have a wonderful community of tips and I know we all enjoy reading what each of us seem to do! Let’s move on!
- FINAL CALL for a Product Share from the NEW CATALOG!

Yep, it is that time…the last offering of a Product Share from the NEW Annual Catalog. Product Shares are simply the BEST WAY to get a taste without stuffing yourself and also your wallet!
I take great pride in my Product Shares not only offering you a super fair offering but also in my delivery and attention to detail with your shares~
Remember, I once use to take FULL ADVANTAGE of also purchasing shares and I know the happy feeling inside we get when the HAPPY MAIL arrives! Who in the heck does not like receiving HAPPY MAIL!
You can CLICK HERE to see the offerings and then please email me with your name and address along with your shares that you need.
The cut off is SATURDAY, JUNE 30th and I will be sending Pay Pal Invoices out Sunday Morning.
All Shares will be shipped on Tuesday (one week from today) and I ship Priority Mail so you will have them next week! Next in this post you will learn about the Buy 3 get 1 FREE DSP SALE through the month of July. Getting the share #2 (the DSP OFFERING) is a great way to get a taste of the DSP and then you can see if you want to take advantage of the sale in July!
- UPCOMING DSP PAPER SALE: Runs from July 1st (yikes that is this Sunday!) – July 31st

We all know that Stampin’ Up! does a great job with their Designer Series Papers (DSP) and if you all remember from the past…
Stampin’ Up! will periodically run a DSP sale and YEP…it is coming to the NEW DSP’s from the New Catalog. The papers are featured on pages 188 – 191 and there are 10 offerings for you to take advantage of…(below you will see the 10 offerings)
Buy 3 DSP’s and get 1 FREE DSP!!!
(remember it is just from July 1st – 31st)
What would be my favorite picks???…..hmmmmmm….that is hard but I will say bullet points #’s 3,4,8 & 9 would be my picks for the buy 3 get 1 FREE as I love the colors and the style of each of these papers as you know me, I adore color with crisp and fun patterns!
This might surprise you…..but really – REALLY close was the Best Route DSP…..I am not a huge fan of that Suite (pages 52 & 53)….but the paper is really fun.
We all know that there are 2 sides to every story and YEP, it is true with paper as well! 🙂
The more “basic prints” are just wonderful and that Maps Etc…Embossing Folder is great! Over the weekend played with the new embossing folders as YEP, I am type A with those as well and I make a sample ring of the new embossing folders so when I sit to create – I can quickly go to the sample to see if the look and feel will work with my project! It is a super fun emboss with such crisp details!
Ok – there you GO! A super LONG POST but one that I hope you found super helpful! Below I am showcasing the DSPs that will be on special during the month of July….
Please remember, the cut off for the last WAVE OF THE PRODUCT SHARE is Saturday, June 30th!
Here is the link for you to view the various offerings. Please email me and put in the subject line, PRODUCT SHARE so I can spot it! Trust me my cyber friends….I totally GET IT that it does take, time, money and energy getting organized. It is a draining process but in the long run you will be super happy!
That is exactly what I have been up to! We sure do have a BUNCH to be organized around our home and I have been trying to break it down into sections! Unfortunately we lost our guy that helped us with mowing and John decided that “we could handle it”…..well…..with all of the rain we have had and the endless cycle of hoping on a mower….John is now agreeing that we need help!
Trust me….when you hear about a HAPPY DANCE….I was sweating with joy to hear those words! Fingers crossed that the guy that is coming on Thursday to “look at it” will want the job!
Have a FAB-O day….and go get ORGANIZED!

by Susan Itell | Jun 3, 2018 | Organizational Tips, Uncategorized |
 What can I say but this time of the year is exciting, simply exciting! I know, I know….it takes time to let the new things settle and sink in….and that’s ok! I am in the same boat as you are!LE
The NEW CATALOG launched on Friday but because of way that the calendar fell…NO NEW ORDERS are even starting to be shipped until tomorrow (Monday) so please…do not feel that you are late!!! Heck…we’ve got this catalog for a whole darn year so please…take it all in and enjoy the journey!
I love to share tips & tricks that make things easier and when it comes to ORGANIZING I know that when we have a system that works – we are happy stampers!
Let’s DIVE IN to the sea of getting ORGANIZED!
This post is one for you to sit back and take in…one for you to reread and revisit…and this post clearly is tips & tricks that have worked for me and by no means am I suggesting for you to change if you have a system that works perfectly fine for you.
That is what is great about this fun thing that we do…we always see things in different ways and the ultimate goal is to have a system that allows you to continue to create with ease and by all means, not to feel stressed over something that I am sure we have said to ourselves….”What the heck to I do with ALL OF THIS!”
Before we continue forward with this post I need to be upfront and say this…I know that my posts are very long (a bunch of times) and for those that like short and sweet, (I’m sorry) but I just have to be “me” and when I started this journey with Stampin’ Up! 6 years ago…the LAST THING that I ever thought that I would be doing is blogging and also – actually still being a Stampin’ Up! Demonstrator as I was just joining to get a discount and then OUT THE DOOR! They make it just too easy to continue to get a discount and the reality is I love the people I have met and touched my life….so I guess you can say – your stuck with me!
Let’s get this going and I will say…this took me a LONG TIME to compile as I have hyperlinked many items for you to help “make sense” for you to understand what I am trying to convey. Darn, I wish that we all lived in the same town and I could just show you in person what I am trying to say convey!
There are 3 things that need to be organized – Paper, Ink and Stamps…
Trust me, there are a bunch more but lets start with these 3 things as if these areas are total chaos for you… you are NOT going to have a fun stampin’ experience and we need to do something about that! Today is all about Paper Storage….something that ALWAYS seems to perk you up and always ask questions!
YEARS AGO….I did a blog post about paper storage (click here and then here is another one) and I will say…I still believe in it. Since that post I have invested in some custom cabinets in my craft area so I have tweaked my personal area but this system that I will highlight below is a PERFECT one for a crafter.
Get 1 or 2 storage bins that are similar to the ones that I have pictured below. The reason that you might need 2 is simply for the fact that you might have more paper and also depending on the amount of scraps you put into it. Personally, I only keep the current Stampin’ Up! colors in it but again, do what works for you!

I am linking things for you from many different sources so please, just do what works for you – we all live all over the place so many people feel comfortable with certain retail places. The MOST IMPORTANT thing is that make sure it works for your needs with the space you have dedicated to. There is nothing more frustrating than starting something to only figure out you are saying – “Now where in the heck am I going to put it”
I think it is ket to have the option to have a lid. WHY? Well for starters…many of us like an option to stack to minimize space. Personally, I keep my 2 bins behind a cabinet door so my lids are not on them but if I were ever to go somewhere and take these bins…you bet that I would put the lids on them!
Here you go with some links / options…..
Next, file folders….I use a separate file folder for every color. I know that some might be thinking. THAT’S A LOT OF FILE FOLDERS and YEP, it is but it is worth it and you can and will always use file folders!
- Here is a link for the File Folders…
- Here is a link for the 3 1/2″ clear tabs that will hold the actual card stock and label on. I really like this longer length (3 1/2″) as it allows more of the color of paper to show after you will put your label with the color name on it.
- Here is a link for the labels – I will say this – when it comes to labels, buy the Avery Brand. It is well worth the extra money as the labels stick well. Heck, I am one that always loves to save when I can…but this brands really is the best.
WHEW….how are you doing? Hanging in there?
I feel bad that this post is sooo darn wordy but I truly am trying my best to share and paint the picture of organization for you! You can do this and I know that IF you have a workable system than you are more likely to enjoy the journey a bit better!
CLICK HERE for all of the Stampin’ Up! Colors for you to get organized!
Next, we need to add card stock and label them. I cut a 3 1/2″ X 1 1/4″ piece of the card stock and then score it at 5/8″…the reason that I do it this way is that I have found that sometime the card stock paper will fall down if I make it 5/8″ X 3 1/2″ (and that makes me grumpy) so if it is a bit thicker (being scored and folded in 1/2…it stays put). Add the specific color label of the card stock and SMILE! (you’re getting there)

I know that there is going to be someone asking this question….How do you organize your colors? Here’s my answer…I organize them by the color families.In one bin I have the BRIGHTS, REGALS and SUBTLES together…and in the other bin I have the NEUTRALS and IN COLORS.
If you do it this way and if you also have retired Stampin’ Up! colors…you can easily add more folders to your 2nd bin. I know that some people organize by the color of the rainbow but for me, my simple brain works better this way!
I have shared with you that I use these bins for my scraps because I have a built in paper cubbies for all of my full sheets of paper (and I will share that with you in a later post) but here is an idea of how to incorporate your full sheets of paper to keep them both clean & organized.
You can actually do 3 things….please read them below and then let them “sink in” and you decide how it works best for you.
- Add an additional file folder to your bins and place it in front of the one that has the tab scraps like we did above.
- Add the full sheets of the card stock behind all of your scraps as described above.
- Put your full sheets of Card Stock in a Job Ticket Holder and then slide this in the scraps folder.
Let me explain…I like to use these pouches to keep my Non-Stampin’ Up! Paper in when I purchase it full packs of paper, just like we can do with our Stampin’ Up! Paper. A full pack of 24 sheets can easily fit into a Job Ticket Holder. I totally realize that many of you do not purchase full packs of every color…but I am just trying to share with you another way to stay organized.

I guess you could say I am a bit picky about the way that I like my products to be kept…nice and neat….with no chances of getting the tips bent etc…so these works for me. Just as I shared above with the labels, I would buy the Avery Brand for these as the quality is stellar – they are super heavy gauge vinyl that truly hold a bunch. These pouches WILL fit in the file folders.
We are just about done…..(well heck, I could go on for HOURS about this topic) but I will try to wrap it up! On the outside of the Job Ticket Holder I use the label maker to identify what is inside the Job Ticket. In the picture below you will see that I have the Company Name on line #1 and then underneath it I put the product color.
I have blogged about this a BUNCH but I think a label maker is a MUST HAVE – we use it all over the house! Here is a link for the Brothers P Touch Label Maker….this is “go-to” in my home! I can tell you that the price fluctuates a bunch in Amazon and also in stores… but seriously, if you do not have it…I would treat yourself.
As for the refills…always have refills because when you are in a groove in making labels…nothing is more frustrating than running out. For this…I do buy a knock off brand from Amazon and they work GREAT….I would make sure you have both widths.
- Here is a link for the 1/2″ width (I use this size more than the 1/4″ as I like to get either 2 lines of text on it and also I like the font to be super large if I am just labeling something with one word)
- Here is a link for the 1/4″ width – I do think that it is wise to have this width as well because I use this to label my punches and also to label my non stampin’ up! ink pads ….I just think you will be amazed with how you will use the narrower width (I also use this for my spices in the kitchen)
When I can save money, I do…(heck, that’s why I signed up to be a Stampin’ Up! Demonstrator) and I will say….buying an off brand for the tape for you Label Maker IS the way to go. The quality is just fine and there is a HUGE difference in the Brothers Label Refill price.
Now we are going to touch on what I truly think IS THE BEST OPTION for you to me on the “New Track of the Stampin’ Up! Color Revamp” Chances are you already have many of the Stampin’ Up! Colors but I think that at the beginning of a NEW CATALOG YEAR the best and most economical thing to do is purchase the collections of the card stocks.
This way, you will have (2) sheets of EACH COLOR of EVERY SOLID COLOR of paper (4 of the In Colors) that we have and then you will be able to get a feel to what colors you gravitate to – this way you will start to see a pattern in your style and then perhaps purchase full packs of 24 sheets of a given color. At the end of this post you will see all of the Collection Lines Up! in the Product Line up!
The other thing that I would do is…purchase one of my Card Stock on a Ring Swatch Books that I have made up! This is a must have and actually I would have (2) – one to keep at home and another to keep with you in case you are somewhere and are trying to match up something and use a current color that we have.

I have had to re-order on them as they seem to be “hot cakes” and to me, there is nothing like seeing and feeling the actual card stock in your own hands. Each swatch is professionally printed with the Color Name and Color Family it comes from. CLICK HERE TO ORDER ONE and in the SUBJECT LINE PLEASE PUT, Card Stock Swatches.
How are you scratching your head as to what and where do the new COLOR FAMILY called BASICS fit in? (page184) First – I am THRILLED that stampin’ up! has pulled out the old faithfuls and made a new sub-section for them. I am talking about Whisper White, Very Vanilla and Basic Black. All of these are in my swatch book so you can feel the difference on the weights between the thick and the regular.
Again, you will see them in the product line up at the end but we all need full packs of these papers as they are just as they are called, the BASICS. I always use the Thick Weight for my card bases and then the regular weight gets used for the inside layer as well as for when I stamp an image and want to use the blends or copics with it.
You can put them in your bins just like I have outlined above but here I am going to share with you what I call a GAME CHANGER for me in my work area. I use the Whisper White and also the Very Vanilla ALL THE TIME and honestly because I reach for them quite often, I keep my scraps of these in the AMAZING stacking containers that are SUPER AFFORDABLE.
You can CLICK HERE to see where I purchased them but truthfully you can find something in a store that would probably work but I honestly think these are the best because of the price and also because of the quality. They are SUPER STRONG as we know sometimes we get things that are nothing more than cheap plastic.

I do love the Container Store and in future posts you will see more Items I get there in keeping me organized! You want to make sure that the container you use is long enough to have the scraps lay flat. These stack perfectly and the quality – fabulous! I often go ahead and precut strips of paper in the basics so when I am creating, I can reach in and pull out a strip that is 1″ .
You can see that I labeled them with my P-Touch Label Maker and it is super easy for me to read and use….hence saving a bunch of full sheets as I think when we cannot find something easily – we just grab a full sheet. (does this sound familiar to anyone)
WHEW….this has taken me FOREVER TO DO and I do hope that you have enjoyed it, found it helpful and can see the vision as to where I am going for you in being organized. Please feel free to leave me a comment. I will continue to explore more organizational ideas on the future if you enjoy these.
Please know….if you want to get into the 1st wave of the PROJECT SHARE for this new catalog….you can! The cut off for WAVE 1 is this Wednesday, June 6th and then I will do another wave of product shares but that will not be until towards the end of the month.
The cut off for the 1st wave of the product share is WEDNESDAY, June 6th.
I am excited to hear and see what products tickle your fancy from the newbie. The BEST ADVICE I can give you is…look….look…and then look again. Take sometime to let it sink in and then take an inventory of the stamps you already have. There are some new and exciting products and some that I think you will be able to use a bunch in conjunction with things you already have!
With the NEW goes the retired…and yep, I have deeply discounted my RETIRED STAMPS/BUNDLES from the past Catalog. They are all at least 50% off and you can find them under the Blog Header/Shop…and it is the 4th down – RETIRED SU Product. All of them are on a 1st come basis so take a look to take advantage of a great deal!
Enjoy the afternoon and on the East Coast….I think we are all about to swim away as we have had rain, rain and MORE RAIN! This is the time of the year that I adore to pick Strawberries…but with all of the rain we have been having…it has really put a damper on the local farmers.
Please let me know if this blog post helps you and if YES – I will share more…and if NOT – no worries….it would save me a bunch of time! I do love sharing with you as this little thing that I do is soooo much more than selling….it’s about a journey of love and passion that I have with some AMAZING PEOPLE….like YOU!
by Susan Itell | Aug 23, 2016 | Organizational Tips |

Here you go my organizing friends. Here is another topic that sometimes stresses us out. For me, 2 things that stress me out about Bakers Twine are:
- The creases in the bakers twine because of how it is packaged.
- Pulling out a bunch and having it tangle.
I have several of these containers and they are PERFECT for my needs. I always keep the rolls from ribbon to use for other uses like this and also my son Will loves them for his classroom! (o.k. – he likes the rolls from the ribbon but doesn’t want to craft with dear old Mom)
Here is a link of the container from Amazon, I do know that you can find it at Bed, Bath & Beyond (don’t forget your coupon) but for some reason I am not finding it on the site….this is the best that I can do for you but remember the dimensions are 12″ X 4″ X 3″. What I like to do is take the spools with you when you go so you can make sure that it works for your needs!

These have been game changers for me. I have several of them in drawers that I can simply pull out and see exactly what I need! I have on a wall a ribbon organizer that really is more of a pain than what it is worth. It is a great visual but I find it not to be super user friendly. I use that for discontinued ribbon, we all love our ribbon and we use it up until the roll is gone!
Ok…ok….here is the TYPE A in me, I use the handy label maker to mark my Bakers Twine…WHY?????? Easy = Items come and go so often and I adore Bakers Twine and honestly, I really do not shy away from using it – here is a link from Amazon, (by far the best price)
Remember, this label maker comes in all different widths and colors of tape – have fun!

I hope that this post has helped you and has also “rang a bell” in case you are like me….not liking the creases in the Bakers Twine! Have a fabulous day and until tomorrow……go and make someone smile!
by Susan Itell | Jul 5, 2016 | Organizational Tips |

I do not know about you….but when a holiday is on a Monday – I am always saying “what day is it?” – it totally messes me up but I will take the “mess up” as it was a fabulous time with the peeps!
Today is a Tuesday Tip for you and one that I hope helps you as it is a LIFESAVER for me. Please remember, if it works for me…it might not work for you and guess what ~ that is TOTALLY o.k. as when it comes to organizing, we are all different!
One thing that I will say…if you have a method that works for you – please leave a comment so we all can share and learn…and perhaps I will swoop it up and change what I am doing currently. That is what I love about what we do, help ~ learn~ share & grow!
Stampin’ Up! has paper in a 6″ X 6″ size and in the Annual Catalog there are (3) offerings ~ A Little Foxy , Playful Palette & Serene Scenery. I am sure, (well I am hoping) that there will be more additions in the upcoming Holiday Catalog so I really feel the need to have a system for this size to “WORKS FOR ME”
In addition to this type of paper, I like to cut my DSP paper Stacks into the 6″ X 6′ size as that is a perfect size for me to work with as I use this a bunch with envelopes. I adore this paper and it is always so popular with my Product Shares….if you missed the Annual Catalog share – I will offer the Paper Stacks when the Holiday Catalog rolls around!
I admit, I will share/show you (2) different containers for the 6″ X 6″ paper…one that is very affordable, the other more pricey…it is all about options.


We all know that there are certain times of the year that certain retail items are on sale….so be on the “LOOK OUT” for BACK TO SCHOOL” sales as this post is one that it pertains to.


I have both and I use them for different things but I will say that the clear acrylic one I have on my shelves as it matched the other containers that I have in my work area.
Here is the “low down”
The dividers that I use are plastic/vinyl folders that I purchased at Office Max (you will find them at many stores) and yesterday I “scouted” them out and they were 60 cents piece. I cut the to “work” for me.
I cut them to 7″ X 6 1/2″ and this fits perfect in both containers. I can get (2) per folder and you might think – “you are wasting a lot” but the way that I look at it is…it is an investment to helping me stay organized and being organized….makes me happy 🙂
I used (2) different colors to help me in a glance see what I am looking for. The one color (yellow) is for the paper and the other (blue) is for the scraps! The P-Touch Label Maker is my “true blue friend”
We need to be organized to make what we do work with ease….(o.k – Chris R. ~ I am sure that you have a “funny” comment for us) but seriously folks, we are all happier when we have a system.
The Clear ones are from a Company called InterDesign and you can find them at Bed, Bath & Beyond…the Container Store and yep, good old Amazon….Here is the one that I have. They are basically Refrigerator/Pantry organizers but I love the durability if them, very high quality.
The Black one I picked up at Walmart and if you go in a couple of weeks when it is Back to School, you will find them in all sorts of fun colors and I have seen them for $1.00 a piece when running a great sale. The also can be found in the storage/office section and I am sorry….I tried to find a link for you but I am not finding one anywhere 🙁
I know that this post is long (and I am sorry) but I just want to try to help you stay organized! As I said above, I use the clear one but I do have several of the Black ones as I love the fact that you can stack them on top of each other and they are a perfect solution for “stashing” things and using minimal storage space.
For those of you that have purchased my shares before, I have the black ones to keep my ribbon organized and clean after I wrap it around the white chipboard, when I am working on my monthly kits, I use them for each card etc…..what I am trying to say is…these are a very affordable option for you!
For those of you that missed the post yesterday…here is another “fur baby” picture for you. John put a bird feeder out to be nice to the birds and we have squirrels ….and more squirrels! We usually do not have a problem with them because of the dogs chasing them but now they have become “SMART SQUIRRELS”
Look at poor Charlie, (I do not think his elevator goes all the way up) but he is patiently waiting for his squirrel friends to make a wrong move!

Update on Milo – I had several emails about this one….I was SHOCKED, he is up about 7 feet. He is so funny. To date, he has proudly caught 2 squirrels…he was very proud of himself, the squirrel not as happy.
He was like a little kid that was given a new toy…..he graciously brought his “manly work” to the back door….I screamed, he dropped the victims! I wasn’t sure if I was to say, “good boy” or not….poor squirrel! 🙁

by Susan Itell | Jun 28, 2016 | Organizational Tips, Uncategorized |
I know that you all enjoyed last Tuesday when we worked with Paper Storage and I am thrilled that many of you enjoy getting “TIPS” to help you with organizing and also making the whole process of crafting more enjoyable.
I have shared this tip before but sometimes you just can’t see certain things too many times…and I hope that this post does inspire you to do this!
Before we get the the pictures, let’s chat about are ink refills necessary? To me, I say yes. WHY? Easy = if you have an ink pad than I say FOR SURE get the refill. When I first started stamping I did not “drink the Kool-Aid” and I can remember working on a card and getting so frustrated that I was not getting an even, deep and rich stamp.
I learned my lesson and I have never regretted purchasing them. When you stop and think about it….we put lots of money into our stamps ….our papers, tools, framlits etc….so don’t you think that the small investment in an ink refill is worth making your projects look the best!
O.k. – enough chattering, the secret to my organizing today is a hand held punch and glue dots! YEP, that’s it – simply use the coordinating paper to punch out a sample cardstock and simply pop it on the top of the ink refill!
Enjoy the pictures, I think that they will be helpful! Next Tuesday I have TIPS for you with your 6 X 6 paper storage!!!


I had many comments and emails about that many of you have been working in your craft areas. YIPPEE – me too! It feels so good to get things in place. I know that I am “happier” when things are in order….it just is a more “pleasant experience” having your tools and products in order.
Here is another tip…and one that you might think is silly – have a piece of paper with things to order next time….I cannot tell you how many times I have ran low on something and I did not write it down. If you are anything like me….if it is not written down….I forget!
This is that last week for you to get your (2) Free stamp sets of your choice with the “Ultimate Bundle” – nothing to lose with no obligations! Email me, I would love to explain and listen to your questions!
by Susan Itell | Sep 10, 2015 | Organizational Tips, Paper Pumpkin, Tips and Tricks!!! |
Woot-woot….I know that you all like when I post scoop on some organization tips. Please remember, we all have different ways to do things….some work for us…some don't! I think that we all have tried and tried many different ways of doing things and today ~ I wanted to give you a glimpse of some storage ideas that work for me!
I have a lot for you today so grab that cup of coffee…and get ready to be inspired and then get ready to take advantage of the clearance items and read the scoop for taking advantage of Paper Pumpkin being 50% off for your 1st 2 months! TODAY IS THE LAST DAY!
LET'S GET ORGANIZED!!!
I know…I know – I am very "TYPE A" – always have been….always will be! I am a firm believer that when we are organizer not only are we happier, but we are more productive! (I can hear Chris R right now laughing!!!!)
I have shared with you before that I use organizational products from Stamp-n-Storage. I realize that the products are an investment but I will say I have purchased bit by bit and love each and every product I have! Watch the "Crafted Spaces" episodes…and you will drool….there are some amazing craft rooms….(Mary Fish's is on there and it is just gorgeous)!

With Back to School in full swing, now is the perfect time to buy these plastic folders! I cut them to fit inside and in between the sections that I categorized. I use the Brothers P-Touch Label Maker, not only is it easy to use…it is a "must have" that you will use all over your home. (Amazon has the best prices and also for the tape refills)

Moving on…here is another goodie that was in Walmart – it is just a plastic cube that probably get purchased a bunch for kids going back to college. They came in all sorts of colors and I think it was around $2.50! I have really had a hard time finding something to store my paper stack in….they were either too wide or the sides were too short and the paper would flop!

I know that it might not be the prettiest – but it sure does do the trick! I like to take the paper out of the stacks it comes in as I find that as you use the paper, the glue that holds it together gets icky and my paper gets all messed up and not orderly (I know….type A kicking in) and I also like to cut my DSP Stacks into 6 X 6 squares as it is rare that I need a cut that is longer than 6" and I find it just easier for me!

LAST DAY FOR 50% OFF
PAPER PUMPKIN!
The best phrase I can give to you about the Paper Pumpkin program is…."You've come a long way baby"! I have been receiving this monthly kits since they started several years ago and WOW – Stampin' Up! has really….REALLY put a lot into the marketing, the product and the quality!
Today is the last day that you can take advantage of becoming a Paper Pumpkin Person….(I like that a PPP'er). It is for NEW members…..so if you have been a member in the past, you will not be able to take advantage of it…BUT…..I am sure your husband would like to be "the person" (ha-ha!!!!) It just cannot be in your name if you were part of the program in the past!
In July I shared with you the kit….I LOVED it and was hoping that they would offer the refills…and lucky me they did and I took full advantage of it and ordered (4) of them! Look below how I changed it up a bit….they really are fun kits and you really have nothing to lose.

Just like we do with any cards/projects that we make, it is super fun to change things up a bit and here you can see that I put a fun sentiment in the cup and popped some stars with a small bit of bling to make it fun!
Did you see the Bakers Twine? Yep, this is the basic gray and that is in the clearance rack for just $1.19. You know how I feel about Bakers Twine – LOVE IT and yep….I will take advantage of goodies in the clearance rack – I love a deal as much as you do…..but I will even get it at a lower price with my discount (hint-hint…how about becoming a hobby demonstrator )

I even had to have fun with the envelope; you know me…I can't resist as I love my envelopes! Bakers Twine really does make a fun look that is super easy and super effective!


Now here is another Organizational Tool that I love to use….the Wide Stamp Cases…I always have a stash of these to make life easier! You can use them over and over and they snap together like a charm!
It is just like our stamp cases and you can see that I just slide the paper in the front and then stashed the stamp set in the back! Easy, Fast….DONE!


Whew…this post was LONG – but I do hope that you found it helpful! I do hope that you take advantage of becoming a Paper Pumpkin Person….you can click here and it will direct you to the website and you can sign up!
Remember, to use the code HALFOFF and you will get the next 2 months for just 10.00 and then is you want to cancel in December….that is absolutely fine!
I would greatly appreciate it if you put my name as your Demonstrator (I have a personal challenge with this promotion) and trust me, you will LOVE…LOVE Septembers Kit (yep – you will get Sept. kit and I had the chance to peek at it at convention)
Remember to refer back to my post on Sept 1st to see the goodies I have for you with qualifying orders and also, do not forget to use the Hostess Code of YHNMUJNJ to have me send you the goodies!
The clearance rack has some new goodies….the weekly deals are below and we have an amazing new catalog…..Life is great for a stamper!
Weekly Deals